Vagrant-安装教程及常见问题


- vagrant up (启动虚拟机)
- vagrant halt (关闭虚拟机——对应就是关机)
- vagrant suspend (暂停虚拟机——只是暂停,虚拟机内存等信息将以状态文件的方式保存在本地,可以执行恢复操作后继续使用)
- vagrant resume (恢复虚拟机—— 与前面的暂停相对应)
- vagrant destroy (删除虚拟机,删除后在当前虚拟机所做进行的除开Vagrantfile中的配置都不会保留)
在我们的开发目录下有一个文件Vagrantfile,里面包含有大量的配置信息,主要包括三个方面的配置,虚拟机的配置、SSH配置、Vagrant的一些基础配置。Vagrant是使用Ruby开发的,所以它的配置语法也是Ruby的,但是我们没有学过Ruby的人还是可以跟着它的注释知道怎么配置一些基本项的配置。
具体介绍,参考:http://blog.csdn.net/chajinglong/article/details/52805915
- # -*- mode: ruby -*-
- # vi: set ft=ruby :
- # All Vagrant configuration is done below. The "2" in Vagrant.configure
- # configures the configuration version (we support older styles for
- # backwards compatibility). Please don\'t change it unless you know what
- # you\'re doing.
- Vagrant.configure(2) do |config|
- # The most common configuration options are documented and commented below.
- # For a complete reference, please see the online documentation at
- # https://docs.vagrantup.com.
- # Every Vagrant development environment requires a box. You can search for
- # boxes at https://atlas.hashicorp.com/search.
- config.vm.box = "base"
- # Disable automatic box update checking. If you disable this, then
- # boxes will only be checked for updates when the user runs
- # `vagrant box outdated`. This is not recommended.
- # config.vm.box_check_update = false
- # Create a forwarded port mapping which allows access to a specific port
- # within the machine from a port on the host machine. In the example below,
- # accessing "localhost:8080" will access port 80 on the guest machine.
- # config.vm.network "forwarded_port", guest: 80, host: 80
- # Create a private network, which allows host-only access to the machine
- # using a specific IP.
- config.vm.network "private_network", ip: "192.168.33.10"
- # Create a public network, which generally matched to bridged network.
- # Bridged networks make the machine appear as another physical device on
- # your network.
- # config.vm.network "public_network"
- # Share an additional folder to the guest VM. The first argument is
- # the path on the host to the actual folder. The second argument is
- # the path on the guest to mount the folder. And the optional third
- # argument is a set of non-required options.
- config.vm.synced_folder "D:/all_code/", "/home/www"
- # Provider-specific configuration so you can fine-tune various
- # backing providers for Vagrant. These expose provider-specific options.
- # Example for VirtualBox:
- #
- # config.vm.provider "virtualbox" do |vb|
- # # Display the VirtualBox GUI when booting the machine
- # vb.gui = true
- #
- # # Customize the amount of memory on the VM:
- # vb.memory = "1024"
- # end
- #
- # View the documentation for the provider you are using for more
- # information on available options.
- # Define a Vagrant Push strategy for pushing to Atlas. Other push strategies
- # such as FTP and Heroku are also available. See the documentation at
- # https://docs.vagrantup.com/v2/push/atlas.html for more information.
- # config.push.define "atlas" do |push|
- # push.app = "YOUR_ATLAS_USERNAME/YOUR_APPLICATION_NAME"
- # end
- # Enable provisioning with a shell script. Additional provisioners such as
- # Puppet, Chef, Ansible, Salt, and Docker are also available. Please see the
- # documentation for more information about their specific syntax and use.
- # config.vm.provision "shell", inline: <
- # sudo apt-get update
- # sudo apt-get install -y apache2
- # SHELL
- end
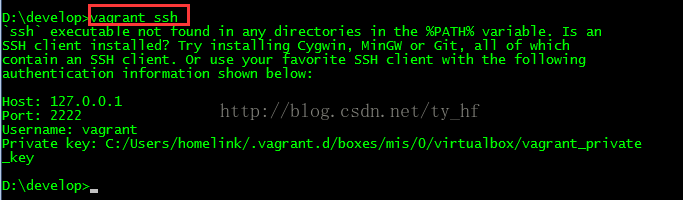
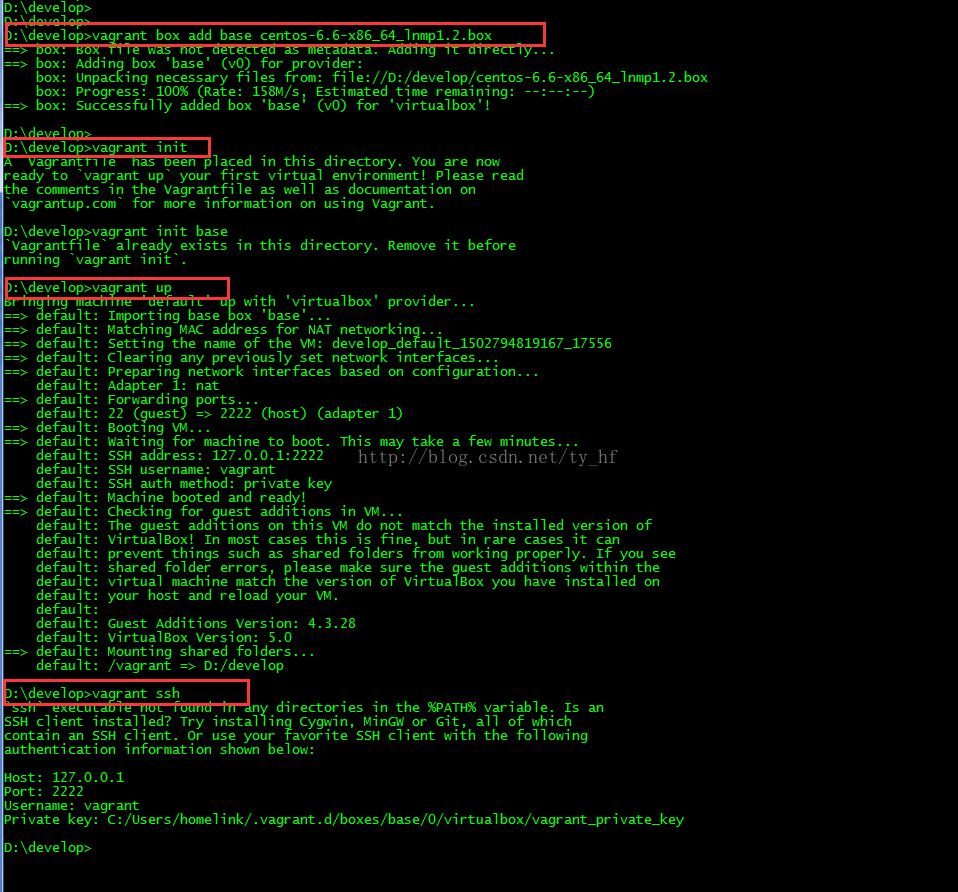
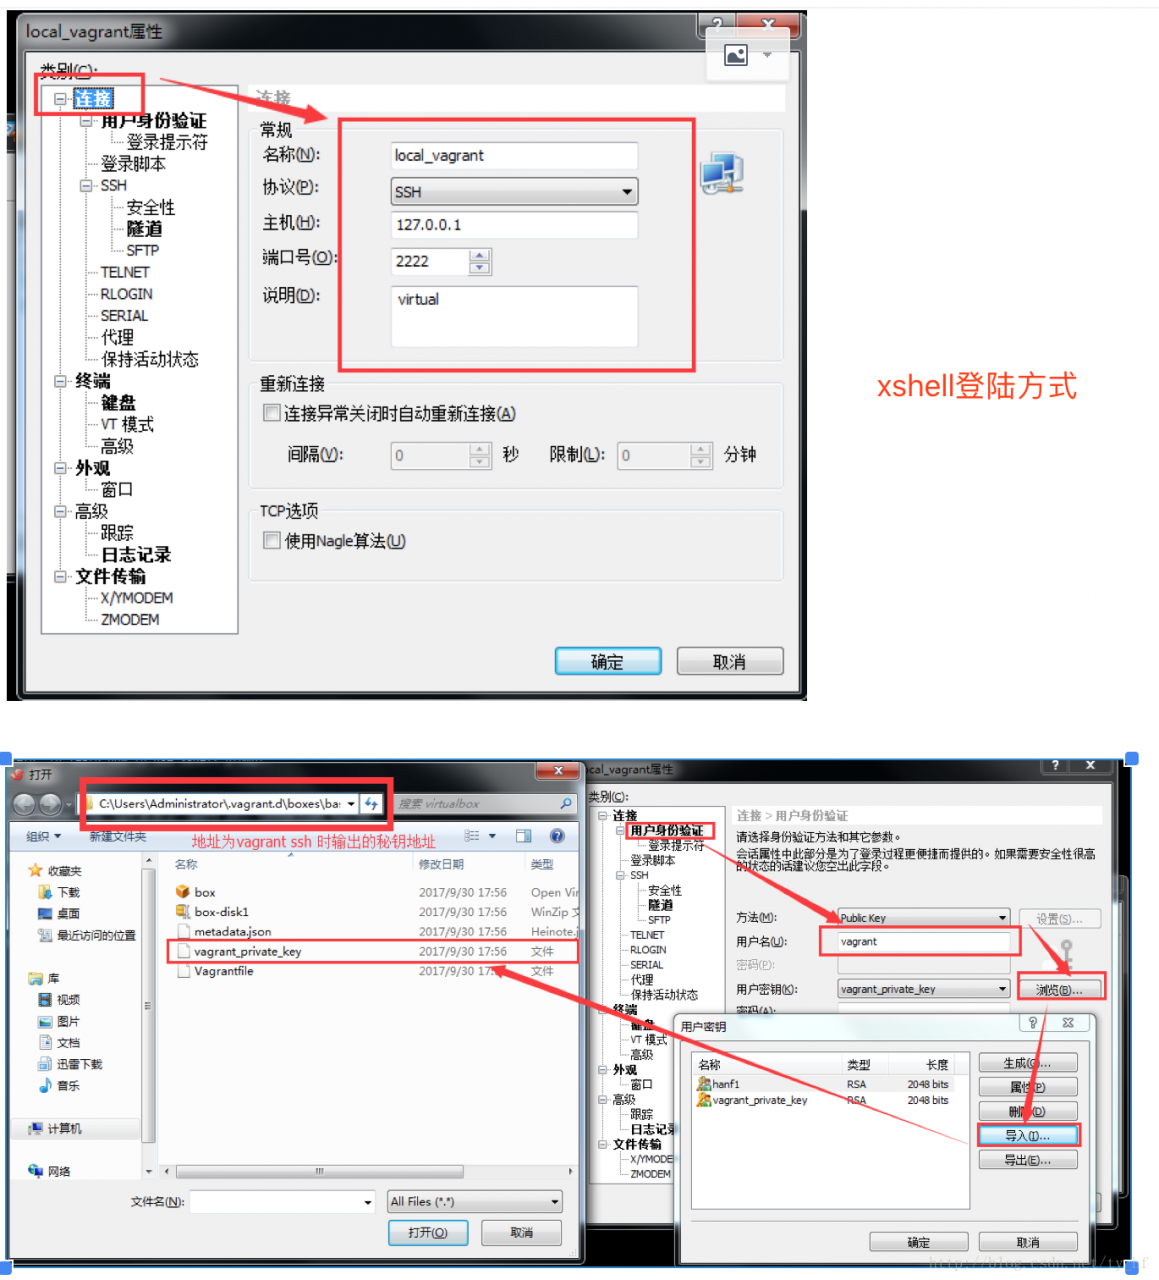
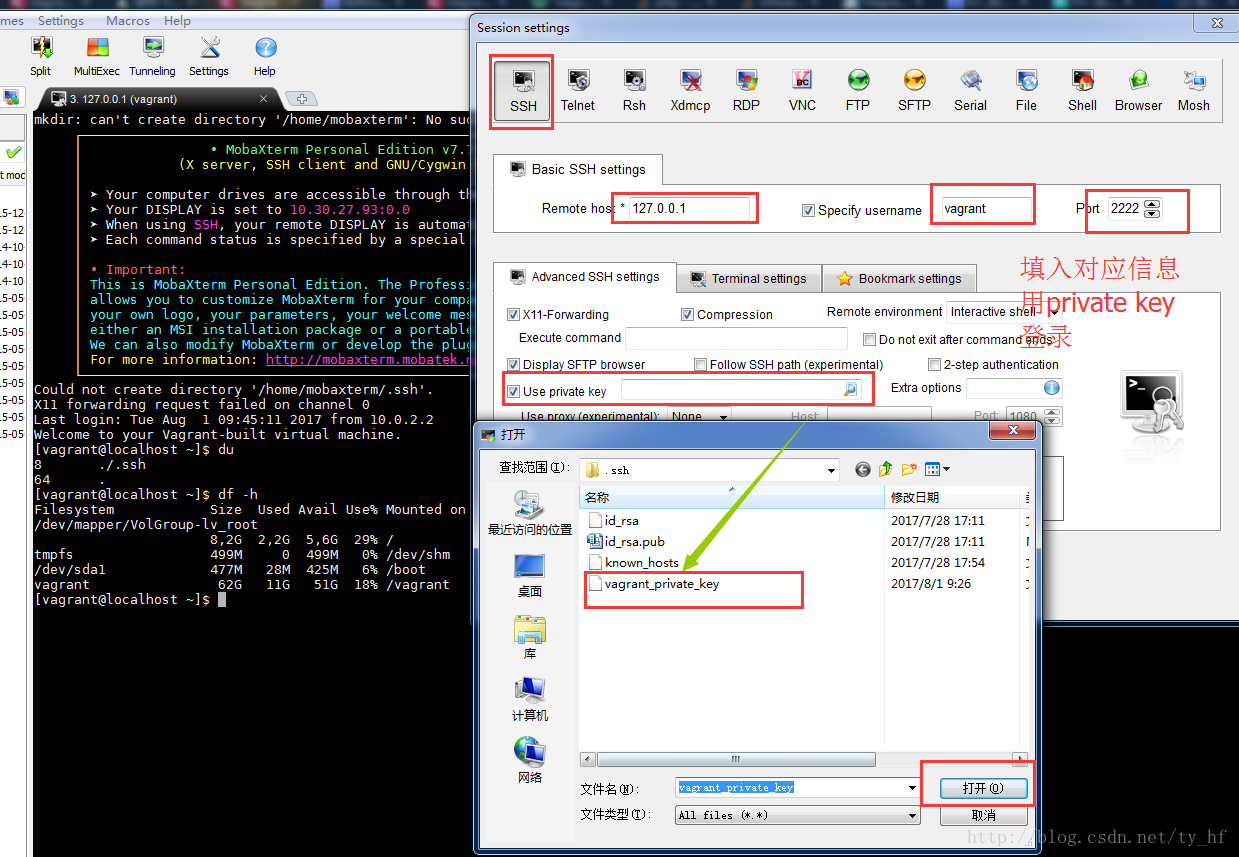
- ssh: 127.0.0.1
- 端口: 2222
- 用户名: vagrant
- 密码: vagrant

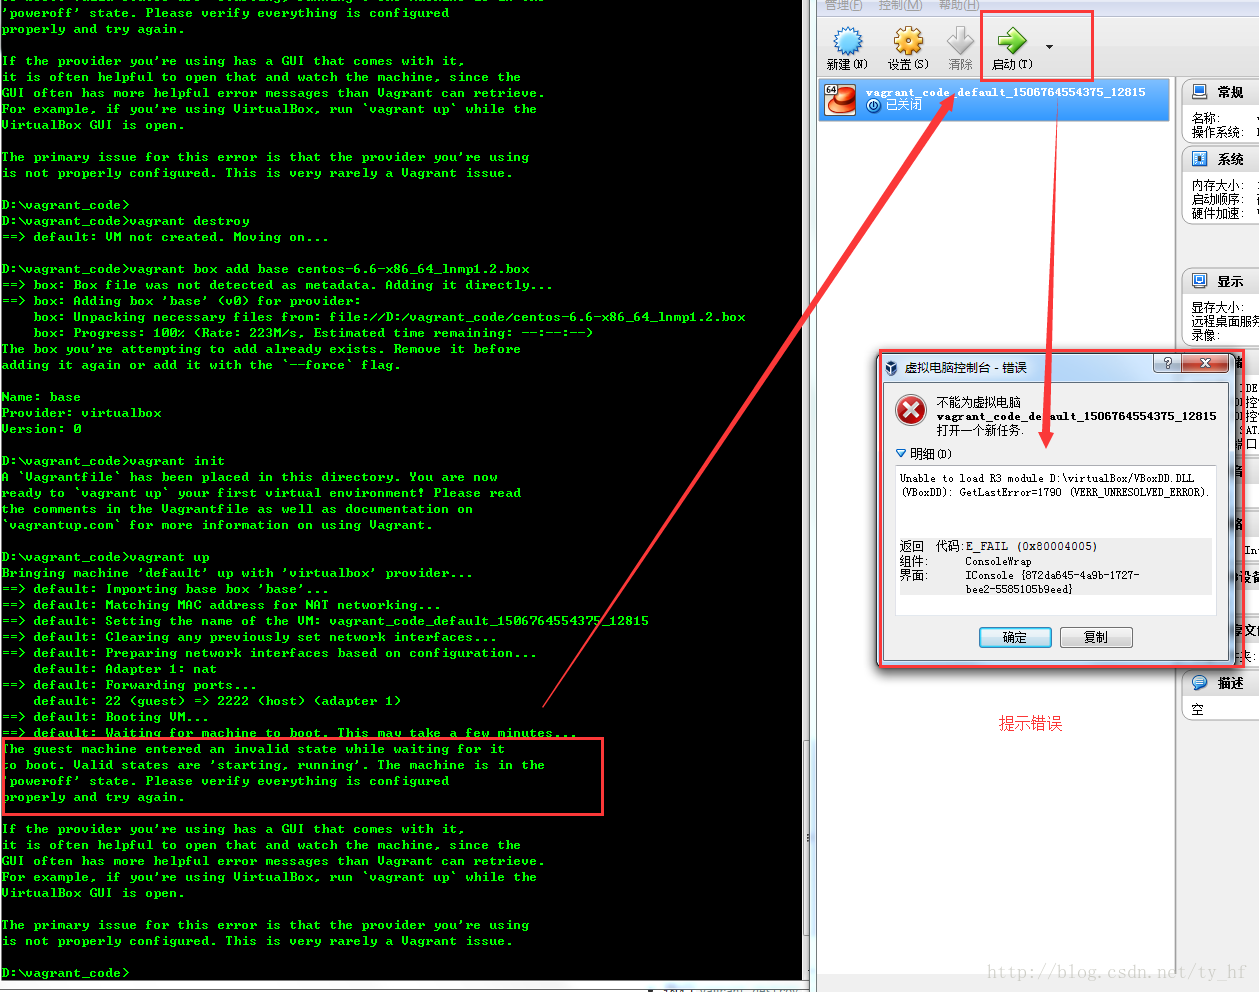
- The guest machine entered an invalid state while waiting for it
- to boot. Valid states are \'starting, running\'. The machine is in the
- \'poweroff\' state. Please verify everything is configured
- properly and try again.
- If the provider you\'re using has a GUI that comes with it,
- it is often helpful to open that and watch the machine, since the
- GUI often has more helpful error messages than Vagrant can retrieve.
- For example, if you\'re using VirtualBox, run `vagrant up` while the
- VirtualBox GUI is open.
- The primary issue for this error is that the provider you\'re using
- is not properly configured. This is very rarely a Vagrant issue.
- Unable to load R3 module D:\virtualBox/VBoxDD.DLL (VBoxDD): GetLastError=1790 (VERR_UNRESOLVED_ERROR).
- sudo rm -f /etc/udev/rules.d/70-persistent-net.rules
- vi /etc/hosts
3.问题 default: Warning: Authentication failure. Retrying...
- Bringing machine \'default\' up with \'virtualbox\' provider...
- ==> default: Clearing any previously set forwarded ports...
- ==> default: Clearing any previously set network interfaces...
- ==> default: Preparing network interfaces based on configuration...
- default: Adapter 1: nat
- default: Adapter 2: hostonly
- ==> default: Forwarding ports...
- default: 22 (guest) => 2222 (host) (adapter 1)
- ==> default: Booting VM...
- ==> default: Waiting for machine to boot. This may take a few minute
- default: SSH address: 127.0.0.1:2222
- default: SSH username: vagrant
- default: SSH auth method: private key
- default: Warning: Remote connection disconnect. Retrying...
- default: Warning: Authentication failure. Retrying...
- default: Warning: Authentication failure. Retrying...
- default: Warning: Authentication failure. Retrying...
- Timed out while waiting for the machine to boot. This means that
- Vagrant was unable to communicate with the guest machine within
- the configured ("config.vm.boot_timeout" value) time period.
- If you look above, you should be able to see the error(s) that
- Vagrant had when attempting to connect to the machine. These errors
- are usually good hints as to what may be wrong.
- If you\'re using a custom box, make sure that networking is properly
- working and you\'re able to connect to the machine. It is a common
- problem that networking isn\'t setup properly in these boxes.
- Verify that authentication configurations are also setup properly,
- as well.
- If the box appears to be booting properly, you may want to increase
- the timeout ("config.vm.boot_timeout") value.
解决:
- config.ssh.username = "vagrant"
- config.ssh.password = "vagrant"
- vagrant halt
- vagrant up
注意登陆的时候看下 vagrant ssh 看下你的登录信息,端口号
4.报错问题:
- Bringing machine \'default\' up with \'virtualbox\' provider...
- Your VM has become "inaccessible." Unfortunately, this is a critical error
- with VirtualBox that Vagrant can not cleanly recover from. Please open VirtualBox
- and clear out your inaccessible virtual machines or find a way to fix
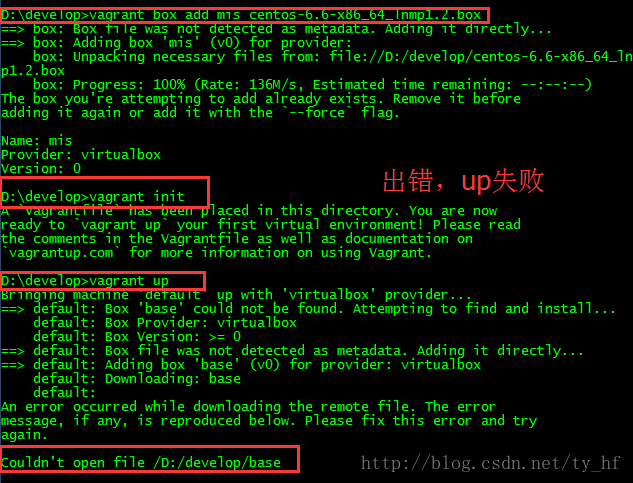
- A Vagrant environment or target machine is required to run this
- command. Run vagrant init to create a new Vagrant environment. Or,
- get an ID of a target machine from vagrant global-status to run
- this command on. A final option is to change to a directory with a
- Vagrantfile and to try again.
少前边步骤了,比如vagrant init;或者没有进入对应vagrant init的文件夹
- config.vm.provider :virtualbox do |vb|
- vb.customize ["modifyvm", :id, "--natdnshostresolver1", "on"]
- vb.customize ["modifyvm", :id, "--natdnsproxy1", "on"]
- D:\vcode>vagrant up
- Bringing machine \'default\' up with \'virtualbox\' provider...
- Your VM has become "inaccessible." Unfortunately, this is a critical error
- with VirtualBox that Vagrant can not cleanly recover from. Please open VirtualBo
- x
- and clear out your inaccessible virtual machines or find a way to fix
- them.
CentOS安装crontab及使用方法
安装crontab:
[root@CentOS ~]# yum install vixie-cron
[root@CentOS ~]# yum install crontabs
说明:
vixie-cron软件包是cron的主程序;
crontabs软件包是用来安装、卸装、或列举用来驱动 cron 守护进程的表格的程序。
//+++++++++++++++++++++++++++++++++++
cron 是linux的内置服务,但它不自动起来,可以用以下的方法启动、关闭这个服务:
/sbin/service crond start //启动服务
/sbin/service crond stop //关闭服务
/sbin/service crond restart //重启服务
/sbin/service crond reload //重新载入配置
查看crontab服务状态:service crond status
手动启动crontab服务:service crond start
查看crontab服务是否已设置为开机启动,执行命令:ntsysv
加入开机自动启动:
chkconfig --level 35 crond on
一.
1.1 /etc/crontab
如:
[root@dave ~]# cat /etc/crontab
SHELL=/bin/bash
PATH=/sbin:/bin:/usr/sbin:/usr/bin
MAILTO=root
HOME=/
# run-parts
01 * * * * root run-parts /etc/cron.hourly
02 4 * * * root run-parts /etc/cron.daily
22 4 * * 0 root run-parts /etc/cron.weekly
42 4 1 * * root run-parts /etc/cron.monthly
1.2 /etc/cron.deny
/etc/cron.deny
/etc/cron.allow
如果两个文件同时存在,那么/etc/cron.allow
如果两个文件都不存在,那么只有超级用户可以安排作业。
每个用户都会生成一个自己的crontab
如:
[root@dave ~]# cd /var/spool/cron
[root@dave cron]# ls
oracle
我们直接查看这个文件,里面的内容和对应用户显示的crontab -l
[root@dave cron]# cat oracle
00 6 * * * /u02/scripts/del_st_archive.sh >/u02/scripts/del_st_arch.log 2>&1
[root@dave cron]# cat root
0 12 * * * /root/bin/sync-clock.sh
[root@dave cron]#
二.
2.1
usage:
帮助:
[root@dave ~]# man crontab
CRONTAB(1)
NAME
SYNOPSIS
DESCRIPTION
OPTIONS
SEE ALSO
FILES
STANDARDS
DIAGNOSTICS
AUTHOR
4th Berkeley Distribution
2.2
前5个字段分别表示:
还可以用一些特殊符号:
-:表示一个段,如第二端里:
一些示例:
00 8,12,16 * * * /data/app/scripts/monitor/df.sh
30 2 * * * /data/app/scripts/hotbackup/hot_database_backup.sh
10 8,12,16 * * * /data/app/scripts/monitor/check_ind_unusable.sh
10 8,12,16 * * * /data/app/scripts/monitor/check_maxfilesize.sh
10 8,12,16 * * * /data/app/scripts/monitor/check_objectsize.sh
43 21 * * * 21:43
15 05 * * *
0 17 * * * 17:00
0 17 * * 1
0,10 17 * * 0,2,3
0-10 17 1 * *
0 0 1,15 * 1
42 4 1 * *
0 21 * * 1-6
0,10,20,30,40,50 * * * * 每隔10分
*/10 * * * *
* 1 * * *
0 1 * * *
0 */1 * * *
0 * * * *
2 8-20/3 * * * 8:02,11:02,14:02,17:02,20:02
30 5 1,15 * *
2.3
2.4
先看一个例子:
0 2 * * * /u01/test.sh >/dev/null 2>&1 &
这句话的意思就是在后台执行这条命令,并将错误输出2重定向到标准输出1,然后将标准输出1全部放到/dev/null
在这里有有几个数字的意思:
我们也可以这样写:
0 2 * * * /u01/test.sh
0 2 * * * /u01/test.sh
0 2 * * * /u01/test.sh
0 2 * * * /u01/test.sh
将tesh.sh
2>&1
&1
&
测试:
ls 2>1
ls xxx 2>1:
ls xxx 2>&1:
ls xxx >out.txt 2>&1 == ls xxx 1>out.txt 2>&1;
2.5
如果改成:
百度地图插件安装参考
百度地图插件安装参考:http://developer.baidu.com/map/index.php?title=jspopular
http://developer.baidu.com/map/index.php?title=%E9%A6%96%E9%A1%B5
下方有相关插件模块
<!DOCTYPE html PUBLIC "-//W3C//DTD XHTML 1.0 Transitional//EN" "http://www.w3.org/TR/xhtml1/DTD/xhtml1-transitional.dtd">
<html xmlns="http://www.w3.org/1999/xhtml">
<head>
<meta http-equiv="Content-Type" content="text/html; charset=utf-8" />
</head>

<body>
<div id="map-canvas" class=""style="width:715px;height:400px"></div>
<script src="http://api.map.baidu.com/api?v=1.5&ak=3912c09d8490b8c5754aedc170955e21" type="text/javascript"></script>
<script type="text/javascript">
var map = new BMap.Map("map-canvas");
map.enableScrollWheelZoom();
var point = new BMap.Point(117.180386, 39.084208);
map.centerAndZoom(point, 15);
//加入缩放控件;
map.addControl(new BMap.NavigationControl());
//创建坐标点;
var marker1 = new BMap.Marker(point);
map.addOverlay(marker1);
</script>
</html>
Win7上Git安装及配置过程
Win7上Git安装及配置过程
| 文档名称 | Win7上Git安装及配置过程 |
| 创建时间 | 2012/8/20 |
| 修改时间 | 2012/8/20 |
| 创建人 | Baifx |
| 简介(收获) | 1、在win7上安装msysgit步骤;
2、在win7上安装TortoiseGit步骤; 3、在VS2010中集成Git方法和步骤(未)。 |
| 参考源 | Git的配置与使用
http://wenku.baidu.com/view/929d7b4e2e3f5727a5e962a8.html |
一、安装说明
1、Git在windows平台上安装说明。
Git 是 Linux Torvalds 为了帮助管理 Linux 内核开发而开发的一个开放源码的版本控制软件。目前Git已经可以在windows下使用,主要方法有二:msysgit和Cygwin。Cygwin和Linux使用方法类似,Windows版本的Git提供了友好的GUI(图形界面),安装后很快可以上手,此处我们主要讨论基于msysgit的Git安装和使用。
TortoiseGit是TortoiseSVN的Git版本,TortoiseGit用于迁移TortoiseSVN到TortoiseGit。一直以来Git在Windows平台没有好用GUI客户端,现在TortoiseGit的出现给Windows开发者带来福音。我们将在64位win7操作系统上安装Git,并使用GUI界面,则需同时安装msysGit和TortoiseGit。
2、阅读TortoiseGit官方安装说明:
http://code.google.com/p/tortoisegit/wiki/SetupHowTo
- For the latest version of TortoiseGit Windows XP SP3 or newer is required.
- Admin privileges for the installation
- msysGit is required by TortoiseGit
- You do not need to download the whole msysGit development package, the "Full installer for official Git for Windows" download package is sufficient
- msysGit 1.7.10+ is recommended for TortoiseGit 1.7.9+ (msysGit 1.7.10 adds utf-8 support and is compatible to *nix git)
- minimum compatible version is 1.6.1 (for TortoiseGit < 1.7.9 you should use msysGit 1.7.6)
Just download the setup package for your system and install it. If you are running a 64 bit system, you do not need to download and install the 32 bit version: The 32 bit shell extension is included in the 64 bit installer since TortoiseGit 1.7.3.0.
If you want to use TortoiseGit in a Win2K environment (only 1.6.5 and below support Win2K), please install GDI+ before you install TortoiseGit. However, running these old versions is not recommended (no utf-8 and separate-git-dir support).
Before upgrading you should read the ReleaseNotes.
Just download the setup package for your system and install it. The old version will be replaced automatically.
If you are upgrading from 1.7.3.0 or older and you have installed the 32-bit version on a 64-bit system you have to deinstall the 32-bit version first.
Common problems (installer aborts with an error message)
"This installation package is not supported by this processor type. Contact your product vendor."
This means you are trying to install the 64-bit version of TortoiseGit on a normal 32-bit operating system. You need to download and use the correct msi file for your OS. For normal 32-bit OS, make sure the msi filename does not have "64-bit" in it.
"Please wait while the installer finishes determining your disk space requirements."
Cleanup/empty the temp-directory (e.g. C:Users<your user>AppDataLocalTemp, C:User and Settings<your user>Local SettingsTemp, c:WindowsTemp).
由如上说明,我们寻找要下载的对应安装包,如下。
二、下载安装包
1、TortoiseGit下载地址:
http://code.google.com/p/tortoisegit/downloads/list
本次下载版本——TortoiseGit-1.7.12.0-64bit.msi
TortoiseGit 1.7.12.0 64bit
x64 Featured
2、msysgit下载地址:
http://code.google.com/p/msysgit/downloads/list
本次下载版本——Git-1.7.11-preview20120710.exe
Full installer for official Git for Windows 1.7.11
Featured Beta
三、安装过程
安装顺序:首先安装msysgit;然后安装TortoiseGit。
1、安装msysgit。
a、安装包下载完成后,双击进入安装界面,如下图:

b、两步next后选择安装目录,如下图:

c、next进入Git安装模块选择,默认,如下图:

d、next进入Git setup界面,“Select start menu folder”,默认,如下图:

e、next进入Git Setup界面,“Adjusting your PATH environment”,选择默认值“Use Git Bash only”,如下图所示:

f、next进入Git Setup界面,“Configuring the line ending conversions”,选择换行格式,选择“Checkout as-is, commit Unix-style line endings”,如下图所示:

g、next进入安装界面,完成安装,如下图所示:

这个时候已经可以使用git了, 打开Git Bash可以进入linux shell,可以使用git命令进行各种操作,由于大家都习惯使用图形界面的 TortoiseSVN,下面介绍使用 TortoiseSVN的类似软件TortoiseGit,使用习惯相同,大家应该比较容易使用。
2、安装TortoiseGit。
a、双击安装程序,进入安装界面,如下如所示:

b、两步next进入“Choose SSH Client”选择界面,选择“OpenSSH,Git default SSH Client”,如下图所示:

c、next进入“Custom Setup”界面,选择默认值,如下图所示:

d、next,进入“Ready to Install”界面,选择“Install”按钮开始安装过程,完成安装。如下图所示:

e、至此,TortoiseGit安装完成。在桌面空白处点击右键,右键菜单中会加入TortoiseGit快捷键,如下图所示:

f、选择“Settings”,进入“Settings-TortoiseGit”界面,选择“General”选项卡,设置本机器的git路径,如下图所示:

g、同时选择“Network”选项卡,设置SSH路径。SSH默认在安装Git时就安装了,在如下图所示的路径中。如下图所示:

h、选择“Git”选项卡,设置用户名、邮箱和key。如下图所示:

注:如果暂时在本地使用就只需将用户名和邮箱添加,而“Signing key”会自动生成。
至此,TortoiseGit设置完成。
3、下载代码。
a、桌面空白处右键,选择git clone添加版本库地址URL和本地文件夹。如下图所示:

点击ok即可下载一份新版本库。
支持博主

关于邵珠庆博客
文章标签
记事邵珠庆博客
最近文章
最近评论
- 发表在《中国翻墙网民状况调查》
- 发表在《教你如何简单获取新浪微博短地址接口》
- 发表在《教你如何简单获取新浪微博短地址接口》
- 发表在《教你如何简单获取新浪微博短地址接口》
- 发表在《教你如何简单获取新浪微博短地址接口》
博客日历
| 一 | 二 | 三 | 四 | 五 | 六 | 日 |
|---|---|---|---|---|---|---|
| « 8月 | ||||||
| 1 | 2 | 3 | 4 | |||
| 5 | 6 | 7 | 8 | 9 | 10 | 11 |
| 12 | 13 | 14 | 15 | 16 | 17 | 18 |
| 19 | 20 | 21 | 22 | 23 | 24 | 25 |
| 26 | 27 | 28 | 29 | 30 | 31 | |
目录分类
文章归档
- 2025年8月 (2)
- 2022年9月 (1)
- 2022年8月 (3)
- 2022年7月 (1)
- 2022年3月 (1)
- 2021年10月 (3)
- 2021年1月 (1)
- 2020年4月 (3)
- 2020年3月 (3)
- 2020年2月 (2)
- 2020年1月 (3)
- 2019年12月 (2)
- 2019年11月 (3)
- 2019年10月 (2)
- 2019年9月 (2)
- 2019年8月 (4)
- 2019年7月 (2)
- 2019年6月 (2)
- 2019年5月 (2)
- 2019年4月 (3)
- 2019年3月 (2)
- 2019年2月 (3)
- 2019年1月 (2)
- 2018年12月 (2)
- 2018年11月 (2)
- 2018年10月 (3)
- 2018年9月 (2)
- 2018年8月 (2)
- 2018年7月 (1)
- 2018年6月 (2)
- 2018年5月 (3)
- 2018年4月 (2)
- 2018年3月 (6)
- 2018年2月 (7)
- 2018年1月 (3)
- 2017年11月 (2)
- 2017年10月 (2)
- 2017年9月 (5)
- 2017年8月 (4)
- 2017年7月 (8)
- 2017年6月 (5)
- 2017年5月 (14)
- 2017年4月 (8)
- 2017年3月 (5)
- 2017年2月 (2)
- 2017年1月 (1)
- 2016年12月 (1)
- 2016年11月 (5)
- 2016年10月 (3)
- 2016年9月 (2)
- 2016年8月 (1)
- 2016年7月 (2)
- 2016年6月 (2)
- 2016年5月 (5)
- 2016年4月 (5)
- 2016年3月 (2)
- 2016年2月 (1)
- 2016年1月 (2)
- 2015年12月 (2)
- 2015年11月 (1)
- 2015年10月 (3)
- 2015年9月 (2)
- 2015年8月 (4)
- 2015年7月 (5)
- 2015年6月 (6)
- 2015年5月 (3)
- 2015年4月 (8)
- 2015年3月 (6)
- 2015年2月 (4)
- 2015年1月 (5)
- 2014年12月 (2)
- 2014年11月 (5)
- 2014年10月 (5)
- 2014年9月 (1)
- 2014年8月 (2)
- 2014年7月 (4)
- 2014年6月 (1)
- 2014年5月 (9)
- 2014年4月 (5)
- 2014年3月 (1)
- 2014年2月 (1)
- 2014年1月 (5)
- 2013年12月 (4)
- 2013年11月 (12)
- 2013年10月 (6)
- 2013年9月 (7)
- 2013年8月 (8)
- 2013年7月 (15)
- 2013年6月 (9)
- 2013年5月 (12)
- 2013年4月 (8)
- 2013年3月 (11)
- 2013年2月 (9)
- 2013年1月 (21)
- 2012年12月 (8)
- 2012年11月 (7)
- 2012年10月 (19)
- 2012年9月 (16)
- 2012年8月 (13)
- 2012年7月 (10)
- 2012年6月 (11)
- 2012年5月 (11)
- 2012年4月 (8)
- 2012年3月 (8)
- 2012年2月 (11)
- 2012年1月 (8)
- 2011年12月 (18)
- 2011年11月 (32)
- 2011年10月 (17)
- 2011年9月 (18)
- 2011年8月 (11)
- 2011年7月 (55)
- 2011年6月 (1)
- 2011年5月 (4)
- 2011年4月 (2)
- 2011年3月 (1)
- 2011年1月 (3)
- 2010年12月 (1)
- 2010年11月 (6)
- 2010年9月 (5)
- 2010年8月 (2)
- 2010年7月 (3)
- 2010年6月 (7)
- 2010年5月 (3)
- 2010年4月 (4)
- 2010年3月 (8)
- 2010年2月 (2)
- 2010年1月 (2)
- 2009年12月 (2)
- 2009年11月 (1)
- 2009年10月 (1)
- 2009年8月 (1)
- 2009年7月 (2)
- 2009年5月 (1)
- 2009年4月 (1)
- 2009年3月 (1)
- 2009年2月 (1)
- 2009年1月 (1)
- 2008年12月 (1)
- 2008年11月 (2)
- 2008年10月 (1)
- 2008年8月 (5)
- 2008年7月 (2)
- 2008年6月 (1)
- 2008年5月 (3)
- 2008年4月 (11)
- 2008年3月 (1)
- 2008年2月 (1)
- 2008年1月 (1)
- 2007年12月 (1)
- 2007年11月 (3)
- 2007年10月 (1)
- 2007年9月 (1)
- 2007年8月 (1)
- 2007年7月 (1)
- 2007年6月 (1)
- 2007年5月 (1)
博客功能
京东好物
