实时支付状态监控和处理结果的变更
如果2000台机器的实时用户支付状态监控和处理结果的变更,需要构建一个兼具高并发处理能力、毫秒级低延迟响应和持续高可用性的强大后端架构。
其核心设计理念在于确保实时、高效、可靠的数据流转与处理,具体涵盖实时通信、状态同步和高效存储三大关键要素。
高级整体架构设计,搭建运行服务较多,运行维护成本较高
采用分层、解耦的设计原则,由数据采集与通信层、数据接入与缓冲层、实时计算与处理层、数据存储与状态管理层以及监控与告警层构成。
1. 数据采集与通信层:与机器的实时连接
-
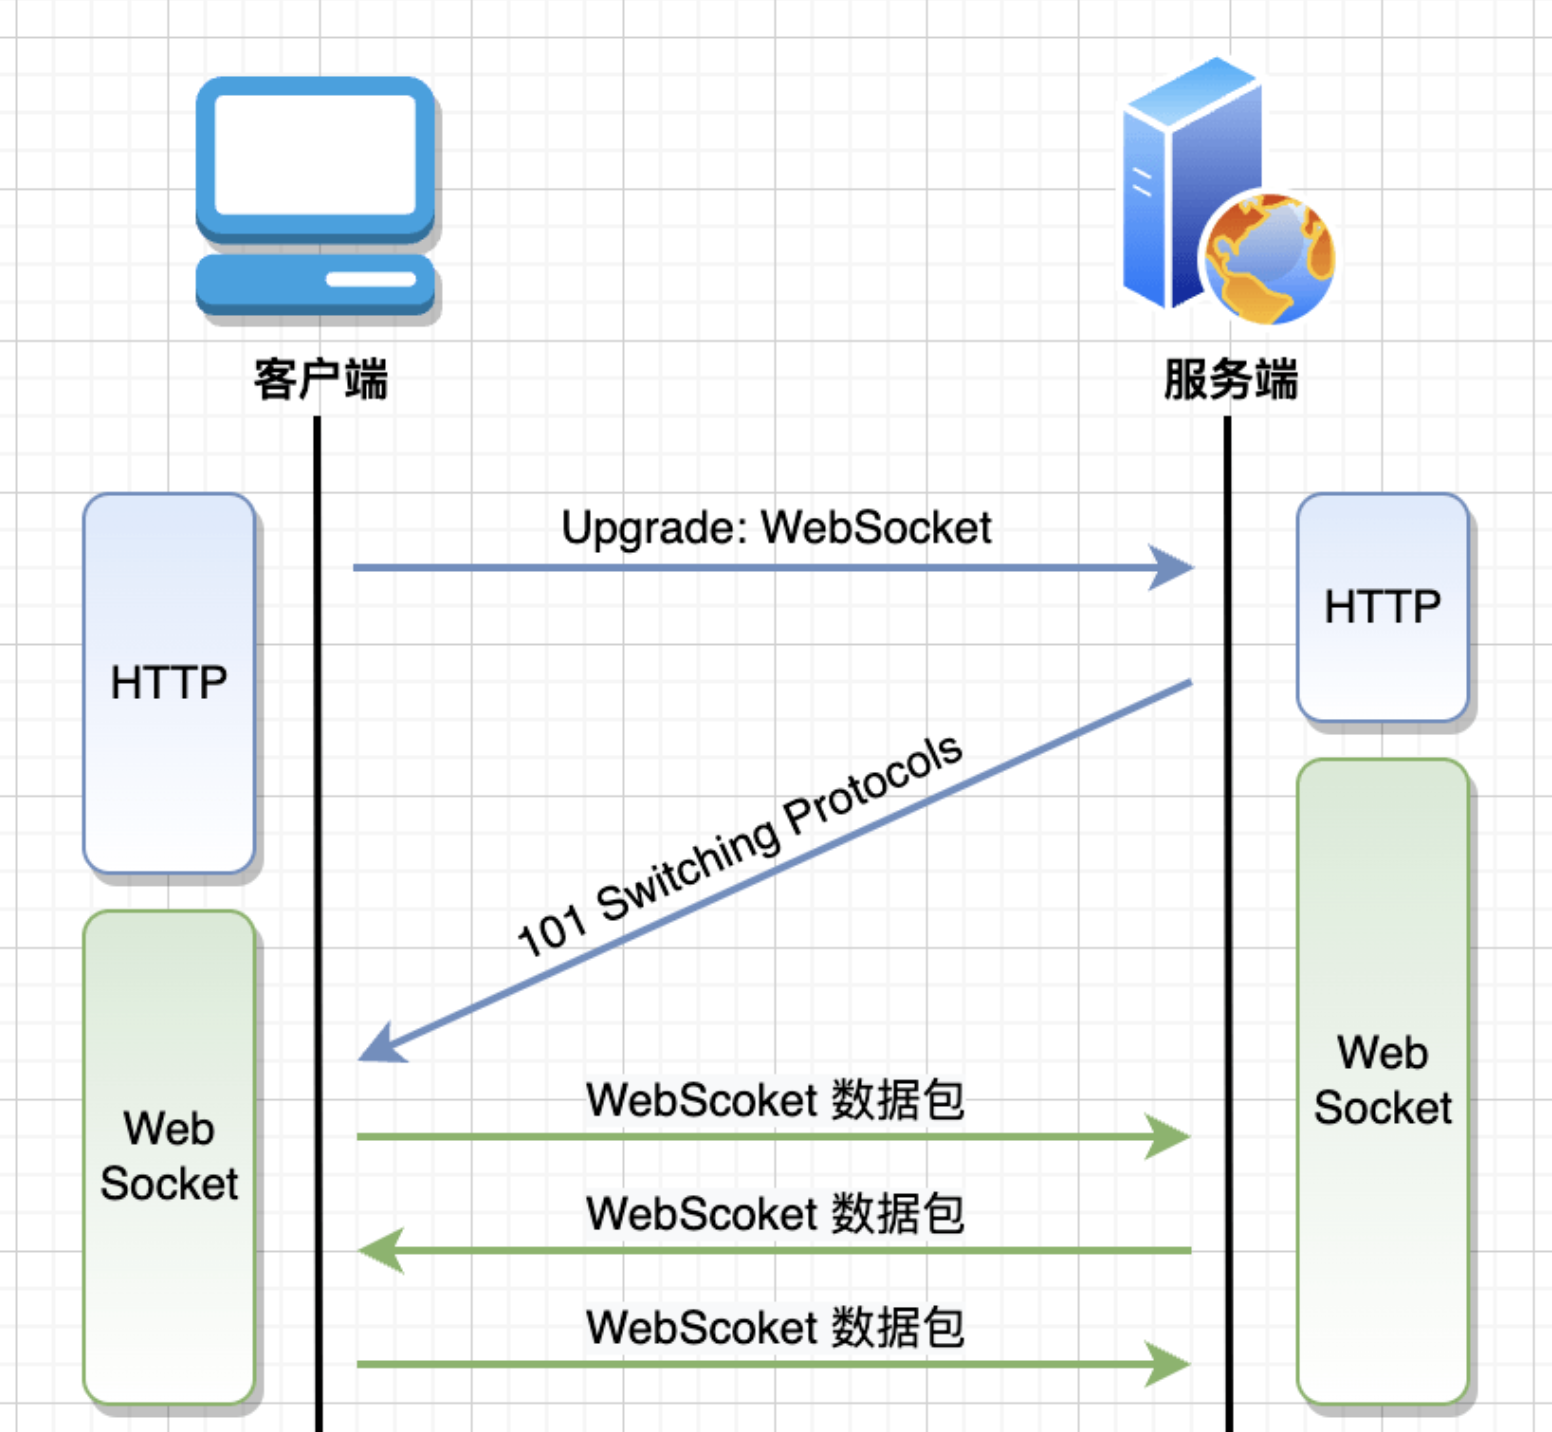
通信协议选择:WebSocket
为了实现服务器与2000台机器之间的低延迟、双向通信,推荐采用 WebSocket。相比于传统的HTTP轮询或长轮询,WebSocket建立持久化连接,允许服务器主动向机器推送状态变更通知,极大地降低了通信延迟和服务器开销。 -
客户端(机器端)设计
机器端的SDK应轻量且高效,负责维护与后端的WebSocket连接,并具备心跳检测和自动重连机制以确保连接的稳定性。当用户发起支付或支付状态发生变化时,SDK将立即通过WebSocket将事件上报。
2. 数据接入与缓冲层:削峰填谷,保证系统稳定
-
消息队列选型:Apache Kafka / RabbitMQ
来自2000台机器的并发请求可能瞬间产生巨大的流量洪峰。为了保护后端应用不被冲垮,引入消息队列进行削峰填谷至关重要。Apache Kafka 是此场景下的理想选择,其具备极高吞吐量、低延迟和高可扩展性的特点,能够轻松应对每秒数十万甚至上百万条消息。Kafka的持久化和分区机制也为数据可靠性和并行处理提供了保障。 -
数据格式
所有上报数据应采用统一的、轻量级的数据格式,如 JSON 。Protobuf在序列化/反序列化效率和数据体积上更具优势,有助于降低网络带宽消耗和处理开销。
3. 实时计算与处理层:核心业务逻辑
-
实时计算引擎:Apache Flink
对于支付状态这种对实时性要求极高的场景,推荐使用 Apache Flink 作为实时计算引擎。Flink是真正的事件驱动型流处理框架,支持事件时间(Event Time)处理和精确一次(Exactly-Once)的状态一致性保证,确保即使在乱序或延迟事件到达时也能产出正确的结果。Flink的毫秒级处理延迟远优于基于微批处理的Spark Streaming。 -
核心处理逻辑
-
支付状态机: 在Flink作业中为每一笔支付订单维护一个状态机,根据上报的事件(如“创建订单”、“支付中”、“支付成功”、“支付失败”、“订单超时”等)驱动状态流转。
-
关联外部信息: Flink作业可以实时关联外部数据源(如用户风控信息、优惠券信息等)进行复杂的业务逻辑判断。
-
处理结果变更: 处理完成后,将结果(如“允许发货”、“交易关闭”等)发送到下游的消息队列,或直接通过API通知相关业务系统。
-
4. 数据存储与状态管理层:高效读写与持久化
-
分布式缓存:Redis
为了实现状态的快速读取和更新,采用 Redis 作为分布式缓存。 Redis基于内存,读写性能极高。支付过程中的中间状态、订单的实时状态等高频访问的数据都应存储在Redis中,以减轻数据库压力。Redis丰富的数据结构(如Hashes、Sorted Sets)也能很好地满足不同业务场景的需求。 -
数据库选型:PostgreSQL /Mysql 或 NoSQL
-
关系型数据库 (PostgreSQL): 对于需要强事务保证和复杂查询的核心交易数据,PostgreSQL 是一个优秀的选择。它在并发处理和对JSON等现代数据类型的支持上表现出色。
-
NoSQL数据库 (MongoDB/ClickHouse):
-
对于支付日志、用户行为等非核心但数据量巨大的数据,可以考虑使用 MongoDB 这类文档型数据库,其灵活的模式设计易于扩展。
-
如果需要对海量历史支付数据进行实时分析和BI查询,ClickHouse 这种列式存储数据库能提供极高的查询性能。
-
-
-
数据一致性
采用数据库与缓存双写的策略,并配合消息队列实现最终一致性,确保在高并发下数据状态的正确同步。
5. 监控与告警层:保障系统健康运行
-
全链路监控: 使用如 Prometheus + Grafana 的组合,对系统各组件(Kafka、Flink、Redis、应用服务等)的核心指标(如QPS、延迟、资源使用率)进行全面监控。
-
日志聚合与分析: 通过 ELK Stack (Elasticsearch, Logstash, Kibana) 或 Loki 聚合所有服务的日志,方便快速定位和排查问题。
-
实时告警: 设置关键指标的告警阈值,一旦系统出现异常(如消息队列积压、Flink作业失败、数据库连接池耗尽等),能通过短信、电话或即时通讯工具立即通知相关人员。
高可用性设计
-
无状态服务: 核心应用服务应设计为无状态,便于水平扩展和快速故障恢复。
-
集群化部署: 所有关键组件(接入网关、Kafka、Flink、Redis、数据库)均采用集群模式部署,避免单点故障。
-
负载均衡: 在应用层前端使用 Nginx 或 LVS 等负载均衡器,将流量分发到多个服务实例。
-
故障自动转移: 利用Kubernetes等容器编排平台的健康检查和自动重启机制,以及数据库和消息队列自身的故障转移能力,实现服务的高可用性。
通过上述架构设计,可以构建一个稳定、高效且可扩展的实时支付监控系统,从容应对2000台机器带来的高并发、低延迟和高可用的挑战。
只允许单用户登录的处理方式
只允许单用户登录问题的处理方式,详细实现流程:
通过两个关键场景来详细描述实现流程:
场景一:用户在设备A首次登录
-
客户端请求登录:
-
用户在设备A上输入用户名和密码,发送登录请求到认证服务。
-
-
认证服务处理:
-
验证用户名和密码是否正确。
-
验证通过后,生成一个唯一的会话标识(Session ID),例如使用JWT (JSON Web Token)。这个Session ID将作为后续所有请求的凭证。
-
【核心步骤】 将用户的活跃会话信息存入 Redis。这里使用一个简单的Key-Value结构:
-
Key: user_active_session:<UserID> (例如: user_active_session:12345)
-
Value: SessionID_A (例如: eyJhbGciOiJIUzI1NiIsIn...)
-
Redis命令: SET user_active_session:12345 "SessionID_A"
-
-
-
建立实时连接:
-
认证服务将生成的 SessionID_A 返回给设备A。
-
设备A的客户端收到 SessionID_A 后,立即向实时通信网关 (WebSocket Gateway) 发起WebSocket连接请求,并在请求中携带 SessionID_A 进行身份验证。
-
-
通信网关注册连接:
-
WebSocket网关收到连接请求,验证 SessionID_A 的合法性(例如解析JWT)。
-
验证通过后,WebSocket网关会维护一个映射关系,用于未来能根据UserID找到对应的连接。这个映射可以存在网关的内存中,或者也存入Redis中(尤其是在网关是集群部署时)。
-
映射: UserID -> WebSocketConnectionID (例如: 12345 -> conn_xyz123)
-
-
至此,设备A登录成功并保持在线。
-
场景二:用户在设备B进行新登录(踢出设备A)
-
客户端请求登录:
-
用户在设备B上输入用户名和密码,发送登录请求到认证服务。
-
-
认证服务处理(踢出逻辑):
-
验证用户名和密码。
-
验证通过后,生成一个新的会话标识 SessionID_B。
-
【核心步骤】 在将新会话写入Redis之前,先获取并替换旧的会话。Redis的 GETSET 命令是原子性的,非常适合此场景。
-
原子操作: GETSET user_active_session:12345 "SessionID_B"
-
结果: 这个命令会返回旧的值 SessionID_A,同时将Key的值更新为 SessionID_B。现在,SessionID_B 成为了唯一合法的会话。
-
-
-
发布“强制下线”事件:
-
认证服务拿到了旧的 SessionID_A(如果存在的话)。它会立即通过一个内部的消息队列 (如Kafka或RabbitMQ) 发布一个“强制下线”事件。
-
事件内容: {"event": "FORCE_LOGOUT", "userId": "12345", "oldSessionId": "SessionID_A"}
-
消息队列为了解耦。认证服务不应该直接与WebSocket网关通信,通过消息队列可以提高系统的健壮性和可扩展性。
-
-
通信网关处理下线事件:
-
实时通信网关 (WebSocket Gateway) 订阅了“强制下线”事件。
-
当它收到该事件后,根据 userId: 12345 查找到对应的旧连接 conn_xyz123。
-
【主动踢出】 网关通过 conn_xyz123 这条WebSocket连接,向设备A的客户端主动发送一条消息。
-
消息内容: {"type": "force_logout", "message": "您已在其他设备登录"}
-
-
发送消息后,服务器主动关闭这条WebSocket连接。
-
-
设备A响应:
-
设备A的客户端收到 force_logout 消息后,应立即执行下线操作:清除本地存储的 SessionID_A 和用户信息,并跳转到登录页面。
-
即使客户端代码出现异常未能正确处理该消息,由于服务器已主动断开连接,设备A也无法再进行任何实时操作。
-
-
设备B完成登录:
-
与此同时,认证服务已将新的 SessionID_B 返回给设备B。
-
设备B走与场景一相同的流程,建立新的WebSocket连接并保持在线。
-
安全性与健壮性:最后的防线
仅仅踢出WebSocket连接是不够的。如果设备A的网络恰好在被踢出前断开,它可能不知道自己已下线。当网络恢复后,它可能会尝试使用旧的 SessionID_A 去请求普通的HTTP API(例如查询订单历史)。
因此,必须有后端防线:
-
API网关/后端服务强校验:
-
所有需要登录才能访问的API,都必须在API网关或服务内部对请求携带的Session ID进行验证。
-
验证逻辑:从Redis中根据 user_active_session:<UserID> 取出当前合法的 Session ID,与请求中携带的 Session ID进行比对。
-
如果请求携带的 SessionID_A 与Redis中存储的 SessionID_B 不匹配,则立即拒绝该请求,返回401 Unauthorized错误。
-
总结
通过以上设计,我们构建了一个三层防御体系来确保单点登录的实现:
-
权威状态层 (Redis): 利用Redis作为唯一、高速的会话状态记录中心。
-
主动通知层 (WebSocket): 在新登录发生时,通过WebSocket主动、实时地通知旧客户端下线。
-
被动验证层 (API校验): 对每一次API请求都进行会话有效性校验,作为最终的、最可靠的防线,杜绝任何使用旧会话操作的可能性。
这样不仅解决了实时T出旧客户端的问题,而且通过组件解耦和多层防御,保证了系统整体的高性能、高可用和高安全性。
Linux系统里面图形接口服务器X server
X server是Linux系统里面图形接口服务器的简称。Windows系统的界面是这个系统不可分割的一部分,各种窗口操作界面显示都是由系统核心直接管理的,而Linux的图形界面并不是系统的必要组成部分,它可以在无界面的条件下运行。当需要Linux提供界面的时候,系统就会建立一个或者数个X server,通过X协议跟窗口管理器交互,由独立于系统的应用程序来产生窗口,状态栏,按钮之类的交互界面。
比较常见的Linux界面操作环境有KDE和GNOME,为它们提供系统支持的就是X server,而并非Linux核心。
总结一下linux图形界面层次关系:
linux本身-->X服务器<-[通过X协议交谈]->窗口管理器(综合桌面环境)-->X应用程序。
介绍两种方法在命令行中打开远程端的图形应用程序。
两台主机A和B(B是linux主机)
1. A是linux
1)在A主机上,打开终端,执行:ssh -X user@B(ssh -X user@ip)
2)然后在A终端上执行B主机上的图形化界面程序,该图形界面可在A主机显示。
2. A是Windows
需要安装支持x server协议的终端工具
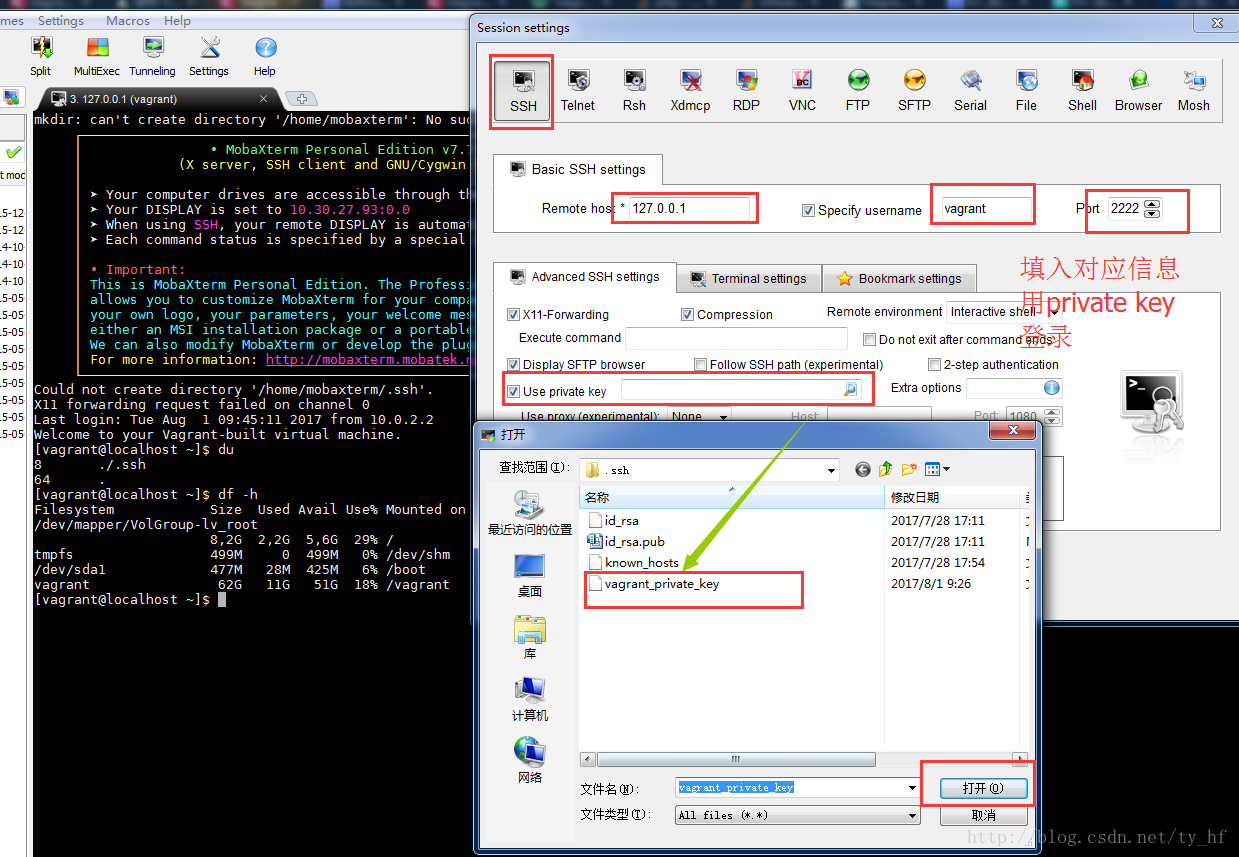
2.1 使用MobaXterm(已经集成x server协议)
1)在A主机上,打开MobaXterm,执行:ssh -X user@B(ssh -X user@ip)
2)然后在MobaXterm上执行B主机上的图形化界面程序,该图形界面可在A主机显示。
2.2 xshell
需要安装xmanager
实测MobaXterm的图形响应速度比xmanager要快,推荐MobaXterm。
————————————————
版权声明:本文为CSDN博主「hello_courage」的原创文章,遵循CC 4.0 BY-SA版权协议,转载请附上原文出处链接及本声明。
原文链接:https://blog.csdn.net/u012247418/article/details/105347383/
linux 系统中 /bin 目录的区别
/bin
This directory contains executable programs which are needed in single user mode and to bring the sys‐ tem up or repair it.
此目录包含在单用户模式下需要的可执行程序,这些程序用于启动或修复系统。
/sbin
Like /bin, this directory holds commands needed to boot the system, but which are usually not executed by normal users.
与/bin一样,这个目录包含引导系统所需的命令,但这些命令通常不会由普通用户执行。
/usr/bin
This is the primary directory for executable programs. Most programs executed by normal users which are not needed for booting or for repairing the system and which are not installed locally should be placed in this directory.
主目录是可执行程序。大多数由普通用户执行的、不需要启动或修复系统的程序以及不在本地安装的程序都应该放在这个目录中。
/usr/sbin
This directory contains program binaries for system administration which are not essential for the boot process, for mounting /usr, or for system repair.
此目录包含用于系统管理的程序二进制文件,这些文件对于引导过程、装入/usr或系统修复都不是必需的。
/usr/local/bin
Binaries for programs local to the site.
站点本地程序的二进制文件。
/usr/local/sbin
Locally installed programs for system administration.
本地安装的系统管理程序。
RedisTemplate访问Redis数据结构
Redis五种基本数据结构
redis提供键值对的形式对数据进行存储。支持五种数据类型:String(字符串),List(链表),Hash(散列),Set(无序集合),ZSet(有序集合)。下面是网上对其数据结构简单的归纳比较好的,如下:
结构类型 结构存储的值 结构的读写能力
String 可以是字符串、整数或者浮点数 对整个字符串或者字符串的其中一部分执行操作;对象和浮点数执行 自增(increment)或者自减(decrement)
List 一个链表,链表上的每个节点都包含了一个字符串 从链表的两端推入或者弹出元素;根据偏移量对链表进行修剪(trim);读取单个或者多个元素;根据值来查找或者移除元素
Hash 包含键值对的无序散列表 添加、获取、移除单个键值对;获取所有键值对
Set 包含字符串的无序收集器(unorderedcollection),并且被包含的每个字符串都是独一无二的、各不相同 添加、获取、移除单个元素;检查一个元素是否存在于某个集合中;计算交集、并集、差集;从集合里卖弄随机获取元素
ZSet 字符串成员(member)与浮点数分值(score)之间的有序映射,元素的排列顺序由分值的大小决定 添加、获取、删除单个元素;根据分值范围(range)或者成员来获取元素
Spring-data-Redis简介
对于JAVA语言,我们之前使用Jedis对redis进行基本的指令操作,随着Spring对Jedis进行了很好的封装之后,使用Spring-data-redis包对redis的操作变得更加简单和方便。而Spring-data-Redis则是通过RedisTemplate对象来操作Redis的五种数据结构。
如何引入Spring-data-Redis
1.导入jar包:spring-data-redis-1.8.7.RELEASE.jar 和 jedis-2.9.0.jar
<dependency>
<groupId>org.springframework.data</groupId>
<artifactId>spring-data-redis</artifactId>
<version>1.8.7.RELEASE</version>
</dependency>
<dependency>
<groupId>redis.clients</groupId>
<artifactId>jedis</artifactId>
<version>2.9.0</version>
</dependency>
2.配置文件(SpringBoot方式暂不介绍)
redis.properties
redis.host=192.168.132.128
redis.port=10000
redis.password=123456
redis.minIdle=50
redis.maxIdle=300
redis.maxActive=600
redis.maxWait=1000
redis.testOnBorrow=true
applicationContext.xml
<bean id="propertyConfigurer" class="org.springframework.beans.factory.config.PropertyPlaceholderConfigurer">
<property name="locations">
<list>
<!-- 引入小配置文件-->
<value>classpath:redis.properties</value>
</list>
</property>
</bean>
<!-- 连接池 ,本质是对GenericObjectPoolConfig的属性的设置-->
<bean id="poolConfig" class="redis.clients.jedis.JedisPoolConfig">
<property name="minIdle" value="${redis.minIdle}" />
<property name="maxIdle" value="${redis.maxIdle}" />
<property name="maxTotal" value="${redis.maxActive}" />
<property name="maxWaitMillis" value="${redis.maxWait}" />
<property name="testOnBorrow" value="${redis.testOnBorrow}" />
</bean>
<!-- REDIS连接工厂 -->
<bean id="jedisConnFactory" class="org.springframework.data.redis.connection.jedis.JedisConnectionFactory">
<!-- 基础连接参数 -->
<property name="hostName" value="${redis.host}" />
<property name="port" value="${redis.port}" />
<property name="password" value="${redis.password}" />
<!-- 是否启用连接池 -->
<property name="usePool" value="true" />
<property name="poolConfig" ref="poolConfig" />
</bean>
<!-- 对String类型处理的RedisTemplate -->
<bean id="stringRedisTemplate" class="org.springframework.data.redis.core.StringRedisTemplate">
<property name="connectionFactory" ref="jedisConnFactory" />
<property name="keySerializer">
<bean class="org.springframework.data.redis.serializer.StringRedisSerializer" />
</property>
<property name="valueSerializer">
<bean class="org.springframework.data.redis.serializer.StringRedisSerializer" />
</property>
<property name="hashKeySerializer">
<bean class="org.springframework.data.redis.serializer.StringRedisSerializer" />
</property>
<property name="hashValueSerializer">
<bean class="org.springframework.data.redis.serializer.StringRedisSerializer" />
</property>
</bean>
<!-- 对LIST,SET,ZSET,HASH等类型的处理RedisTemplate -->
<bean id="redisTemplate" class="org.springframework.data.redis.core.RedisTemplate">
<property name="connectionFactory" ref="jedisConnFactory"/>
<property name="keySerializer">
<bean class="org.springframework.data.redis.serializer.StringRedisSerializer"/>
</property>
<property name="hashKeySerializer">
<bean class="org.springframework.data.redis.serializer.StringRedisSerializer"/>
</property>
<property name="valueSerializer">
<!-- 对象序列化方案 -->
<bean class="org.springframework.data.redis.serializer.GenericJackson2JsonRedisSerializer"/>
</property>
<property name="hashValueSerializer">
<bean class="org.springframework.data.redis.serializer.GenericJackson2JsonRedisSerializer"/>
</property>
</bean>
3.注意
推荐使用GenericJackson2JsonRedisSerializer,而不是Jackson2JsonRedisSerializer,因为GenericJackson2JsonRedisSerializer提供了很好的对泛型的支持,而使用Jackson2JsonRedisSerializer对不同对象进行操作时都需要手动set序列化方案,不能直接集成到配置文件中将其直接托管给spring工厂。当然,我们可以自定义序列化方案,同时也可以使用spring-data-redis集成好的序列化方案,例如集成号称速度最快的fastjson序列化方案,下面提供一个fastjson的Serializer(暂时没有集成对泛型纳入工厂方案的支持)。
package util;
import java.nio.charset.Charset;
import org.springframework.data.redis.serializer.RedisSerializer;
import org.springframework.data.redis.serializer.SerializationException;
import com.alibaba.fastjson.JSON;
import com.alibaba.fastjson.serializer.SerializerFeature;
/**
* FASTJSON序列化工具
* @author LiuChengxiang
* @time 2017年9月19日上午9:30:27
*
* @param <T>
*/
public class FastJson2JsonRedisSerializer<T> implements RedisSerializer<T> {
public static final Charset DEFAULT_CHARSET = Charset.forName("UTF-8");
private Class<T> clazz;
public FastJson2JsonRedisSerializer(Class<T> clazz){
super();
this.clazz = clazz;
}
@Override
public byte[] serialize(T t) throws SerializationException {
if (t == null) {
return new byte[0];
}
return JSON.toJSONString(t, SerializerFeature.WriteClassName).getBytes(DEFAULT_CHARSET);
}
@Override
public T deserialize(byte[] bytes) throws SerializationException {
if (bytes == null || bytes.length <= 0) {
return null;
}
String str = new String(bytes, DEFAULT_CHARSET);
return (T)JSON.parseObject(str,clazz);
}
}
RedisTemplate访问Redis数据结构(前言)
RedisTemplate访问Redis数据结构(一)——String
RedisTemplate访问Redis数据结构(二)——List
RedisTemplate访问Redis数据结构(三)——Hash
RedisTemplate访问Redis数据结构(四)——Set
RedisTemplate访问Redis数据结构(五)——ZSet
https://blog.csdn.net/weixin_37490221/article/details/78134105
H5计算器实现
Redis内存分析方法
一般会采用 bgsave 生成 dump.rdb 文件,再结合 redis-rdb-tools 和 sqlite 来进行静态分析。
BGSAVE:在后台异步(Asynchronously)保存当前数据库的数据到磁盘。
BGSAVE 命令执行之后立即返回 OK ,然后 Redis fork 出一个新子进程,原来的 Redis 进程(父进程)继续处理客户端请求,而子进程则负责将数据保存到磁盘,然后退出。
生成内存快照:redis-rdb-tools 是一个 python 的解析 rdb 文件的工具,在分析内存的时候,主要用它生成内存快照。
redis-rdb-tools 安装:
使用 PYPI 安装:
pip install rdbtools
使用 源码安装:
git clone https://github.com/sripathikrishnan/redis-rdb-tools
cd redis-rdb-tools
sudo python setup.py install
使用 redis-rdb-tools 生成内存快照:
rdb -c memory dump.rdb > memory.csv
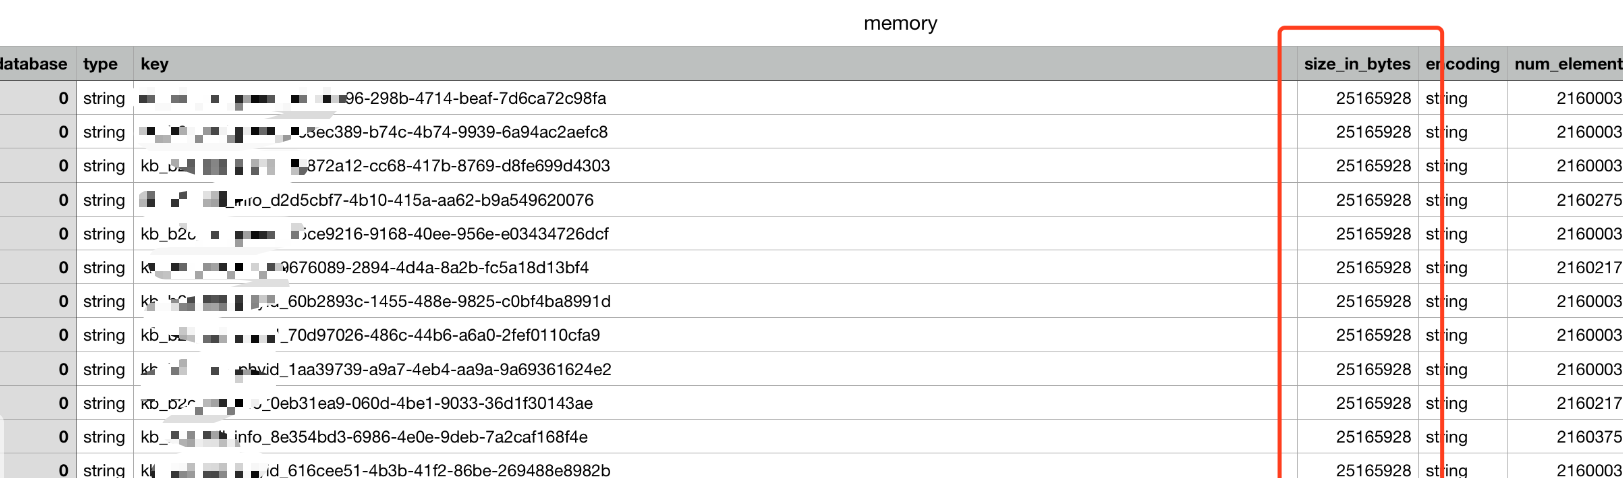
生成 CSV 格式的内存报告。包含的列有:数据库 ID,数据类型,key,内存使用量(byte),编码。内存使用量包含 key、value 和其他值。
内存使用量是理论上的近似值,在一般情况下,略低于实际值。
[ares:~/Desktop$head memory.csv
database,type,key,size_in_bytes,encoding,num_elements,len_largest_element
0,string,trade.coupon.id:653601465,112,string,8,8
0,string,trade.coupon.id:631354838,112,string,8,8
0,string,trade.coupon.id:632477800,112,string,8,8
0,string,trade.coupon.id:620802294,112,string,8,8
0,string,trade.coupon.id:631432959,112,string,8,8
0,string,trade.coupon.id:632933399,112,string,8,8
0,string,trade.coupon.id:632117725,112,string,8,8
0,string,trade.coupon.id:634240609,112,string,8,8
0,string,trade.coupon.id:646317603,112,string,8,8
注:若csv文件不大,可直接用相关软件打开,以size_in_bytes列排序,可以看到大致内存使用。
使用SQLite分析内存快照:
SQLite版本必须是3.16.0以上。
导入memory.csv数据库:
$sqlite3 memory.db
SQLite version 3.19.3 2017-06-27 16:48:08
Enter ".help" for usage hints.
sqlite> create table memory(database int,type varchar(128),key varchar(128),size_in_bytes int,encoding varchar(128),num_elements int,len_largest_element varchar(128));
sqlite> .mode csv memory
sqlite> .import memory.csv memory

数据导入后,可以随处理:
查询key总数:
sqlite> select count(*) from memory;
31143847
查询key总占用内存:
sqlite> select sum(size_in_bytes) from memory;
17391950414.0
查询内容占用最高的几个key:
sqlite> select key,size_in_bytes from memory order by size_in_bytes desc limit 10;
key,size_in_bytes
public.xx.xx:xx,7860169636
public.xx.xx:xx,3043206524
public.xx.xx:xx,1866022916
public.xx.xx:xx,420931316
public.xx.xx:idxx171118172
xx,162984940
xx,133443892
public.xx.xx:xx,80925132
public.xx.xx:xx,28340356
Vagrant-安装教程及常见问题


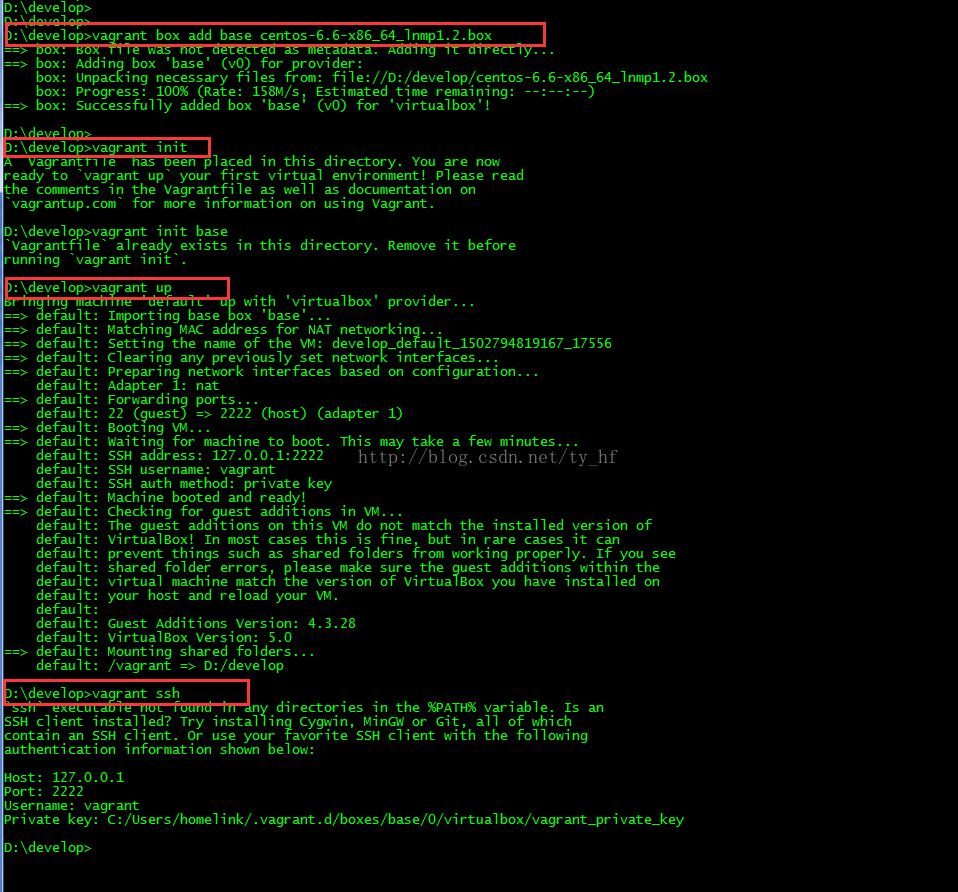
- vagrant up (启动虚拟机)
- vagrant halt (关闭虚拟机——对应就是关机)
- vagrant suspend (暂停虚拟机——只是暂停,虚拟机内存等信息将以状态文件的方式保存在本地,可以执行恢复操作后继续使用)
- vagrant resume (恢复虚拟机—— 与前面的暂停相对应)
- vagrant destroy (删除虚拟机,删除后在当前虚拟机所做进行的除开Vagrantfile中的配置都不会保留)
在我们的开发目录下有一个文件Vagrantfile,里面包含有大量的配置信息,主要包括三个方面的配置,虚拟机的配置、SSH配置、Vagrant的一些基础配置。Vagrant是使用Ruby开发的,所以它的配置语法也是Ruby的,但是我们没有学过Ruby的人还是可以跟着它的注释知道怎么配置一些基本项的配置。
具体介绍,参考:http://blog.csdn.net/chajinglong/article/details/52805915
- # -*- mode: ruby -*-
- # vi: set ft=ruby :
- # All Vagrant configuration is done below. The "2" in Vagrant.configure
- # configures the configuration version (we support older styles for
- # backwards compatibility). Please don\'t change it unless you know what
- # you\'re doing.
- Vagrant.configure(2) do |config|
- # The most common configuration options are documented and commented below.
- # For a complete reference, please see the online documentation at
- # https://docs.vagrantup.com.
- # Every Vagrant development environment requires a box. You can search for
- # boxes at https://atlas.hashicorp.com/search.
- config.vm.box = "base"
- # Disable automatic box update checking. If you disable this, then
- # boxes will only be checked for updates when the user runs
- # `vagrant box outdated`. This is not recommended.
- # config.vm.box_check_update = false
- # Create a forwarded port mapping which allows access to a specific port
- # within the machine from a port on the host machine. In the example below,
- # accessing "localhost:8080" will access port 80 on the guest machine.
- # config.vm.network "forwarded_port", guest: 80, host: 80
- # Create a private network, which allows host-only access to the machine
- # using a specific IP.
- config.vm.network "private_network", ip: "192.168.33.10"
- # Create a public network, which generally matched to bridged network.
- # Bridged networks make the machine appear as another physical device on
- # your network.
- # config.vm.network "public_network"
- # Share an additional folder to the guest VM. The first argument is
- # the path on the host to the actual folder. The second argument is
- # the path on the guest to mount the folder. And the optional third
- # argument is a set of non-required options.
- config.vm.synced_folder "D:/all_code/", "/home/www"
- # Provider-specific configuration so you can fine-tune various
- # backing providers for Vagrant. These expose provider-specific options.
- # Example for VirtualBox:
- #
- # config.vm.provider "virtualbox" do |vb|
- # # Display the VirtualBox GUI when booting the machine
- # vb.gui = true
- #
- # # Customize the amount of memory on the VM:
- # vb.memory = "1024"
- # end
- #
- # View the documentation for the provider you are using for more
- # information on available options.
- # Define a Vagrant Push strategy for pushing to Atlas. Other push strategies
- # such as FTP and Heroku are also available. See the documentation at
- # https://docs.vagrantup.com/v2/push/atlas.html for more information.
- # config.push.define "atlas" do |push|
- # push.app = "YOUR_ATLAS_USERNAME/YOUR_APPLICATION_NAME"
- # end
- # Enable provisioning with a shell script. Additional provisioners such as
- # Puppet, Chef, Ansible, Salt, and Docker are also available. Please see the
- # documentation for more information about their specific syntax and use.
- # config.vm.provision "shell", inline: <
- # sudo apt-get update
- # sudo apt-get install -y apache2
- # SHELL
- end
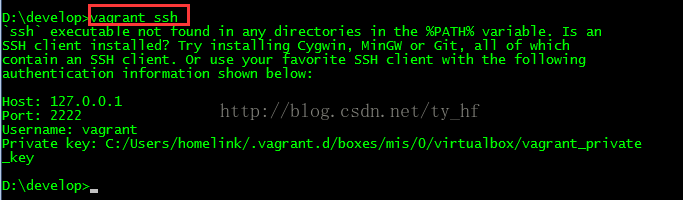
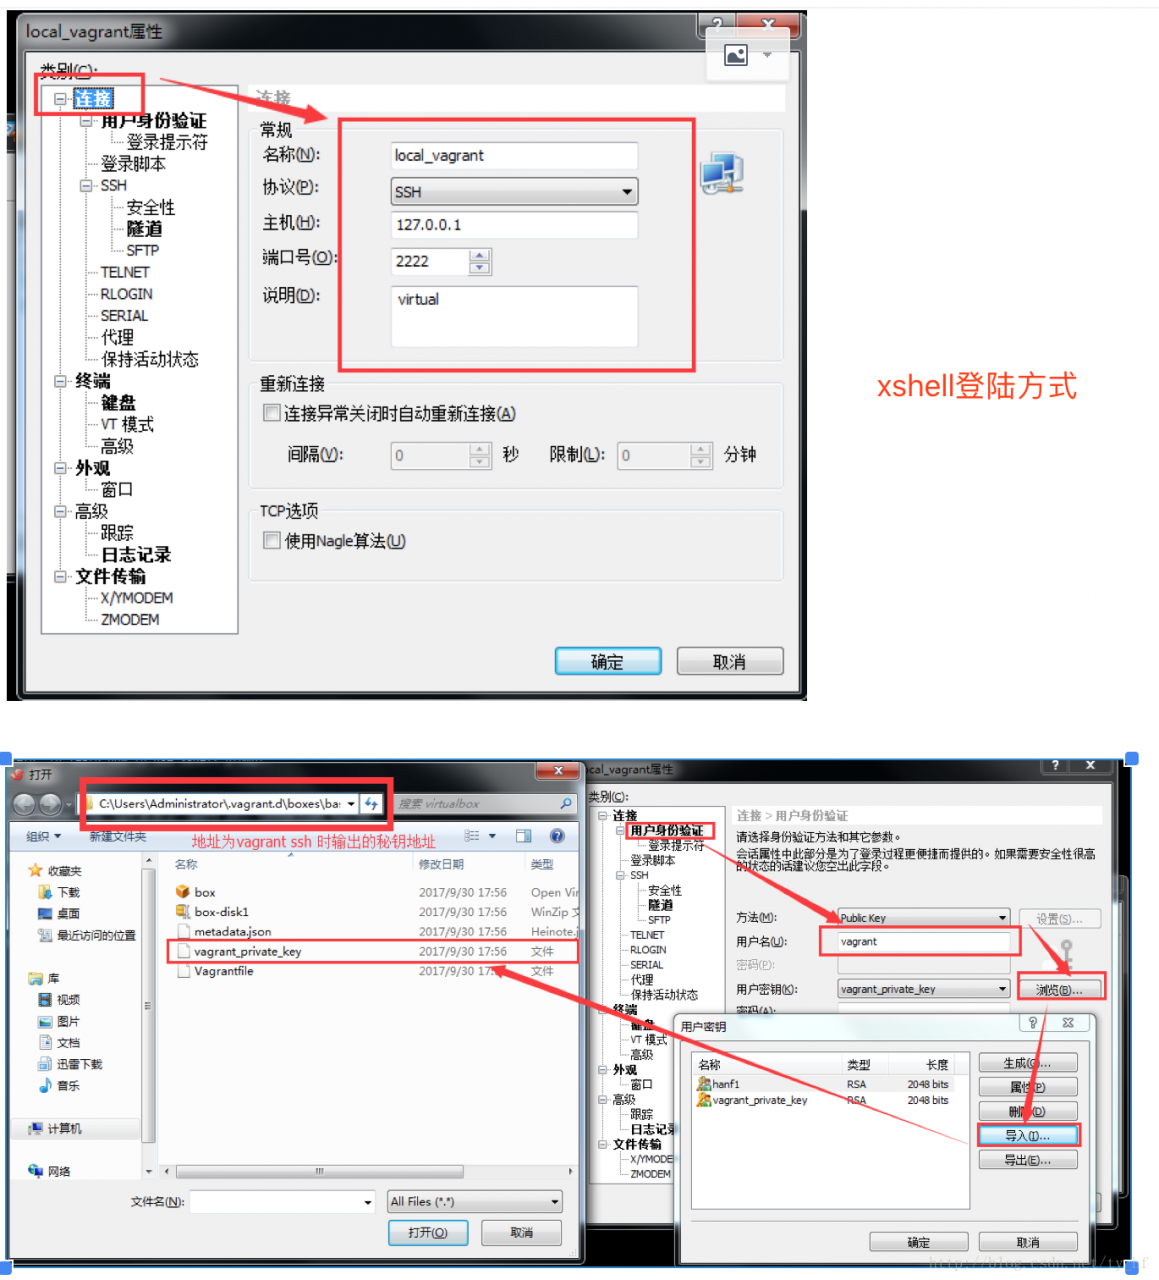
- ssh: 127.0.0.1
- 端口: 2222
- 用户名: vagrant
- 密码: vagrant

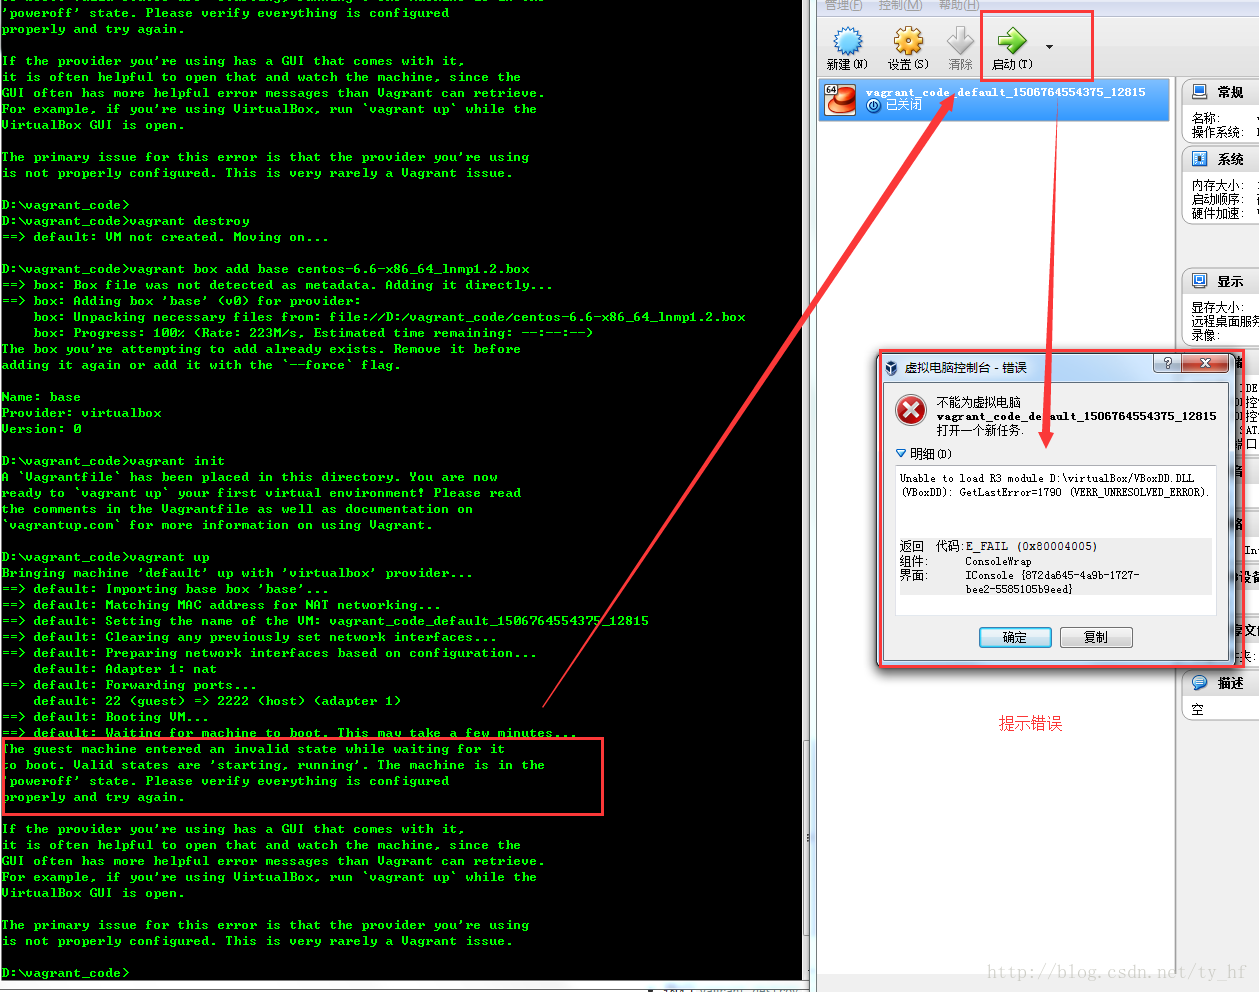
- The guest machine entered an invalid state while waiting for it
- to boot. Valid states are \'starting, running\'. The machine is in the
- \'poweroff\' state. Please verify everything is configured
- properly and try again.
- If the provider you\'re using has a GUI that comes with it,
- it is often helpful to open that and watch the machine, since the
- GUI often has more helpful error messages than Vagrant can retrieve.
- For example, if you\'re using VirtualBox, run `vagrant up` while the
- VirtualBox GUI is open.
- The primary issue for this error is that the provider you\'re using
- is not properly configured. This is very rarely a Vagrant issue.
- Unable to load R3 module D:\virtualBox/VBoxDD.DLL (VBoxDD): GetLastError=1790 (VERR_UNRESOLVED_ERROR).
- sudo rm -f /etc/udev/rules.d/70-persistent-net.rules
- vi /etc/hosts
3.问题 default: Warning: Authentication failure. Retrying...
- Bringing machine \'default\' up with \'virtualbox\' provider...
- ==> default: Clearing any previously set forwarded ports...
- ==> default: Clearing any previously set network interfaces...
- ==> default: Preparing network interfaces based on configuration...
- default: Adapter 1: nat
- default: Adapter 2: hostonly
- ==> default: Forwarding ports...
- default: 22 (guest) => 2222 (host) (adapter 1)
- ==> default: Booting VM...
- ==> default: Waiting for machine to boot. This may take a few minute
- default: SSH address: 127.0.0.1:2222
- default: SSH username: vagrant
- default: SSH auth method: private key
- default: Warning: Remote connection disconnect. Retrying...
- default: Warning: Authentication failure. Retrying...
- default: Warning: Authentication failure. Retrying...
- default: Warning: Authentication failure. Retrying...
- Timed out while waiting for the machine to boot. This means that
- Vagrant was unable to communicate with the guest machine within
- the configured ("config.vm.boot_timeout" value) time period.
- If you look above, you should be able to see the error(s) that
- Vagrant had when attempting to connect to the machine. These errors
- are usually good hints as to what may be wrong.
- If you\'re using a custom box, make sure that networking is properly
- working and you\'re able to connect to the machine. It is a common
- problem that networking isn\'t setup properly in these boxes.
- Verify that authentication configurations are also setup properly,
- as well.
- If the box appears to be booting properly, you may want to increase
- the timeout ("config.vm.boot_timeout") value.
解决:
- config.ssh.username = "vagrant"
- config.ssh.password = "vagrant"
- vagrant halt
- vagrant up
注意登陆的时候看下 vagrant ssh 看下你的登录信息,端口号
4.报错问题:
- Bringing machine \'default\' up with \'virtualbox\' provider...
- Your VM has become "inaccessible." Unfortunately, this is a critical error
- with VirtualBox that Vagrant can not cleanly recover from. Please open VirtualBox
- and clear out your inaccessible virtual machines or find a way to fix
- A Vagrant environment or target machine is required to run this
- command. Run vagrant init to create a new Vagrant environment. Or,
- get an ID of a target machine from vagrant global-status to run
- this command on. A final option is to change to a directory with a
- Vagrantfile and to try again.
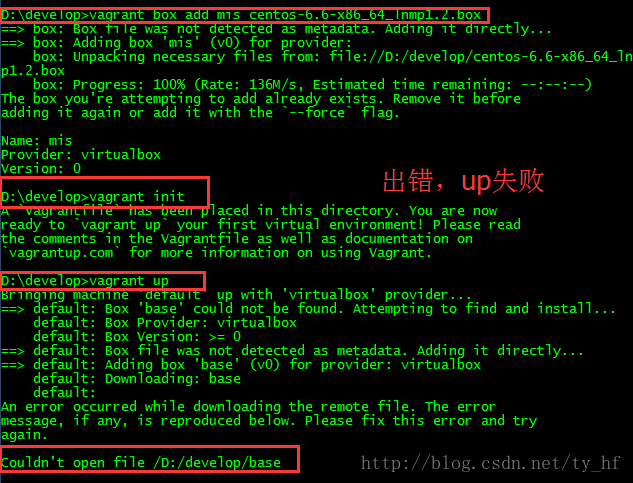
少前边步骤了,比如vagrant init;或者没有进入对应vagrant init的文件夹
- config.vm.provider :virtualbox do |vb|
- vb.customize ["modifyvm", :id, "--natdnshostresolver1", "on"]
- vb.customize ["modifyvm", :id, "--natdnsproxy1", "on"]
- D:\vcode>vagrant up
- Bringing machine \'default\' up with \'virtualbox\' provider...
- Your VM has become "inaccessible." Unfortunately, this is a critical error
- with VirtualBox that Vagrant can not cleanly recover from. Please open VirtualBo
- x
- and clear out your inaccessible virtual machines or find a way to fix
- them.
Token 认证的来龙去脉
为什么要用 Token?
而要回答这个问题很简单——因为它能解决问题! 可以解决哪些问题呢?
- Token 完全由应用管理,所以它可以避开同源策略
- Token 可以避免 CSRF 攻击
- Token 可以是无状态的,可以在多个服务间共享
Token 是在服务端产生的。如果前端使用用户名/密码向服务端请求认证,服务端认证成功,那么在服务端会返回 Token 给前端。前端可以在每次请求的时候带上 Token 证明自己的合法地位。如果这个 Token 在服务端持久化(比如存入数据库),那它就是一个永久的身份令牌。 于是,又一个问题产生了:需要为 Token 设置有效期吗?
需要设置有效期吗?
对于这个问题,我们不妨先看两个例子。一个例子是登录密码,一般要求定期改变密码,以防止泄漏,所以密码是有有效期的;另一个例子是安全证书。SSL 安全证书都有有效期,目的是为了解决吊销的问题,对于这个问题的详细情况,来看看知乎的回答。所以无论是从安全的角度考虑,还是从吊销的角度考虑,Token 都需要设有效期。 那么有效期多长合适呢? 只能说,根据系统的安全需要,尽可能的短,但也不能短得离谱——想像一下手机的自动熄屏时间,如果设置为 10 秒钟无操作自动熄屏,再次点亮需要输入密码,会不会疯?如果你觉得不会,那就亲自试一试,设置成可以设置的最短时间,坚持一周就好(不排除有人适应这个时间,毕竟手机厂商也是有用户体验研究的)。 然后新问题产生了,如果用户在正常操作的过程中,Token 过期失效了,要求用户重新登录……用户体验岂不是很糟糕? 为了解决在操作过程不能让用户感到 Token 失效这个问题,有一种方案是在服务器端保存 Token 状态,用户每次操作都会自动刷新(推迟) Token 的过期时间——Session 就是采用这种策略来保持用户登录状态的。然而仍然存在这样一个问题,在前后端分离、单页 App 这些情况下,每秒种可能发起很多次请求,每次都去刷新过期时间会产生非常大的代价。如果 Token 的过期时间被持久化到数据库或文件,代价就更大了。所以通常为了提升效率,减少消耗,会把 Token 的过期时保存在缓存或者内存中。 还有另一种方案,使用 Refresh Token,它可以避免频繁的读写操作。这种方案中,服务端不需要刷新 Token 的过期时间,一旦 Token 过期,就反馈给前端,前端使用 Refresh Token 申请一个全新 Token 继续使用。这种方案中,服务端只需要在客户端请求更新 Token 的时候对 Refresh Token 的有效性进行一次检查,大大减少了更新有效期的操作,也就避免了频繁读写。当然 Refresh Token 也是有有效期的,但是这个有效期就可以长一点了,比如,以天为单位的时间。
时序图表示
使用 Token 和 Refresh Token 的时序图如下:
1)登录

2)业务请求

3)Token 过期,刷新 Token
 上面的时序图中并未提到 Refresh Token 过期怎么办。不过很显然,Refresh Token 既然已经过期,就该要求用户重新登录了。 当然还可以把这个机制设计得更复杂一些,比如,Refresh Token 每次使用的时候,都更新它的过期时间,直到与它的创建时间相比,已经超过了非常长的一段时间(比如三个月),这等于是在相当长一段时间内允许 Refresh Token 自动续期。 到目前为止,Token 都是有状态的,即在服务端需要保存并记录相关属性。那说好的无状态呢,怎么实现?
无状态 Token
如果我们把所有状态信息都附加在 Token 上,服务器就可以不保存。但是服务端仍然需要认证 Token 有效。不过只要服务端能确认是自己签发的 Token,而且其信息未被改动过,那就可以认为 Token 有效——“签名”可以作此保证。平时常说的签名都存在一方签发,另一方验证的情况,所以要使用非对称加密算法。但是在这里,签发和验证都是同一方,所以对称加密算法就能达到要求,而对称算法比非对称算法要快得多(可达数十倍差距)。更进一步思考,对称加密算法除了加密,还带有还原加密内容的功能,而这一功能在对 Token 签名时并无必要——既然不需要解密,摘要(散列)算法就会更快。可以指定密码的散列算法,自然是 HMAC。 上面说了这么多,还需要自己去实现吗?不用!JWT 已经定义了详细的规范,而且有各种语言的若干实现。 不过在使用无状态 Token 的时候在服务端会有一些变化,服务端虽然不保存有效的 Token 了,却需要保存未到期却已注销的 Token。如果一个 Token 未到期就被用户主动注销,那么服务器需要保存这个被注销的 Token,以便下次收到使用这个仍在有效期内的 Token 时判其无效。有没有感到一点沮丧? 在前端可控的情况下(比如前端和服务端在同一个项目组内),可以协商:前端一但注销成功,就丢掉本地保存(比如保存在内存、LocalStorage 等)的 Token 和 Refresh Token。基于这样的约定,服务器就可以假设收到的 Token 一定是没注销的(因为注销之后前端就不会再使用了)。 如果前端不可控的情况,仍然可以进行上面的假设,但是这种情况下,需要尽量缩短 Token 的有效期,而且必须在用户主动注销的情况下让 Refresh Token 无效。这个操作存在一定的安全漏洞,因为用户会认为已经注销了,实际上在较短的一段时间内并没有注销。如果应用设计中,这点漏洞并不会造成什么损失,那采用这种策略就是可行的。 在使用无状态 Token 的时候,有两点需要注意:
- Refresh Token 有效时间较长,所以它应该在服务器端有状态,以增强安全性,确保用户注销时可控
- 应该考虑使用二次认证来增强敏感操作的安全性
到此,关于 Token 的话题似乎差不多了——然而并没有,上面说的只是认证服务和业务服务集成在一起的情况,如果是分离的情况呢?
分离认证服务
当 Token 无状态之后,单点登录就变得容易了。前端拿到一个有效的 Token,它就可以在任何同一体系的服务上认证通过——只要它们使用同样的密钥和算法来认证 Token 的有效性。就样这样:  当然,如果 Token 过期了,前端仍然需要去认证服务更新 Token:
  可见,虽然认证和业务分离了,实际即并没产生多大的差异。当然,这是建立在认证服务器信任业务服务器的前提下,因为认证服务器产生 Token 的密钥和业务服务器认证 Token 的密钥和算法相同。换句话说,业务服务器同样可以创建有效的 Token。 如果业务服务器不能被信任,该怎么办?
不受信的业务服务器
遇到不受信的业务服务器时,很容易想到的办法是使用不同的密钥。认证服务器使用密钥1签发,业务服务器使用密钥2验证——这是典型非对称加密签名的应用场景。认证服务器自己使用私钥对 Token 签名,公开公钥。信任这个认证服务器的业务服务器保存公钥,用于验证签名。幸好,JWT 不仅可以使用 HMAC 签名,也可以使用 RSA(一种非对称加密算法)签名。 不过,当业务服务器已经不受信任的时候,多个业务服务器之间使用相同的 Token 对用户来说是不安全的。因为任何一个服务器拿到 Token 都可以仿冒用户去另一个服务器处理业务……悲剧随时可能发生。 为了防止这种情况发生,就需要在认证服务器产生 Token 的时候,把使用该 Token 的业务服务器的信息记录在 Token 中,这样当另一个业务服务器拿到这个 Token 的时候,发现它并不是自己应该验证的 Token,就可以直接拒绝。 现在,认证服务器不信任业务服务器,业务服务器相互也不信任,但前端是信任这些服务器的——如果前端不信任,就不会拿 Token 去请求验证。那么为什么会信任?可能是因为这些是同一家公司或者同一个项目中提供的若干服务构成的服务体系。 但是,前端信任不代表用户信任。如果 Token 不没有携带用户隐私(比如姓名),那么用户不会关心信任问题。但如果 Token 含有用户隐私的时候,用户得关心信任问题了。这时候认证服务就不得不再啰嗦一些,当用户请求 Token 的时候,问上一句,你真的要授权给某某某业务服务吗?而这个“某某某”,用户怎么知道它是不是真的“某某某”呢?用户当然不知道,甚至认证服务也不知道,因为公钥已经公开了,任何一个业务都可以声明自己是“某某某”。 为了得到用户的信任,认证服务就不得不帮助用户来甄别业务服务。所以,认证服器决定不公开公钥,而是要求业务服务先申请注册并通过审核。只有通过审核的业务服务器才能得到认证服务为它创建的,仅供它使用的公钥。如果该业务服务泄漏公钥带来风险,由该业务服务自行承担。现在认证服务可以清楚的告诉用户,“某某某”服务是什么了。如果用户还是不够信任,认证服务甚至可以问,某某某业务服务需要请求 A、B、C 三项个人数据,其中 A 是必须的,不然它不工作,是否允许授权?如果你授权,我就把你授权的几项数据加密放在 Token 中…… 废话了这么多,有没有似曾相识……对了,这类似开放式 API 的认证过程。开发式 API 多采用 OAuth 认证,而关于 OAuth 的探讨资源非常丰富,这里就不深究了。
Tutorial: Creating a Simple REST API
Tutorial: Creating a Simple REST API
In this tutorial, we will explain how to create a simple application that provides a RESTful API using the different HTTP methods:
GETto retrieve and search dataPOSTto add dataPUTto update dataDELETEto delete data
Defining the API
The API consists of the following methods:
| Method | URL | Action |
|---|---|---|
GET |
/api/robots | Retrieves all robots |
GET |
/api/robots/search/Astro | Searches for robots with 'Astro' in their name |
GET |
/api/robots/2 | Retrieves robots based on primary key |
POST |
/api/robots | Adds a new robot |
PUT |
/api/robots/2 | Updates robots based on primary key |
DELETE |
/api/robots/2 | Deletes robots based on primary key |
Creating the Application
As the application is so simple, we will not implement any full MVC environment to develop it. In this case, we will use a micro application to meet our goal.
The following file structure is more than enough:
my-rest-api/
    models/
        Robots.php
    index.php
    .htaccess
First, we need a .htaccess file that contains all the rules to rewrite the request URIs to the index.php file (application entry-point):
<IfModule mod_rewrite.c>
    RewriteEngine On
    RewriteCond %{REQUEST_FILENAME} !-f
    RewriteRule ^((?s).*)$ index.php?_url=/$1 [QSA,L]
</IfModule>
The bulk of our code will be placed in index.php. The file is created as follows:
<?php

use Phalcon\Mvc\Micro;

$app = new Micro();

// Define the routes here

$app->handle();
Now we will create the routes as we defined above:
<?php

use Phalcon\Mvc\Micro;

$app = new Micro();

// Retrieves all robots
$app->get(
    '/api/robots',
    function () {
        // Operation to fetch all the robots
    }
);

// Searches for robots with $name in their name
$app->get(
    '/api/robots/search/{name}',
    function ($name) {
        // Operation to fetch robot with name $name
    }
);

// Retrieves robots based on primary key
$app->get(
    '/api/robots/{id:[0-9]+}',
    function ($id) {
        // Operation to fetch robot with id $id
    }
);

// Adds a new robot
$app->post(
    '/api/robots',
    function () {
        // Operation to create a fresh robot
    }
);

// Updates robots based on primary key
$app->put(
    '/api/robots/{id:[0-9]+}',
    function ($id) {
        // Operation to update a robot with id $id
    }
);

// Deletes robots based on primary key
$app->delete(
    '/api/robots/{id:[0-9]+}',
    function ($id) {
        // Operation to delete the robot with id $id
    }
);

$app->handle();
Each route is defined with a method with the same name as the HTTP method, as first parameter we pass a route pattern, followed by a handler. In this case, the handler is an anonymous function. The following route: /api/robots/{id:[0-9]+}, by example, explicitly sets that the id parameter must have a numeric format.
When a defined route matches the requested URI then the application executes the corresponding handler.
Creating a Model
Our API provides information about robots, these data are stored in a database. The following model allows us to access that table in an object-oriented way. We have implemented some business rules using built-in validators and simple validations. Doing this will give us the peace of mind that saved data meet the requirements of our application. This model file should be placed in your Models folder.
<?php

namespace Store\Toys;

use Phalcon\Mvc\Model;
use Phalcon\Mvc\Model\Message;
use Phalcon\Mvc\Model\Validator\Uniqueness;
use Phalcon\Mvc\Model\Validator\InclusionIn;

class Robots extends Model
{
    public function validation()
    {
        // Type must be: droid, mechanical or virtual
        $this->validate(
            new InclusionIn(
                [
                    'field'  => 'type',
                    'domain' => [
                        'droid',
                        'mechanical',
                        'virtual',
                    ],
                ]
            )
        );

        // Robot name must be unique
        $this->validate(
            new Uniqueness(
                [
                    'field'   => 'name',
                    'message' => 'The robot name must be unique',
                ]
            )
        );

        // Year cannot be less than zero
        if ($this->year < 0) {
            $this->appendMessage(
                new Message('The year cannot be less than zero')
            );
        }

        // Check if any messages have been produced
        if ($this->validationHasFailed() === true) {
            return false;
        }
    }
}
Now, we must set up a connection to be used by this model and load it within our app [File: index.php]:
<?php

use Phalcon\Loader;
use Phalcon\Mvc\Micro;
use Phalcon\Di\FactoryDefault;
use Phalcon\Db\Adapter\Pdo\Mysql as PdoMysql;

// Use Loader() to autoload our model
$loader = new Loader();

$loader->registerNamespaces(
    [
        'Store\Toys' => __DIR__ . '/models/',
    ]
);

$loader->register();

$di = new FactoryDefault();

// Set up the database service
$di->set(
    'db',
    function () {
        return new PdoMysql(
            [
                'host'     => 'localhost',
                'username' => 'asimov',
                'password' => 'zeroth',
                'dbname'   => 'robotics',
            ]
        );
    }
);

// Create and bind the DI to the application
$app = new Micro($di);
Retrieving Data
The first handler that we will implement is which by method GET returns all available robots. Let's use PHQL to perform this simple query returning the results as JSON. [File: index.php]
<?php

// Retrieves all robots
$app->get(
    '/api/robots',
    function () use ($app) {
        $phql = 'SELECT * FROM Store\Toys\Robots ORDER BY name';

        $robots = $app->modelsManager->executeQuery($phql);

        $data = [];

        foreach ($robots as $robot) {
            $data[] = [
                'id'   => $robot->id,
                'name' => $robot->name,
            ];
        }

        echo json_encode($data);
    }
);PHQL, allow us to write queries using a high-level, object-oriented SQL dialect that internally translates to the right SQL statements depending on the database system we are using. The clause use in the anonymous function allows us to pass some variables from the global to local scope easily.
The searching by name handler would look like [File: index.php]:
<?php

// Searches for robots with $name in their name
$app->get(
    '/api/robots/search/{name}',
    function ($name) use ($app) {
        $phql = 'SELECT * FROM Store\Toys\Robots WHERE name LIKE :name: ORDER BY name';

        $robots = $app->modelsManager->executeQuery(
            $phql,
            [
                'name' => '%' . $name . '%'
            ]
        );

        $data = [];

        foreach ($robots as $robot) {
            $data[] = [
                'id'   => $robot->id,
                'name' => $robot->name,
            ];
        }

        echo json_encode($data);
    }
);
Searching by the field id it's quite similar, in this case, we're also notifying if the robot was found or not [File: index.php]:
<?php

use Phalcon\Http\Response;

// Retrieves robots based on primary key
$app->get(
    '/api/robots/{id:[0-9]+}',
    function ($id) use ($app) {
        $phql = 'SELECT * FROM Store\Toys\Robots WHERE id = :id:';

        $robot = $app->modelsManager->executeQuery(
            $phql,
            [
                'id' => $id,
            ]
        )->getFirst();

        // Create a response
        $response = new Response();

        if ($robot === false) {
            $response->setJsonContent(
                [
                    'status' => 'NOT-FOUND'
                ]
            );
        } else {
            $response->setJsonContent(
                [
                    'status' => 'FOUND',
                    'data'   => [
                        'id'   => $robot->id,
                        'name' => $robot->name
                    ]
                ]
            );
        }

        return $response;
    }
);
Inserting Data
Taking the data as a JSON string inserted in the body of the request, we also use PHQL for insertion [File: index.php]:
<?php

use Phalcon\Http\Response;

// Adds a new robot
$app->post(
    '/api/robots',
    function () use ($app) {
        $robot = $app->request->getJsonRawBody();

        $phql = 'INSERT INTO Store\Toys\Robots (name, type, year) VALUES (:name:, :type:, :year:)';

        $status = $app->modelsManager->executeQuery(
            $phql,
            [
                'name' => $robot->name,
                'type' => $robot->type,
                'year' => $robot->year,
            ]
        );

        // Create a response
        $response = new Response();

        // Check if the insertion was successful
        if ($status->success() === true) {
            // Change the HTTP status
            $response->setStatusCode(201, 'Created');

            $robot->id = $status->getModel()->id;

            $response->setJsonContent(
                [
                    'status' => 'OK',
                    'data'   => $robot,
                ]
            );
        } else {
            // Change the HTTP status
            $response->setStatusCode(409, 'Conflict');

            // Send errors to the client
            $errors = [];

            foreach ($status->getMessages() as $message) {
                $errors[] = $message->getMessage();
            }

            $response->setJsonContent(
                [
                    'status'   => 'ERROR',
                    'messages' => $errors,
                ]
            );
        }

        return $response;
    }
);
Updating Data
The data update is similar to insertion. The id passed as parameter indicates what robot must be updated [File: index.php]:
<?php

use Phalcon\Http\Response;

// Updates robots based on primary key
$app->put(
    '/api/robots/{id:[0-9]+}',
    function ($id) use ($app) {
        $robot = $app->request->getJsonRawBody();

        $phql = 'UPDATE Store\Toys\Robots SET name = :name:, type = :type:, year = :year: WHERE id = :id:';

        $status = $app->modelsManager->executeQuery(
            $phql,
            [
                'id'   => $id,
                'name' => $robot->name,
                'type' => $robot->type,
                'year' => $robot->year,
            ]
        );

        // Create a response
        $response = new Response();

        // Check if the insertion was successful
        if ($status->success() === true) {
            $response->setJsonContent(
                [
                    'status' => 'OK'
                ]
            );
        } else {
            // Change the HTTP status
            $response->setStatusCode(409, 'Conflict');

            $errors = [];

            foreach ($status->getMessages() as $message) {
                $errors[] = $message->getMessage();
            }

            $response->setJsonContent(
                [
                    'status'   => 'ERROR',
                    'messages' => $errors,
                ]
            );
        }

        return $response;
    }
);
Deleting Data
The data delete is similar to update. The id passed as parameter indicates what robot must be deleted [File: index.php]:
<?php

use Phalcon\Http\Response;

// Deletes robots based on primary key
$app->delete(
    '/api/robots/{id:[0-9]+}',
    function ($id) use ($app) {
        $phql = 'DELETE FROM Store\Toys\Robots WHERE id = :id:';

        $status = $app->modelsManager->executeQuery(
            $phql,
            [
                'id' => $id,
            ]
        );

        // Create a response
        $response = new Response();

        if ($status->success() === true) {
            $response->setJsonContent(
                [
                    'status' => 'OK'
                ]
            );
        } else {
            // Change the HTTP status
            $response->setStatusCode(409, 'Conflict');

            $errors = [];

            foreach ($status->getMessages() as $message) {
                $errors[] = $message->getMessage();
            }

            $response->setJsonContent(
                [
                    'status'   => 'ERROR',
                    'messages' => $errors,
                ]
            );
        }

        return $response;
    }
);
Testing our Application
Using curl we'll test every route in our application verifying its proper operation.
Obtain all the robots:
curl -i -X GET http://localhost/my-rest-api/api/robots

HTTP/1.1 200 OK
Date: Tue, 21 Jul 2015 07:05:13 GMT
Server: Apache/2.2.22 (Unix) DAV/2
Content-Length: 117
Content-Type: text/html; charset=UTF-8

[{"id":"1","name":"Robotina"},{"id":"2","name":"Astro Boy"},{"id":"3","name":"Terminator"}]
Search a robot by its name:
curl -i -X GET http://localhost/my-rest-api/api/robots/search/Astro

HTTP/1.1 200 OK
Date: Tue, 21 Jul 2015 07:09:23 GMT
Server: Apache/2.2.22 (Unix) DAV/2
Content-Length: 31
Content-Type: text/html; charset=UTF-8

[{"id":"2","name":"Astro Boy"}]
Obtain a robot by its id:
curl -i -X GET http://localhost/my-rest-api/api/robots/3

HTTP/1.1 200 OK
Date: Tue, 21 Jul 2015 07:12:18 GMT
Server: Apache/2.2.22 (Unix) DAV/2
Content-Length: 56
Content-Type: text/html; charset=UTF-8

{"status":"FOUND","data":{"id":"3","name":"Terminator"}}
Insert a new robot:
curl -i -X POST -d '{"name":"C-3PO","type":"droid","year":1977}'
    http://localhost/my-rest-api/api/robots

HTTP/1.1 201 Created
Date: Tue, 21 Jul 2015 07:15:09 GMT
Server: Apache/2.2.22 (Unix) DAV/2
Content-Length: 75
Content-Type: text/html; charset=UTF-8

{"status":"OK","data":{"name":"C-3PO","type":"droid","year":1977,"id":"4"}}
Try to insert a new robot with the name of an existing robot:
curl -i -X POST -d '{"name":"C-3PO","type":"droid","year":1977}'
    http://localhost/my-rest-api/api/robots

HTTP/1.1 409 Conflict
Date: Tue, 21 Jul 2015 07:18:28 GMT
Server: Apache/2.2.22 (Unix) DAV/2
Content-Length: 63
Content-Type: text/html; charset=UTF-8

{"status":"ERROR","messages":["The robot name must be unique"]}
Or update a robot with an unknown type:
curl -i -X PUT -d '{"name":"ASIMO","type":"humanoid","year":2000}'
    http://localhost/my-rest-api/api/robots/4

HTTP/1.1 409 Conflict
Date: Tue, 21 Jul 2015 08:48:01 GMT
Server: Apache/2.2.22 (Unix) DAV/2
Content-Length: 104
Content-Type: text/html; charset=UTF-8

{"status":"ERROR","messages":["Value of field 'type' must be part of
    list: droid, mechanical, virtual"]}
Finally, delete a robot:
curl -i -X DELETE http://localhost/my-rest-api/api/robots/4

HTTP/1.1 200 OK
Date: Tue, 21 Jul 2015 08:49:29 GMT
Server: Apache/2.2.22 (Unix) DAV/2
Content-Length: 15
Content-Type: text/html; charset=UTF-8

{"status":"OK"}
Conclusion
As we saw, developing a RESTful API with Phalcon is easy using micro applications and PHQL.
支持博主

关于邵珠庆博客
文章标签
记事邵珠庆博客
最近文章
最近评论
- 发表在《中国翻墙网民状况调查》
- 发表在《教你如何简单获取新浪微博短地址接口》
- 发表在《教你如何简单获取新浪微博短地址接口》
- 发表在《教你如何简单获取新浪微博短地址接口》
- 发表在《教你如何简单获取新浪微博短地址接口》
博客日历
| 一 | 二 | 三 | 四 | 五 | 六 | 日 |
|---|---|---|---|---|---|---|
| « 8月 | ||||||
| 1 | 2 | 3 | 4 | |||
| 5 | 6 | 7 | 8 | 9 | 10 | 11 |
| 12 | 13 | 14 | 15 | 16 | 17 | 18 |
| 19 | 20 | 21 | 22 | 23 | 24 | 25 |
| 26 | 27 | 28 | 29 | 30 | 31 | |
目录分类
文章归档
- 2025年8月 (2)
- 2022年9月 (1)
- 2022年8月 (3)
- 2022年7月 (1)
- 2022年3月 (1)
- 2021年10月 (3)
- 2021年1月 (1)
- 2020年4月 (3)
- 2020年3月 (3)
- 2020年2月 (2)
- 2020年1月 (3)
- 2019年12月 (2)
- 2019年11月 (3)
- 2019年10月 (2)
- 2019年9月 (2)
- 2019年8月 (4)
- 2019年7月 (2)
- 2019年6月 (2)
- 2019年5月 (2)
- 2019年4月 (3)
- 2019年3月 (2)
- 2019年2月 (3)
- 2019年1月 (2)
- 2018年12月 (2)
- 2018年11月 (2)
- 2018年10月 (3)
- 2018年9月 (2)
- 2018年8月 (2)
- 2018年7月 (1)
- 2018年6月 (2)
- 2018年5月 (3)
- 2018年4月 (2)
- 2018年3月 (6)
- 2018年2月 (7)
- 2018年1月 (3)
- 2017年11月 (2)
- 2017年10月 (2)
- 2017年9月 (5)
- 2017年8月 (4)
- 2017年7月 (8)
- 2017年6月 (5)
- 2017年5月 (14)
- 2017年4月 (8)
- 2017年3月 (5)
- 2017年2月 (2)
- 2017年1月 (1)
- 2016年12月 (1)
- 2016年11月 (5)
- 2016年10月 (3)
- 2016年9月 (2)
- 2016年8月 (1)
- 2016年7月 (2)
- 2016年6月 (2)
- 2016年5月 (5)
- 2016年4月 (5)
- 2016年3月 (2)
- 2016年2月 (1)
- 2016年1月 (2)
- 2015年12月 (2)
- 2015年11月 (1)
- 2015年10月 (3)
- 2015年9月 (2)
- 2015年8月 (4)
- 2015年7月 (5)
- 2015年6月 (6)
- 2015年5月 (3)
- 2015年4月 (8)
- 2015年3月 (6)
- 2015年2月 (4)
- 2015年1月 (5)
- 2014年12月 (2)
- 2014年11月 (5)
- 2014年10月 (5)
- 2014年9月 (1)
- 2014年8月 (2)
- 2014年7月 (4)
- 2014年6月 (1)
- 2014年5月 (9)
- 2014年4月 (5)
- 2014年3月 (1)
- 2014年2月 (1)
- 2014年1月 (5)
- 2013年12月 (4)
- 2013年11月 (12)
- 2013年10月 (6)
- 2013年9月 (7)
- 2013年8月 (8)
- 2013年7月 (15)
- 2013年6月 (9)
- 2013年5月 (12)
- 2013年4月 (8)
- 2013年3月 (11)
- 2013年2月 (9)
- 2013年1月 (21)
- 2012年12月 (8)
- 2012年11月 (7)
- 2012年10月 (19)
- 2012年9月 (16)
- 2012年8月 (13)
- 2012年7月 (10)
- 2012年6月 (11)
- 2012年5月 (11)
- 2012年4月 (8)
- 2012年3月 (8)
- 2012年2月 (11)
- 2012年1月 (8)
- 2011年12月 (18)
- 2011年11月 (32)
- 2011年10月 (17)
- 2011年9月 (18)
- 2011年8月 (11)
- 2011年7月 (55)
- 2011年6月 (1)
- 2011年5月 (4)
- 2011年4月 (2)
- 2011年3月 (1)
- 2011年1月 (3)
- 2010年12月 (1)
- 2010年11月 (6)
- 2010年9月 (5)
- 2010年8月 (2)
- 2010年7月 (3)
- 2010年6月 (7)
- 2010年5月 (3)
- 2010年4月 (4)
- 2010年3月 (8)
- 2010年2月 (2)
- 2010年1月 (2)
- 2009年12月 (2)
- 2009年11月 (1)
- 2009年10月 (1)
- 2009年8月 (1)
- 2009年7月 (2)
- 2009年5月 (1)
- 2009年4月 (1)
- 2009年3月 (1)
- 2009年2月 (1)
- 2009年1月 (1)
- 2008年12月 (1)
- 2008年11月 (2)
- 2008年10月 (1)
- 2008年8月 (5)
- 2008年7月 (2)
- 2008年6月 (1)
- 2008年5月 (3)
- 2008年4月 (11)
- 2008年3月 (1)
- 2008年2月 (1)
- 2008年1月 (1)
- 2007年12月 (1)
- 2007年11月 (3)
- 2007年10月 (1)
- 2007年9月 (1)
- 2007年8月 (1)
- 2007年7月 (1)
- 2007年6月 (1)
- 2007年5月 (1)
博客功能
京东好物
