CentOS 使用 Google Authenticator 登录验证
Google Authentication 项目 包含了多个手机平台的一次性验证码生成器的实现,以及一个可插拔的验证认证模块(PAM)。这些实现支持基于 HMAC 的一次性验证码(HOTP)算法(RFC 4226)和基于时间的一次性验证码(TOTP)算法(RFC 6238)。
下面将在 CentOS 上安装并使用 Google Authenticator 做登录的身份验证,当前系统的版本为
CentOS Linux release 7.2.1511 (Core)
安装 Google Authenticator PAM module
-
确保
ntpd已安装并正常运行运行yum install -y ntpdate systemctl start ntpd systemctl enable ntpdntpdate是用来自动同步时间的程序,这里启动它并设置它开机自动启动。 -
安装一些接下去会用到的组件
yum install -y git make gcc libtool pam-devel -
编译安装 Google Authenticator PAM module
git clone https://github.com/google/google-authenticator
cd google-authenticator/libpam
./bootstrap.sh
./configure
make
make install
ln -s /usr/local/lib/security/pam_google_authenticator.so /usr/lib64/security/
配置 SSH 服务
打开 /etc/ssh/sshd_config 文件
vim /etc/ssh/sshd_config
修改下面字段的配置
ChallengeResponseAuthentication yes
PasswordAuthentication no
PubkeyAuthentication yes
UsePAM yes
然后重启一下 sshd 服务,使配置生效
systemctl restart sshd
这里将 PubkeyAuthentication 配置成了 yes 表示支持公钥验证登录,即使某个账号启用了 Google Authenticator 验证,只要登录者机器的公钥在这个账号的授权下,就可以不输入密码和 Google Authenticator 的认证码直接登录。
配置 PAM
打开 /etc/pam.d/sshd 文件
vim /etc/pam.d/sshd
这里分四种情况来配置
-
验证密码和认证码,没有启用 Google Authenticator 服务的账号只验证密码(推荐)
auth substack password-auth #... auth required pam_google_authenticator.so nullokpassword-auth与pam_google_authenticator的先后顺序决定了先输入密码还是先输入认证码。 -
验证密码和认证码,没有启用 Google Authenticator 服务的账号无法使用密码登录
auth substack password-auth #... auth required pam_google_authenticator.so -
只验证认证码,不验证密码,没有启用 Google Authenticator 服务的账号不用输入密码直接可以成功登录
#auth substack password-auth
#...
auth required pam_google_authenticator.so nullok
注释掉
auth substack password-auth配置就不会再验证账号密码了。 -
只验证认证码,不验证密码,没有启用 Google Authenticator 服务的账号无法使用密码登录
#auth substack password-auth
#...
auth required pam_google_authenticator.so
启用 Google Authenticator
切换至想要使用 Google Authenticator 来做登录验证的账号,执行下面操作
google-authenticator
然后会出现下面一系列交互式的对话做对应的设置
Do you want authentication tokens to be time-based (y/n) y
https://www.google.com/chart?chs=200x200&chld=M|0&cht=qr&chl=otpauth://totp/shenyu@shenyu.me%3Fsecret%3DKHMH46EWI2RIRZ53KQTNGHXNP4%26issuer%3Dshenyu.me
# 这里是个二维码
Your new secret key is: KHMH46EWI2RIRZ53KQTNGHXNP4
Your verification code is 753579
Your emergency scratch codes are:
  99181037
  68865807
  88385439
  59103432
  81045035
这里会显示一个二维码,如果你的终端终端不支持显示二维码,可以手动打开这个网页链接(墙)来查看二维码或者手动输入后面的密钥(secret key)来代替扫描二维码,之后的操作会用到这个二维码/密钥(secret key)。这里还有一个认证码(verifiction code),暂时不知道有什么用,以及 5 个紧急救助码(emergency scratch code),紧急救助码就是当你无法获取认证码时(比如手机丢了),可以当做认证码来用,每用一个少一个,但其实可以手动添加的,建议如果 root 账户使用 Google Authenticator 的话一定要把紧急救助码另外保存一份。
Do you want me to update your "/home/test/.google_authenticator" file? (y/n) y
是否更新用户的 Google Authenticator 配置文件,选择 y 才能使上面操作对当前用户生效,其实就是在对应用户的 Home 目录下生成了一个 .google_authenticator 文件,如果你想停用这个用户的 Google Authenticator 验证,只需要删除这个用户 Home 目录下的 .google_authenticator 文件就可以了。
Do you want to disallow multiple uses of the same authentication
token? This restricts you to one login about every 30s, but it increases
your chances to notice or even prevent man-in-the-middle attacks (y/n) y
每次生成的认证码是否同时只允许一个人使用?这里选择 y。
By default, tokens are good for 30 seconds. In order to compensate for
possible time-skew between the client and the server, we allow an extra
token before and after the current time. If you experience problems with
poor time synchronization, you can increase the window from its default
size of  -1min (window size of 3) to about  -4min (window size of
17 acceptable tokens).
Do you want to do so? (y/n) n
是否增加时间误差?这里选择 n。
If the computer that you are logging into isn\'t hardened against brute-force
login attempts, you can enable rate-limiting for the authentication module.
By default, this limits attackers to no more than 3 login attempts every 30s.
Do you want to enable rate-limiting (y/n) y
是否启用次数限制?这里选择 y,默认每 30 秒最多尝试登录 3 次。
上面交互式的设置也可用通过参数一次性设置(推荐)
google-authenticator -t -f -d -l shenyu@shenyu.me -i SHENYU.ME -r 3 -R 30 -W
可以看到,通过参数还可以自定义 发行商 和 标签,执行 google-authenticator -h 来查看所有的参数设置
google-authenticator []
-h, --help Print this message
-c, --counter-based Set up counter-based (HOTP) verification
-t, --time-based Set up time-based (TOTP) verification
-d, --disallow-reuse Disallow reuse of previously used TOTP tokens
-D, --allow-reuse Allow reuse of previously used TOTP tokens
-f, --force Write file without first confirming with user
-l, --label=设置 Google Authenticator 手机 App
在手机上下载并安装 Google Authenticator
| 手机类型 | App 程序名称 |
|---|---|
| IOS | Google Authenticator |
| Android | 谷歌动态口令(请在手机对应的应用商店里搜索下载) |
安装完后,打开 Google Authenticator/谷歌动态口令 App,点击 开始设置,选择 扫描条形码 扫描上面 google-authenticator 命令生成的二维码,然后手机上就能看到对应的认证码了。

这里的认证码每 30 秒变化一次,认证码上面的 SHENYU.ME 对应的是 google-authenticator 参数 -i 设置的发行商,认证码下面的 shenyu@shenyu.me 对应的是 google-authenticator 参数 -l设置的标签,如果你没有通过 google-authenticator 的参数设置发行商和标签,默认会使用系统的 hostname 来作为发行商,标签则则使用用户名和 hostname 的组合,格式为 username@hostname,标签其实是后期可以通过手机App来修改的,而发行商则修改不了。
现在重新使用 SSH 登录服务器,就会要求输入密码和 Verification code 来验证身份。如果登陆时遇到问题,请查看日志文件 /var/log/secure。
参考资料
CentOS安装crontab及使用方法
安装crontab:
[root@CentOS ~]# yum install vixie-cron
[root@CentOS ~]# yum install crontabs
说明:
vixie-cron软件包是cron的主程序;
crontabs软件包是用来安装、卸装、或列举用来驱动 cron 守护进程的表格的程序。
//+++++++++++++++++++++++++++++++++++
cron 是linux的内置服务,但它不自动起来,可以用以下的方法启动、关闭这个服务:
/sbin/service crond start //启动服务
/sbin/service crond stop //关闭服务
/sbin/service crond restart //重启服务
/sbin/service crond reload //重新载入配置
查看crontab服务状态:service crond status
手动启动crontab服务:service crond start
查看crontab服务是否已设置为开机启动,执行命令:ntsysv
加入开机自动启动:
chkconfig --level 35 crond on
一.
1.1 /etc/crontab
如:
[root@dave ~]# cat /etc/crontab
SHELL=/bin/bash
PATH=/sbin:/bin:/usr/sbin:/usr/bin
MAILTO=root
HOME=/
# run-parts
01 * * * * root run-parts /etc/cron.hourly
02 4 * * * root run-parts /etc/cron.daily
22 4 * * 0 root run-parts /etc/cron.weekly
42 4 1 * * root run-parts /etc/cron.monthly
1.2 /etc/cron.deny
/etc/cron.deny
/etc/cron.allow
如果两个文件同时存在,那么/etc/cron.allow
如果两个文件都不存在,那么只有超级用户可以安排作业。
每个用户都会生成一个自己的crontab
如:
[root@dave ~]# cd /var/spool/cron
[root@dave cron]# ls
oracle
我们直接查看这个文件,里面的内容和对应用户显示的crontab -l
[root@dave cron]# cat oracle
00 6 * * * /u02/scripts/del_st_archive.sh >/u02/scripts/del_st_arch.log 2>&1
[root@dave cron]# cat root
0 12 * * * /root/bin/sync-clock.sh
[root@dave cron]#
二.
2.1
usage:
帮助:
[root@dave ~]# man crontab
CRONTAB(1)
NAME
SYNOPSIS
DESCRIPTION
OPTIONS
SEE ALSO
FILES
STANDARDS
DIAGNOSTICS
AUTHOR
4th Berkeley Distribution
2.2
前5个字段分别表示:
还可以用一些特殊符号:
-:表示一个段,如第二端里:
一些示例:
00 8,12,16 * * * /data/app/scripts/monitor/df.sh
30 2 * * * /data/app/scripts/hotbackup/hot_database_backup.sh
10 8,12,16 * * * /data/app/scripts/monitor/check_ind_unusable.sh
10 8,12,16 * * * /data/app/scripts/monitor/check_maxfilesize.sh
10 8,12,16 * * * /data/app/scripts/monitor/check_objectsize.sh
43 21 * * * 21:43
15 05 * * *
0 17 * * * 17:00
0 17 * * 1
0,10 17 * * 0,2,3
0-10 17 1 * *
0 0 1,15 * 1
42 4 1 * *
0 21 * * 1-6
0,10,20,30,40,50 * * * * 每隔10分
*/10 * * * *
* 1 * * *
0 1 * * *
0 */1 * * *
0 * * * *
2 8-20/3 * * * 8:02,11:02,14:02,17:02,20:02
30 5 1,15 * *
2.3
2.4
先看一个例子:
0 2 * * * /u01/test.sh >/dev/null 2>&1 &
这句话的意思就是在后台执行这条命令,并将错误输出2重定向到标准输出1,然后将标准输出1全部放到/dev/null
在这里有有几个数字的意思:
我们也可以这样写:
0 2 * * * /u01/test.sh
0 2 * * * /u01/test.sh
0 2 * * * /u01/test.sh
0 2 * * * /u01/test.sh
将tesh.sh
2>&1
&1
&
测试:
ls 2>1
ls xxx 2>1:
ls xxx 2>&1:
ls xxx >out.txt 2>&1 == ls xxx 1>out.txt 2>&1;
2.5
如果改成:
Linux VPS CentOS 5 实例图解网站搭建
详细图文解说下linux vps CentOS 5 搭建wordpress网站:
1,从VPS服务商那里获得 IP(购买后服务商分配给你) 、SSH密码(VPS管理面板可以修改)、SSH名(基本都是root) ,确保你的VPS系统为 linux CentOS 5 32bit(也可以是64bit) ,其他系统请绕行。如果不是CentOS,进入VPS管理面板重新做系统;
2,本地电脑 安装 Xshell 4.0 SSH管理 :http://www.chinaz.com/web/2011/1026/216023.shtml ;然后进入 Xshell 4.0 在你的VPS上安装LNMP ,详情点击 :http://www.chinaz.com/web/2011/1026/216027.shtml;安装好后退出页面 Xshell 页面;
3.1,下载 WinSCP SSH客户端 ;安装到你的电脑上;
3.2,登陆 WinSCP SSH 客户端,如图所示:

3.3,在WinSCP下可清晰可见VPS服务器上所有安装的文件,下面是lnmp的常用文件夹说明:
默认网站文件夹 /home/wwwroot/ ,进入这个文件夹,里面就是你的网站所有文件了,里面包括安装lnmp时默认的 phpmyadmin 、ftp;
默认伪静态文件夹 /usr/local/nginx/conf/ ,已经有了Discuz、Wordpress、typecho、emlog等伪静态;
默认绑定的域名文件夹 /usr/local/nginx/conf/vhost/ , 这里是你添加绑定的所有域名地址;
默认MYSQL文件夹 /usr/local/mysql/var/ ,这里就是你所有建立的MYSQL文件了,当然你也可以用你的phpmyadmin 来管理它;
4.1,如果你已经完成了上面所有步骤,现在就来实例图文演示添加网站和管理。
譬如:
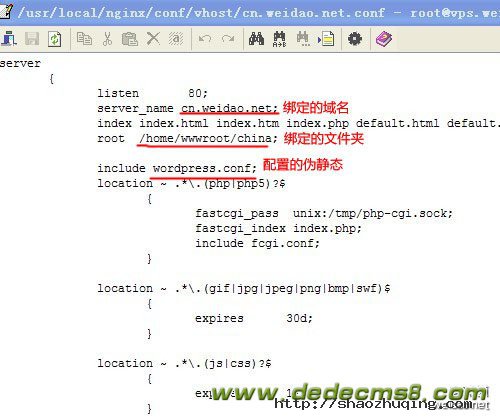
绑定的域名 cn.weidao.net
绑定的文件夹为 /home/wwwroot/china/
绑定域名时也添加了伪静态 /usr/local/nginx/conf/wordpress.conf
已经绑定域名列表 /usr/local/nginx/conf/vhost/ 里面有一个文件 cn.weidao.net.conf ,说明cn.weidao.net 已经绑定好了,双击打开确保添加域名时配置正确。

4.2,打开 http://你的IP/phpmyadmin/ 登陆,如图所示 新建一个MYSQL数据库;

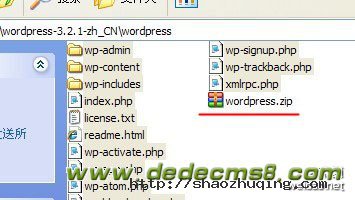
4.3,下载最新版本 wordpress 3.2.1 中文版 : http://cn.wordpress.org/wordpress-3.2.1-zh_CN.zip到本地上传至 VPS 域名绑定的文件夹里;
4.3.1,下载好 wordpress3.2.1 后,本地解压下,将 wordpress 文件夹下所有的文件用 ZIP 格式打包为 wordpress.zip ,然后用 WinSCP 上传至 VPS域名绑定的文件夹china里面, 如图所示:

4.3.2,右键上传好的文件,选择“自定义命令” – “输入(E)” 如图所示:
输入口令 unzip wordpress.zip 进行解压文件包;


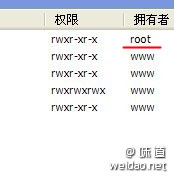
4.3.3,返回上一层,右键 china 文件夹,选择“自定义命令” – “输入(E)” 如图所示:
输入口令 chown www -R china 批量改变文件为 www 属性,不然网站无法安装,提示属性问题。

5,现在你可以打开你绑定的域名地址,进行安装wordpress了。
6,OK!收工!一个简单的Linux下VPS搭建的wordpress网站已经成功了。
支持博主

关于邵珠庆博客
文章标签
记事邵珠庆博客
最近文章
最近评论
- 发表在《中国翻墙网民状况调查》
- 发表在《教你如何简单获取新浪微博短地址接口》
- 发表在《教你如何简单获取新浪微博短地址接口》
- 发表在《教你如何简单获取新浪微博短地址接口》
- 发表在《教你如何简单获取新浪微博短地址接口》
博客日历
| 一 | 二 | 三 | 四 | 五 | 六 | 日 |
|---|---|---|---|---|---|---|
| « 8月 | ||||||
| 1 | 2 | 3 | 4 | 5 | 6 | 7 |
| 8 | 9 | 10 | 11 | 12 | 13 | 14 |
| 15 | 16 | 17 | 18 | 19 | 20 | 21 |
| 22 | 23 | 24 | 25 | 26 | 27 | 28 |
| 29 | 30 | 31 | ||||
目录分类
文章归档
- 2025年8月 (2)
- 2022年9月 (1)
- 2022年8月 (3)
- 2022年7月 (1)
- 2022年3月 (1)
- 2021年10月 (3)
- 2021年1月 (1)
- 2020年4月 (3)
- 2020年3月 (3)
- 2020年2月 (2)
- 2020年1月 (3)
- 2019年12月 (2)
- 2019年11月 (3)
- 2019年10月 (2)
- 2019年9月 (2)
- 2019年8月 (4)
- 2019年7月 (2)
- 2019年6月 (2)
- 2019年5月 (2)
- 2019年4月 (3)
- 2019年3月 (2)
- 2019年2月 (3)
- 2019年1月 (2)
- 2018年12月 (2)
- 2018年11月 (2)
- 2018年10月 (3)
- 2018年9月 (2)
- 2018年8月 (2)
- 2018年7月 (1)
- 2018年6月 (2)
- 2018年5月 (3)
- 2018年4月 (2)
- 2018年3月 (6)
- 2018年2月 (7)
- 2018年1月 (3)
- 2017年11月 (2)
- 2017年10月 (2)
- 2017年9月 (5)
- 2017年8月 (4)
- 2017年7月 (8)
- 2017年6月 (5)
- 2017年5月 (14)
- 2017年4月 (8)
- 2017年3月 (5)
- 2017年2月 (2)
- 2017年1月 (1)
- 2016年12月 (1)
- 2016年11月 (5)
- 2016年10月 (3)
- 2016年9月 (2)
- 2016年8月 (1)
- 2016年7月 (2)
- 2016年6月 (2)
- 2016年5月 (5)
- 2016年4月 (5)
- 2016年3月 (2)
- 2016年2月 (1)
- 2016年1月 (2)
- 2015年12月 (2)
- 2015年11月 (1)
- 2015年10月 (3)
- 2015年9月 (2)
- 2015年8月 (4)
- 2015年7月 (5)
- 2015年6月 (6)
- 2015年5月 (3)
- 2015年4月 (8)
- 2015年3月 (6)
- 2015年2月 (4)
- 2015年1月 (5)
- 2014年12月 (2)
- 2014年11月 (5)
- 2014年10月 (5)
- 2014年9月 (1)
- 2014年8月 (2)
- 2014年7月 (4)
- 2014年6月 (1)
- 2014年5月 (9)
- 2014年4月 (5)
- 2014年3月 (1)
- 2014年2月 (1)
- 2014年1月 (5)
- 2013年12月 (4)
- 2013年11月 (12)
- 2013年10月 (6)
- 2013年9月 (7)
- 2013年8月 (8)
- 2013年7月 (15)
- 2013年6月 (9)
- 2013年5月 (12)
- 2013年4月 (8)
- 2013年3月 (11)
- 2013年2月 (9)
- 2013年1月 (21)
- 2012年12月 (8)
- 2012年11月 (7)
- 2012年10月 (19)
- 2012年9月 (16)
- 2012年8月 (13)
- 2012年7月 (10)
- 2012年6月 (11)
- 2012年5月 (11)
- 2012年4月 (8)
- 2012年3月 (8)
- 2012年2月 (11)
- 2012年1月 (8)
- 2011年12月 (18)
- 2011年11月 (32)
- 2011年10月 (17)
- 2011年9月 (18)
- 2011年8月 (11)
- 2011年7月 (55)
- 2011年6月 (1)
- 2011年5月 (4)
- 2011年4月 (2)
- 2011年3月 (1)
- 2011年1月 (3)
- 2010年12月 (1)
- 2010年11月 (6)
- 2010年9月 (5)
- 2010年8月 (2)
- 2010年7月 (3)
- 2010年6月 (7)
- 2010年5月 (3)
- 2010年4月 (4)
- 2010年3月 (8)
- 2010年2月 (2)
- 2010年1月 (2)
- 2009年12月 (2)
- 2009年11月 (1)
- 2009年10月 (1)
- 2009年8月 (1)
- 2009年7月 (2)
- 2009年5月 (1)
- 2009年4月 (1)
- 2009年3月 (1)
- 2009年2月 (1)
- 2009年1月 (1)
- 2008年12月 (1)
- 2008年11月 (2)
- 2008年10月 (1)
- 2008年8月 (5)
- 2008年7月 (2)
- 2008年6月 (1)
- 2008年5月 (3)
- 2008年4月 (11)
- 2008年3月 (1)
- 2008年2月 (1)
- 2008年1月 (1)
- 2007年12月 (1)
- 2007年11月 (3)
- 2007年10月 (1)
- 2007年9月 (1)
- 2007年8月 (1)
- 2007年7月 (1)
- 2007年6月 (1)
- 2007年5月 (1)
博客功能
京东好物
