Vagrant-安装教程及常见问题


- vagrant up (启动虚拟机)
- vagrant halt (关闭虚拟机——对应就是关机)
- vagrant suspend (暂停虚拟机——只是暂停,虚拟机内存等信息将以状态文件的方式保存在本地,可以执行恢复操作后继续使用)
- vagrant resume (恢复虚拟机—— 与前面的暂停相对应)
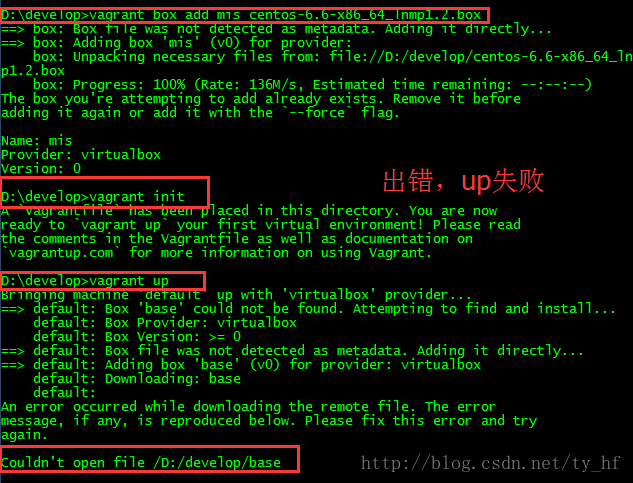
- vagrant destroy (删除虚拟机,删除后在当前虚拟机所做进行的除开Vagrantfile中的配置都不会保留)
在我们的开发目录下有一个文件Vagrantfile,里面包含有大量的配置信息,主要包括三个方面的配置,虚拟机的配置、SSH配置、Vagrant的一些基础配置。Vagrant是使用Ruby开发的,所以它的配置语法也是Ruby的,但是我们没有学过Ruby的人还是可以跟着它的注释知道怎么配置一些基本项的配置。
具体介绍,参考:http://blog.csdn.net/chajinglong/article/details/52805915
- # -*- mode: ruby -*-
- # vi: set ft=ruby :
- # All Vagrant configuration is done below. The "2" in Vagrant.configure
- # configures the configuration version (we support older styles for
- # backwards compatibility). Please don\'t change it unless you know what
- # you\'re doing.
- Vagrant.configure(2) do |config|
- # The most common configuration options are documented and commented below.
- # For a complete reference, please see the online documentation at
- # https://docs.vagrantup.com.
- # Every Vagrant development environment requires a box. You can search for
- # boxes at https://atlas.hashicorp.com/search.
- config.vm.box = "base"
- # Disable automatic box update checking. If you disable this, then
- # boxes will only be checked for updates when the user runs
- # `vagrant box outdated`. This is not recommended.
- # config.vm.box_check_update = false
- # Create a forwarded port mapping which allows access to a specific port
- # within the machine from a port on the host machine. In the example below,
- # accessing "localhost:8080" will access port 80 on the guest machine.
- # config.vm.network "forwarded_port", guest: 80, host: 80
- # Create a private network, which allows host-only access to the machine
- # using a specific IP.
- config.vm.network "private_network", ip: "192.168.33.10"
- # Create a public network, which generally matched to bridged network.
- # Bridged networks make the machine appear as another physical device on
- # your network.
- # config.vm.network "public_network"
- # Share an additional folder to the guest VM. The first argument is
- # the path on the host to the actual folder. The second argument is
- # the path on the guest to mount the folder. And the optional third
- # argument is a set of non-required options.
- config.vm.synced_folder "D:/all_code/", "/home/www"
- # Provider-specific configuration so you can fine-tune various
- # backing providers for Vagrant. These expose provider-specific options.
- # Example for VirtualBox:
- #
- # config.vm.provider "virtualbox" do |vb|
- # # Display the VirtualBox GUI when booting the machine
- # vb.gui = true
- #
- # # Customize the amount of memory on the VM:
- # vb.memory = "1024"
- # end
- #
- # View the documentation for the provider you are using for more
- # information on available options.
- # Define a Vagrant Push strategy for pushing to Atlas. Other push strategies
- # such as FTP and Heroku are also available. See the documentation at
- # https://docs.vagrantup.com/v2/push/atlas.html for more information.
- # config.push.define "atlas" do |push|
- # push.app = "YOUR_ATLAS_USERNAME/YOUR_APPLICATION_NAME"
- # end
- # Enable provisioning with a shell script. Additional provisioners such as
- # Puppet, Chef, Ansible, Salt, and Docker are also available. Please see the
- # documentation for more information about their specific syntax and use.
- # config.vm.provision "shell", inline: <
- # sudo apt-get update
- # sudo apt-get install -y apache2
- # SHELL
- end
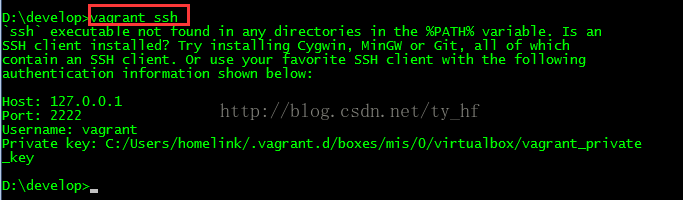
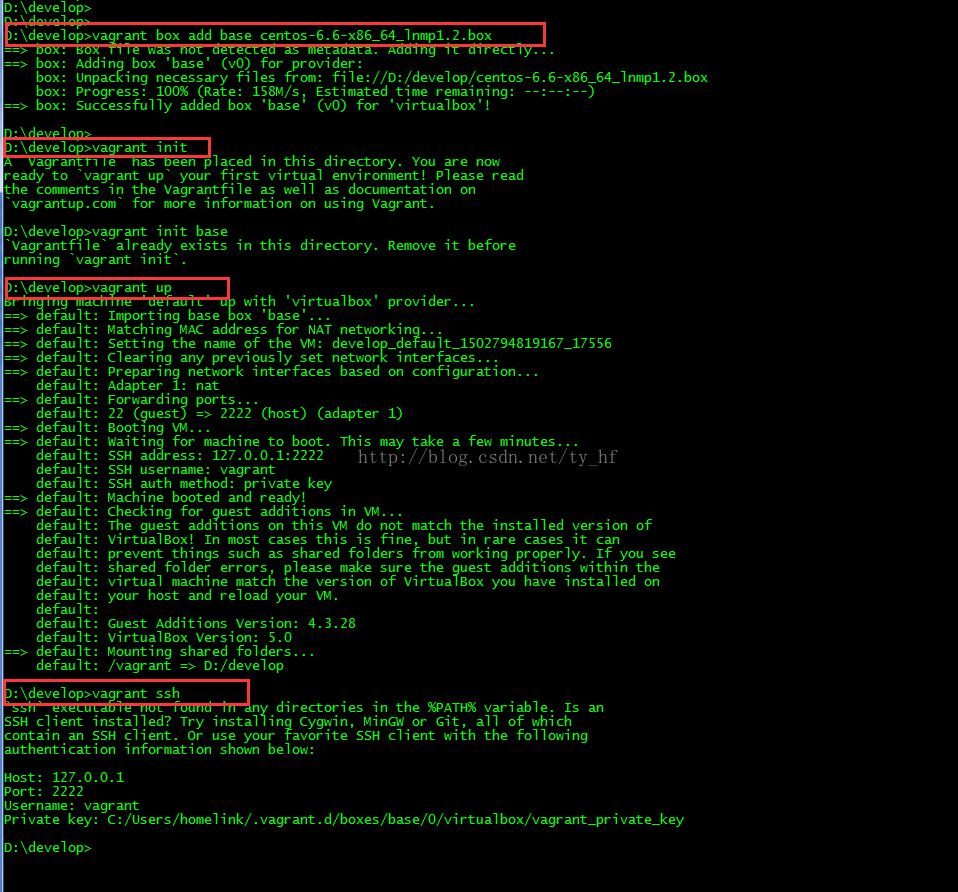
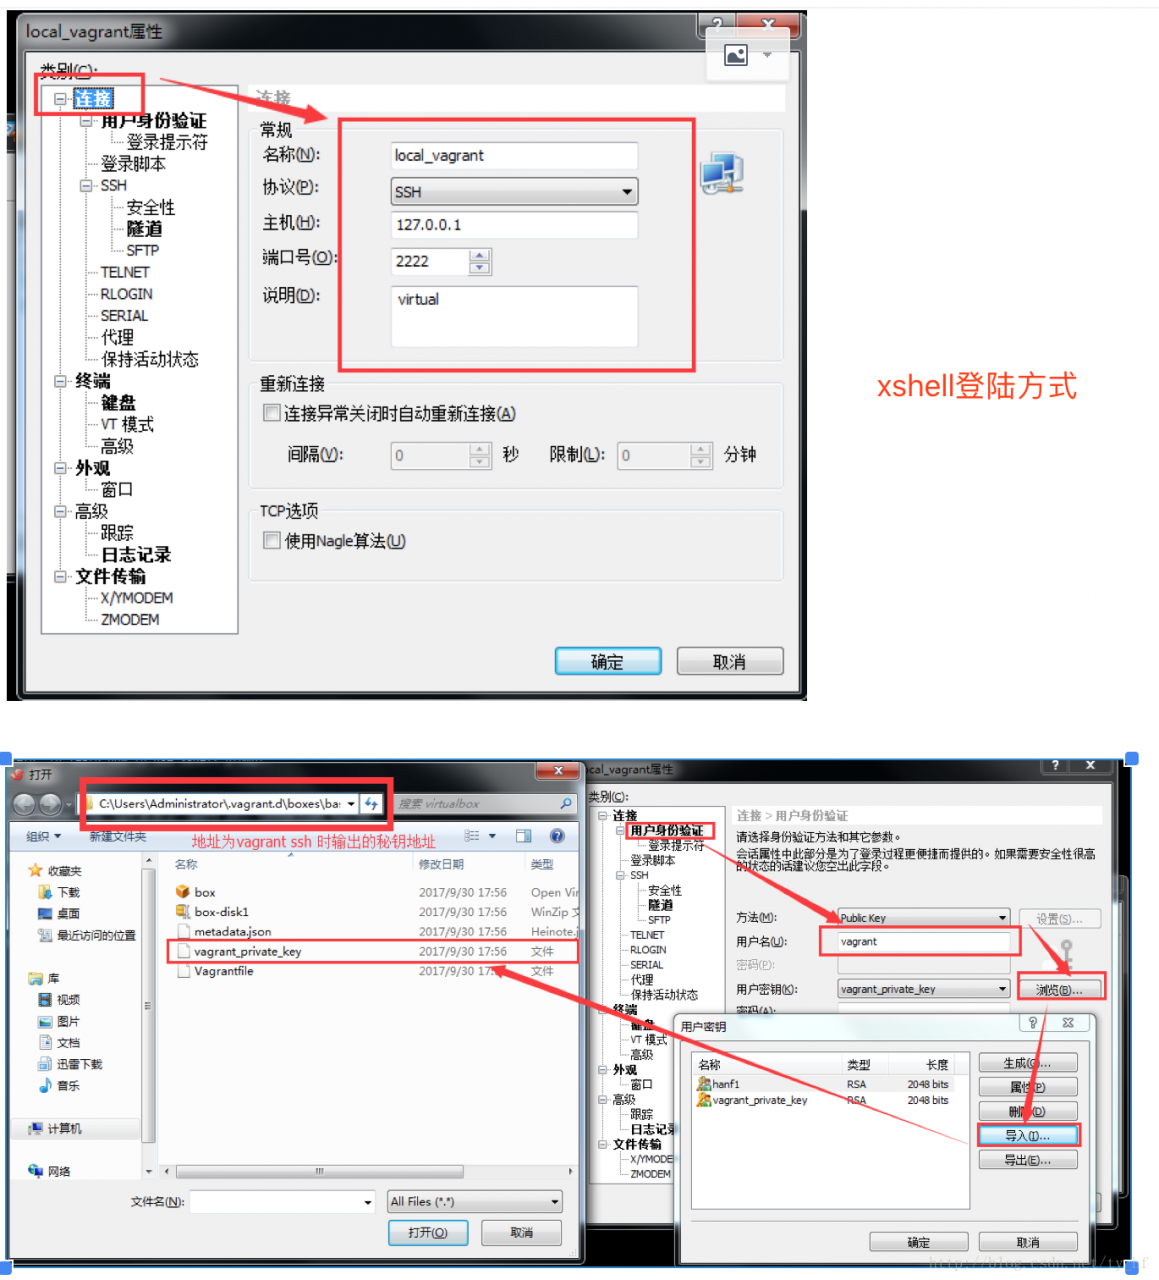
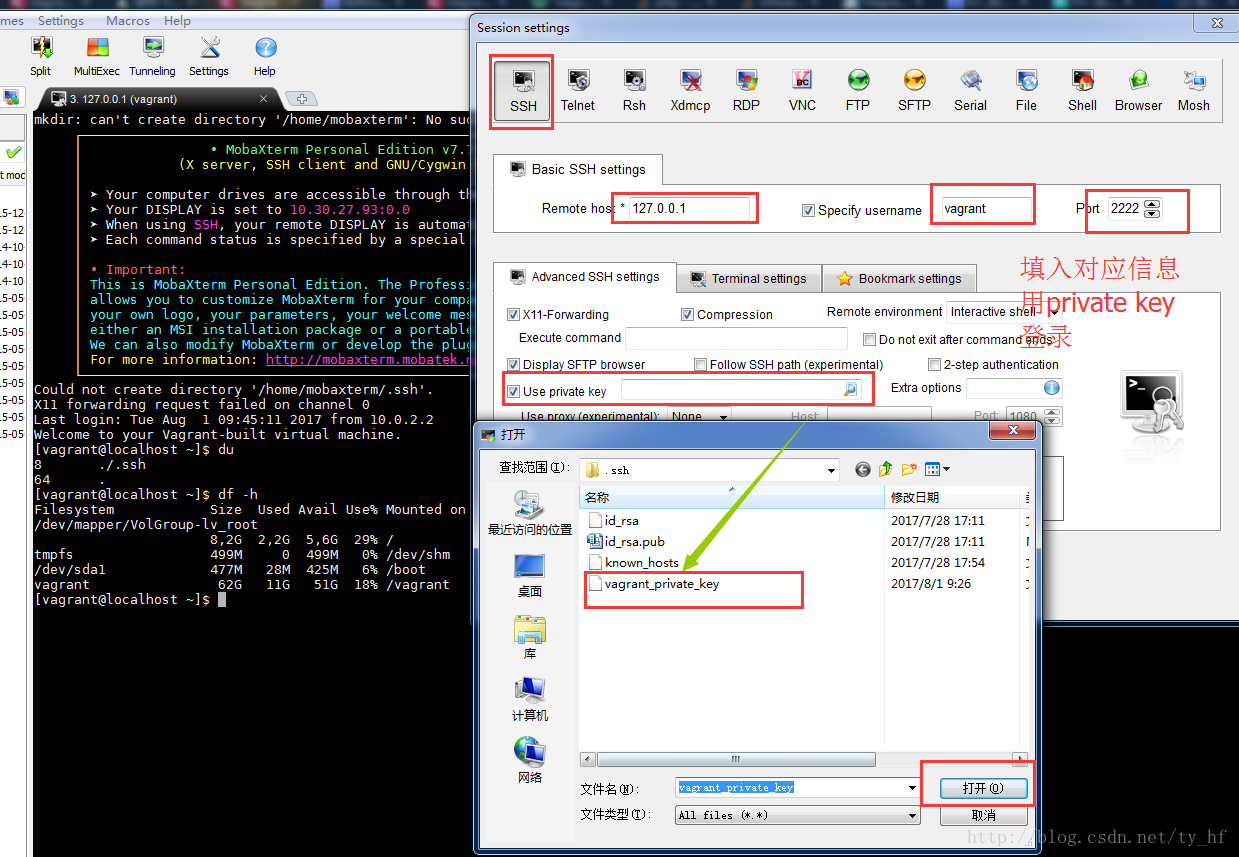
- ssh: 127.0.0.1
- 端口: 2222
- 用户名: vagrant
- 密码: vagrant

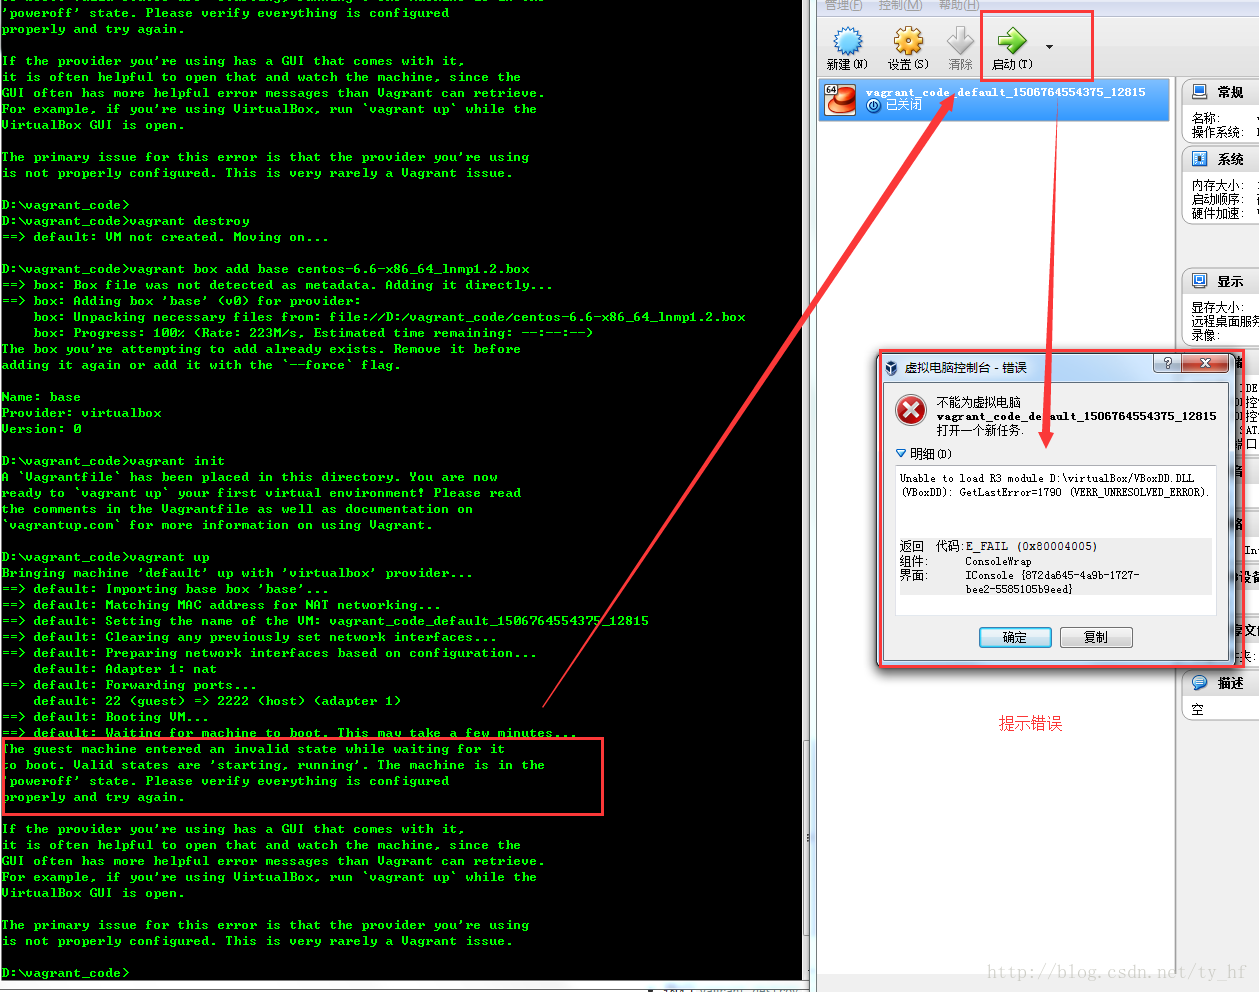
- The guest machine entered an invalid state while waiting for it
- to boot. Valid states are \'starting, running\'. The machine is in the
- \'poweroff\' state. Please verify everything is configured
- properly and try again.
- If the provider you\'re using has a GUI that comes with it,
- it is often helpful to open that and watch the machine, since the
- GUI often has more helpful error messages than Vagrant can retrieve.
- For example, if you\'re using VirtualBox, run `vagrant up` while the
- VirtualBox GUI is open.
- The primary issue for this error is that the provider you\'re using
- is not properly configured. This is very rarely a Vagrant issue.
- Unable to load R3 module D:\virtualBox/VBoxDD.DLL (VBoxDD): GetLastError=1790 (VERR_UNRESOLVED_ERROR).
- sudo rm -f /etc/udev/rules.d/70-persistent-net.rules
- vi /etc/hosts
3.问题 default: Warning: Authentication failure. Retrying...
- Bringing machine \'default\' up with \'virtualbox\' provider...
- ==> default: Clearing any previously set forwarded ports...
- ==> default: Clearing any previously set network interfaces...
- ==> default: Preparing network interfaces based on configuration...
- default: Adapter 1: nat
- default: Adapter 2: hostonly
- ==> default: Forwarding ports...
- default: 22 (guest) => 2222 (host) (adapter 1)
- ==> default: Booting VM...
- ==> default: Waiting for machine to boot. This may take a few minute
- default: SSH address: 127.0.0.1:2222
- default: SSH username: vagrant
- default: SSH auth method: private key
- default: Warning: Remote connection disconnect. Retrying...
- default: Warning: Authentication failure. Retrying...
- default: Warning: Authentication failure. Retrying...
- default: Warning: Authentication failure. Retrying...
- Timed out while waiting for the machine to boot. This means that
- Vagrant was unable to communicate with the guest machine within
- the configured ("config.vm.boot_timeout" value) time period.
- If you look above, you should be able to see the error(s) that
- Vagrant had when attempting to connect to the machine. These errors
- are usually good hints as to what may be wrong.
- If you\'re using a custom box, make sure that networking is properly
- working and you\'re able to connect to the machine. It is a common
- problem that networking isn\'t setup properly in these boxes.
- Verify that authentication configurations are also setup properly,
- as well.
- If the box appears to be booting properly, you may want to increase
- the timeout ("config.vm.boot_timeout") value.
解决:
- config.ssh.username = "vagrant"
- config.ssh.password = "vagrant"
- vagrant halt
- vagrant up
注意登陆的时候看下 vagrant ssh 看下你的登录信息,端口号
4.报错问题:
- Bringing machine \'default\' up with \'virtualbox\' provider...
- Your VM has become "inaccessible." Unfortunately, this is a critical error
- with VirtualBox that Vagrant can not cleanly recover from. Please open VirtualBox
- and clear out your inaccessible virtual machines or find a way to fix
- A Vagrant environment or target machine is required to run this
- command. Run vagrant init to create a new Vagrant environment. Or,
- get an ID of a target machine from vagrant global-status to run
- this command on. A final option is to change to a directory with a
- Vagrantfile and to try again.
少前边步骤了,比如vagrant init;或者没有进入对应vagrant init的文件夹
- config.vm.provider :virtualbox do |vb|
- vb.customize ["modifyvm", :id, "--natdnshostresolver1", "on"]
- vb.customize ["modifyvm", :id, "--natdnsproxy1", "on"]
- D:\vcode>vagrant up
- Bringing machine \'default\' up with \'virtualbox\' provider...
- Your VM has become "inaccessible." Unfortunately, this is a critical error
- with VirtualBox that Vagrant can not cleanly recover from. Please open VirtualBo
- x
- and clear out your inaccessible virtual machines or find a way to fix
- them.
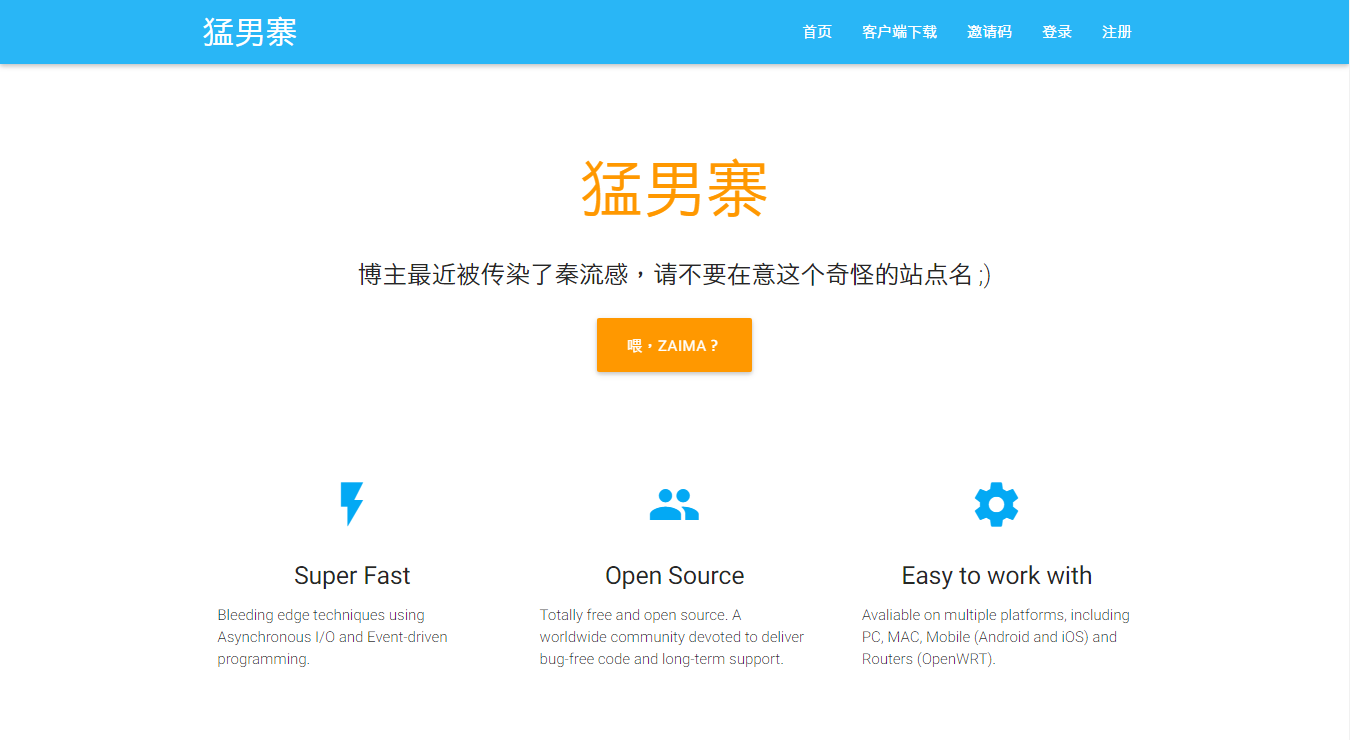
最好的 ss-panel 部署教程
续・为最好的 ss-panel 部署教程献上更新!
本文最后更新与 2016-02-08,更新内容详见博文底部。
今天折腾了好久 ss-panel,期间遇到了一些奇奇怪怪的问题,但是网上都没有好的解决方法。
网上那么多教程有些是写得笼统,有些还是瞎复制的。
由此萌生了想要写一篇配置 ss-panel 和 ss-manyuser 的教程,希望能够帮到需要的人。
注意,本教程 不是 图文并茂的面向小白的教程,窝希望你能够有足够的 linux 操作经验再来看这篇教程。
至少你需要熟悉 ssh 连接,熟悉 web 环境的配置,最好可以看得懂一些代码。
一、安装并配置 ss-panel
本教程打算先配置好前端,当然你想要先配置后端可以拉下去。
0x01 环境要求
作为前端的 ss-panel 是使用 PHP 编写的网页应用程序,它对你的主机运行环境有一定的要求。
- PHP 5.6 或更高
- MySQL 5.5 或更高
- 支持 URL 重写的 Web 服务器(Nginx / Apache 均可)
本教程所使用的环境是 NGINX + PHP 7 + MariaDB 10。
当然其他主流 LNMP/LAMP 架构都可以(个人推荐使用 OneinStack),确保你的站点可以访问后就继续吧。
什么?你不知道上面说的那些东西是什么?那你为什么不问问神奇海螺呢?
注意,接下来的操作大部分都是在【目标服务器】的 shell 中进行的。继续阅读之前,你需要通过 SSH 等工具连接至你的服务器,它一般长这样:

如果你不晓得这是什么,神奇海螺……以下略。
0x02 下载 ss-panel 源码
ss-panel 的 GitHub 项目地址:orvice/ss-panel
使用 cd 进入你站点的 web 根目录,从 git 上 clone 源码:
# 最前面的美元符号是命令提示符,别把这个给一起输进去了
$ git clone https://github.com/orvice/ss-panel.git
当然你也可以下载源码再用 SCP/FPS 传到服务器上去。
注意源码下载完成后的目录结构,请务必保证 /public 目录在站点的根目录下。
你可以使用 $ mv ss-panel/{.,}* ./ 命令将子目录的内容移动到当前目录来。正确的目录结构应该类似于这样:

0x03 配置 ss-panel
执行完上面的步骤之后,你兴高采烈地访问了你的站点,却得到了无情的 403 Forbidden —— 站点根目录下竟然没有 index.php!
好吧其实没什么好奇怪的,大部分 MVC 框架都将 index.php 的入口文件放到其他子目录下了,
这样做是为了保护根目录下的配置文件等可能会导致信息泄露的敏感文件无法被访问。
接下来请按照 官方文档的说明 正确配置你的 Web 服务器。正确配置后的 NGINX 配置应该长这样:

编辑完后重载你的 Web 服务器,然后访问你的站点……
于是你得到了一个 500 Internal Server Error(如果你没开启 display_errors 可能看不到详细报错):
Warning: require(/home/wwwroot/ss.prinzeugen.net/vendor/autoload.php): failed to open stream: No such file or directory in /home/wwwroot/ss.prinzeugen.net/bootstrap.php on line 18 Fatal error: require(): Failed opening required '/home/wwwroot/ss.prinzeugen.net/vendor/autoload.php' (include_path='.:/usr/local/php/lib/php') in /home/wwwroot/ss.prinzeugen.net/bootstrap.php on line 18
这是我们还未安装 ss-panel 所需的依赖库导致的。遂安装之:
$ curl -sS https://getcomposer.org/installer | php $ php composer.phar install

等待它安装完毕后接着进行配置:
$ cp .env.example .env
将 .env.example 复制一份重命名为 .env,自行修改其中的数据库等信息。
# database 数据库配置
db_driver = 'mysql'
db_host = 'localhost'
db_port = '3306'
db_database = 'ss-panel'
db_username = 'ss-panel'
db_password = 'secret'
db_charset = 'utf8'
db_collation = 'utf8_general_ci'
db_prefix = ''
数据库的创建我就不多说了,建站的一般都玩过数据库吧?
将根目录下的 db.sql 导入到数据库中即可。其他配置自行修改。

你还需要修改 .env 中的 muKey 字段,修改为任意字符串(最好只包含 ASCII 字符),
下面配置后端的时候我们需要使用到这个 muKey:
muKey = 'api_key_just_for_test'
接下来,确保 storage 目录可写入(否则 Smarty 会报错):
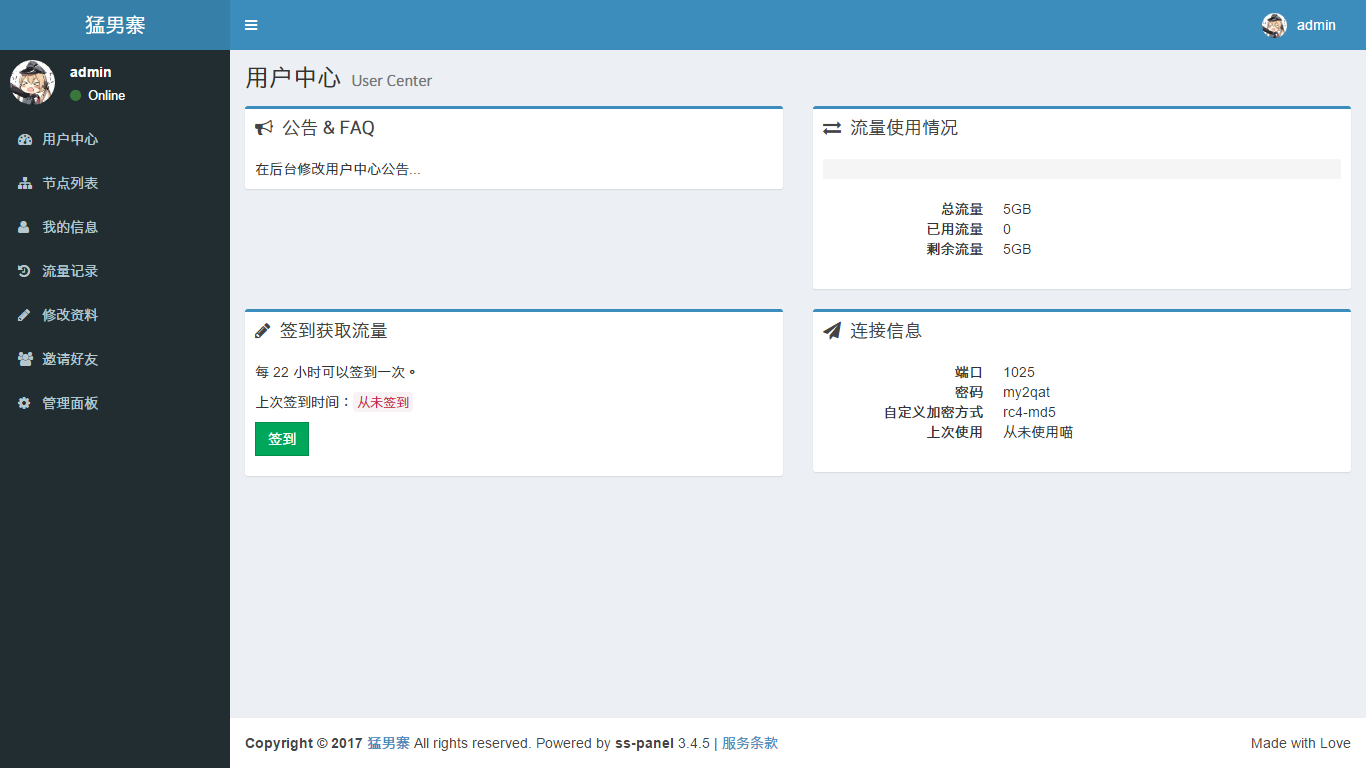
$ chown -R www storage 现在访问你的站点,就可以看到 ss-panel 的首页啦:
0x03 进入 ss-panel 后台 现在访问 http://your-domain/admin 就可以进入 ss-panel 后台了。
不过细心的你可能会注意到,刚才导入数据表的时候,user 表并没有添加记录,那要咋进管理后台呢?
当然你可以在数据库中手动加一条记录,不过作者已经提供了一个更方便的方式:
$ php xcat createAdmin 在站点根目录下运行,根据提示即可创建管理员账号 (这个文字对齐真鸡儿 shi):

使用刚才填写的邮箱和密码进入后台:
到这里,作为前端的 ss-panel 就已经配置完成了。下面开始部署作为后端的 shadowsocks-manyuser。
二、部署并配置 shadowsocks-manyuser
在本篇教程中我们使用 fsgmhoward/shadowsocks-py-mu 这个版本的后端。
不同于这篇教程原先推荐的 @mengskysama 版本,这个后端支持使用 MultiUser API 与前端的 ss-panel 进行用户信息交互。
这个 API 的官方介绍在这里。简单来讲,如果你通过 API 来与前端通信,你就不需要修改后端的数据库配置了,
并且可以使用「自定义加密」、「流量记录」等高级功能。
下面我只介绍使用 API 的方法,另外那个比较麻烦的方法可以在这里查看。
0x01 安装 shadowsocks-manyuser
先将代码 clone 到本地:
$ git clone https://github.com/fsgmhoward/shadowsocks-py-mu.git 源码 clone 后,
你的目录结构应该是这样的:

其中的 shadowsocks 子目录才是我们需要的,外面的是 setup.py 的相关文件。
0x02 配置 shadowsocks-manyuser
进入 shadowsocks 目录,将 config_example.py 复制一份到 config.py:
$ cp config_example.py config.py
修改其中第 15 行和第 29~31 行的内容:
# 启用 MultiUser API API_ENABLED = True
# 就是在你的站点地址后面加个 /mu
API_URL = 'http://ss.prinzeugen.net/mu'
# 还记得上面在 .env 中填写的 muKey 吗?把它填在这里
API_PASS = 'api_key_just_for_test'
由于我们选择使用 Mu API 来与前端通信,所以我们不需要修改 config.py 中任何关于数据库的配置。
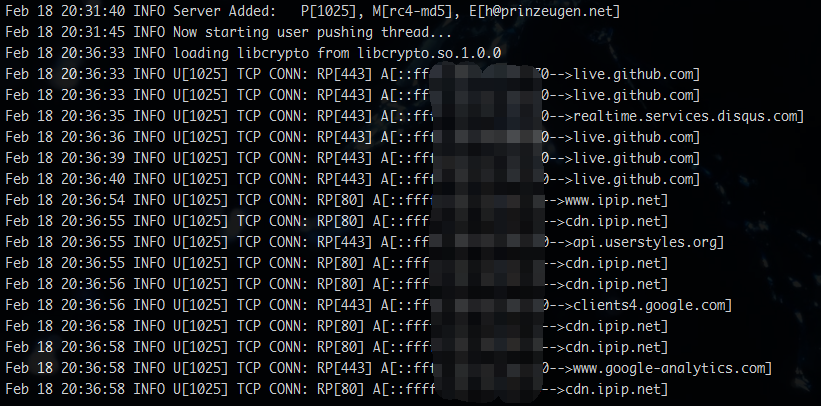
好了,现在可以试着运行一下 $ python servers.py 了(注意,是 servers.py 而不是 server.py)。
如果没错的话,应该可以看到这样的输出:

其中 P[XXX] 表示用户端口,M[XXX] 表示加密方式,E[XXX] 表示用户的邮箱地址。
这些都会随着 ss-panel 前端中用户配置的改变而实时变化。
0x03 常见错误 FAQ
连接上 shadowsocks 试试看能不能翻墙了?八成不能。
虽然你成功的把 servers.py 跑起来了,但还可能有各种神奇的错误阻止你翻出伟大的墙。
首先国际惯例查看连接:
$ netstat -anp | grep
你的端口 正常的话,应该是这样的:
Active Internet connections (servers and established)
Proto Recv-Q Send-Q Local Address           Foreign Address         State       PID/Program name
tcp        0      0 0.0.0.0:62111            0.0.0.0:*               LISTEN      32083/python
tcp        0      0 162.233.122.111:62111    115.233.233.140:47177   TIME_WAIT   -
tcp        0      0 162.233.122.111:62111    115.233.233.140:47161   TIME_WAIT   -
tcp        0      0 162.233.122.111:62111    115.233.233.140:47160   TIME_WAIT   -
tcp        0      0 162.233.122.111:62111    115.233.233.140:47157   TIME_WAIT   -
如果没有来自你的 IP 的 TCP 连接的话,那八成就是防火墙的锅了,
执行 iptables 放行你的端口:
$ iptables -I INPUT -p tcp -m tcp --dport 你的端口 -j ACCEPT
$ iptables-save
ss-panel 新注册的用户所分配的端口均为其 id-1 的用户的端口号 + 1。
比如说你把 admin 用户(uid 为1)的端口改为 12450(ss-panel 中不能改,去数据库改),
那么后面注册的新用户的端口就会是 12451, 12452 这样递增的。
所以如果你要开放注册,就要这样配置你的 iptables:
# 注意是半角冒号,意为允许 12450 及以上的端口
# 也可以指定 12450:15550 这样的范围
$ iptables -I INPUT -p tcp -m tcp --dport 12450: -j ACCEPT
现在再连接 shadowsocks 就应该可以看到 TCP 连接信息了。
并且你可以在 ss-mu 后端的输出信息中看到详细的连接日志:
日志格式的详细介绍在这里:
Explanation of the log output。
三、配置 ss-manyuser 守护进程以及多节点配置
0x01 使用 supervisor 监控 ss-manyuser 运行
如果你只是想让 ss-manyuser 在后台运行的话,可以参考我写的这篇文章。
安装 supervisor (用的是上面安装过的 pip):
# 先安装 pip 包管理器
$ sudo apt-get install python-pip
# For Debian/Ubuntu
$ sudo yum install python-pip
# For CentOS
$ pip install supervisor
创建 supervisor 配置文件
# 输出至 supervisor 的默认配置路径
$ echo_supervisord_conf > /etc/supervisord.conf
运行 supervisor 服务
$ supervisord
配置 supervisor 以监控 ss-manyuser 运行
$ vim /etc/supervisord.conf
在文件尾部(当然也可以新建配置文件,不过这样比较方便)添加如下内容并酌情修改:
[program:ss-manyuser]
command = python /root/shadowsocks-py-mu/shadowsocks/servers.py
user = root
autostart = true
autorestart = true
其中 command 里的目录请自行修改为你的 servers.py 所在的绝对路径。
重启 supervisor 服务以加载配置
$ killall -HUP supervisord
查看 shadowsocks-manyuser 是否已经运行:
$ ps -ef | grep servers.py root 952 739 0 15:40 ? 00:00:00
python /root/shadowsocks-rm/shadowsocks/servers.py
可以通过以下命令管理shadowsock-manyuser 的状态
$ supervisorctl {start|stop|restart} ss-manyuser
0x02 ss-panel 的多节点配置
其实多节点也没咋玄乎,说白了就是多个后端共用一个前端而已。
而且我们的后端是使用 Mu API 来与前端进行交互的,所以多节点的配置就更简单了:
只要把所有后端的 config.py 中的 API_URL 和 API_PASS 都改成一样即可(记得 API_ENABLED = True)。
四、写在后面
其他可用的前端:
esdeathlove/ss-panel-v3-mod,修改版的 ss-panel,修改了蛮多东西的,有兴趣的朋友可以去看看,他那边安装说明都写得很详细了;
sendya/shadowsocks-panel,另外一个全新的 ss-manyuser 前端,有用户等级、套餐、支付等功能,不支持使用 Mu API,部署教程在这里。
其他可用的后端:
shadowsocks-go mu,Go 语言实现,性能比 Python 版好,也支持 Mu API;
shadowsocksR manyuser SSR 版本,见仁见智。
这几个后端的部署方法大同小异,我这里就不再赘述了。
文章更新日志 2017-03-15
根据评论区推荐将后端由 mengskysama/shadowsocks-rm/manyuser 切换至 fsgmhoward/shadowsocks-py-mu; 所有后端配置均改用 Mu API v2 的方法;
使用了更加严谨的文法。

至此,你已完成对 ss-panel 的部署。叫上小伙伴们一起享受自由的互联网吧 😉
如果碰到什么奇怪的错误,请评论留言(带上你的日志)
11 个牛X的 CSS3 和 jQuery 制作的教程
CSS3 为 Web 开发带来了非常令人兴奋的变化,特别是在 CSS 3D 转换、动画等特性的支持,可以轻松的创建很酷的 Web 效果。
在这篇文章中我们介绍 11 个使用 CSS3 和 jQuery 实现的特效,很酷。


via queness/oschina
告诉你wamp5多站点配置教程
第一要做的是安装第二个apache服务
一、找到Apache2的htppd.conf文件.例如:我的wamp是安装在G盘的,我的就是G:\wamp\Apache2\conf目录下.大家自己的是安装在哪里的自己换路径,后面不再重复说这话了。
二、复制htppd.conf,粘贴后在conf目录下后更名www2.conf(这里www2是自定义的,你想变成什么名字都可以。不过没试过中文的可行不。)
三、用用编辑器打开(用什么编辑器无所谓了,记事本就可以)打开www2.conf 找到如下代码
Listen 80
ServerName localhost:80
DocumentRoot "G:/wamp/www"
<Directory "G:/wamp/www">
更改为
Listen 8080//8080是新的apache服务监听的端口,可以自己改成自己想监听的。例如:8888
ServerName localhost:8080
DocumentRoot "G:/wamp/www2"//www2是我们第二个网站的目录
<Directory"G:/wamp/www2">
然后在G:/wamp下建一新文件夹为 www2
四、接下来就是安装服务了,
方法一:打开G:\wamp\Apache2\bin目录,新建一个txt文档,文档内容如下:(红色字部分)
httpd.exe -k install -n "www2" -f "G:\wamp\Apache2\conf\web2.conf"
保存后,更改文件名字以及后缀为www2.bat,双击运行就可以了
方法二:windows下面点击“开始”-“运行”输入“cmd”然后回车,打开命令提示符
把命令提示符切换到G:\wamp\Apache2\bin
输入
httpd.exe -kinstall -n "www2" -f "G:\wamp\Apache2\conf\web2.conf"
后按回车就可以了。
然后我们在www2下放一个html文件来做测试,在ie输入 http://localhost:8080OK。服务正常
第二要做的就是服务安装好之后 就是怎么用wamp控制台来控制新安装的服务了
一、打开wamp目录,找到wampmanager.ini用编辑器打开(用什么编辑器无所谓了,记事本就可以)
二、主要更改的有(更改过的是红色的)
1
[Services]
Name: wampapache
Name: wampmysqld
[Services]
Name: wampapache
Name: wampmysqld
Name: www2
2
[StartupAction]
Action: service; Service: wampapache; ServiceAction: startresume;Flags: ignoreerrors
Action: service; Service: wampmysqld; ServiceAction: startresume;Flags: ignoreerrors
[StartupAction]
Action: service; Service: wampapache; ServiceAction: startresume;Flags: ignoreerrors
Action: service; Service: wampmysqld; ServiceAction: startresume;Flags: ignoreerrors
Action: service; Service: www2; ServiceAction: startresume; Flags:ignoreerrors
3
[Menu.Left]
Type: separator; Caption: "WAMP5"
Type: item; Caption: "Localhost"; Action: run; FileName:"C:\WINDOWS\explorer.exe"; Parameters: "http://localhost/";Glyph: 5
Type: item; Caption: "phpMyAdmin"; Action: run; FileName:"C:\WINDOWS\explorer.exe"; Parameters: "http://localhost/phpmyadmin/"; Glyph: 5
Type: item; Caption: "www 目录(&)"; Action:shellexecute; FileName: "G:/wamp/www"; Glyph: 5
[Menu.Left]
Type: separator; Caption: "WAMP5"
Type: item; Caption: "Localhost"; Action: run; FileName:"C:\WINDOWS\explorer.exe"; Parameters: "http://localhost/"; Glyph: 5
Type: item; Caption: "Localhost:8080"; Action: run; FileName:"C:\WINDOWS\explorer.exe"; Parameters: "http://localhost:8080/"; Glyph: 5
Type: item; Caption: "phpMyAdmin"; Action: run; FileName:"C:\WINDOWS\explorer.exe"; Parameters: "http://localhost/phpmyadmin/";Glyph: 5
Type: item; Caption: "www 目录(&)"; Action:shellexecute; FileName: "G:/wamp/www"; Glyph: 5
Type: item; Caption: "www2目录(&)"; Action:shellexecute; FileName: "G:/wamp/www2"; Glyph: 5
4
[StartAll]
Action: service; Service: wampapache; ServiceAction: startresume;Flags: ignoreerrors
Action: service; Service: wampmysqld; ServiceAction: startresume;Flags: ignoreerrors
[StartAll]
Action: service; Service: wampapache; ServiceAction: startresume;Flags: ignoreerrors
Action: service; Service: www2; ServiceAction: startresume; Flags:ignoreerrors
Action: service; Service: wampmysqld; ServiceAction: startresume;Flags: ignoreerrors
5
[StopAll]
Action: service; Service: wampapache; ServiceAction: stop; Flags:ignoreerrors
Action: service; Service: wampmysqld; ServiceAction: stop; Flags:ignoreerrors
[StopAll]
Action: service; Service: wampapache; ServiceAction: stop; Flags:ignoreerrors
Action: service; Service: www2; ServiceAction: stop; Flags:ignoreerrors
Action: service; Service: wampmysqld; ServiceAction: stop; Flags:ignoreerrors
6
[RestartAll]
Action: service; Service: wampapache; ServiceAction: stop; Flags:ignoreerrors waituntilterminated
Action: service; Service: wampmysqld; ServiceAction: stop; Flags:ignoreerrors waituntilterminated
Action: service; Service: wampapache; ServiceAction: startresume;Flags: ignoreerrors waituntilterminated
Action: service; Service: wampmysqld; ServiceAction: startresume;Flags: ignoreerrors waituntilterminated
[RestartAll]
Action: service; Service: wampapache; ServiceAction: stop; Flags:ignoreerrors waituntilterminated
Action: service; Service: www2; ServiceAction: stop; Flags:ignoreerrors waituntilterminated
Action: service; Service: wampmysqld; ServiceAction: stop; Flags:ignoreerrors waituntilterminated
Action: service; Service: wampapache; ServiceAction: startresume;Flags: ignoreerrors waituntilterminated
Action: service; Service: www2; ServiceAction: startresume; Flags:ignoreerrors waituntilterminated
Action: service; Service: wampmysqld; ServiceAction: startresume;Flags: ignoreerrors waituntilterminated
7
[myexit]
Action: service; Service: wampapache; ServiceAction: stop; Flags:ignoreerrors
Action: service; Service: wampmysqld; ServiceAction: stop; Flags:ignoreerrors
Action: exit
[myexit]
Action: service; Service: wampapache; ServiceAction: stop; Flags:ignoreerrors
Action: service; Service: www2; ServiceAction: stop; Flags:ignoreerrors
Action: service; Service: wampmysqld; ServiceAction: stop; Flags:ignoreerrors
Action: exit
三、更改完成之后保存,并重启wamp就ok了。下面图是我在机子上装有3个服务之后的样子了。
我不说具体的更改的用处是希望大家能自己琢磨下,想表达的观点:最好学习方法就是实践
最后,看帖子要顶哦

支持博主

关于邵珠庆博客
文章标签
记事邵珠庆博客
最近文章
最近评论
- 发表在《中国翻墙网民状况调查》
- 发表在《教你如何简单获取新浪微博短地址接口》
- 发表在《教你如何简单获取新浪微博短地址接口》
- 发表在《教你如何简单获取新浪微博短地址接口》
- 发表在《教你如何简单获取新浪微博短地址接口》
博客日历
| 一 | 二 | 三 | 四 | 五 | 六 | 日 |
|---|---|---|---|---|---|---|
| « 8月 | ||||||
| 1 | 2 | 3 | 4 | 5 | ||
| 6 | 7 | 8 | 9 | 10 | 11 | 12 |
| 13 | 14 | 15 | 16 | 17 | 18 | 19 |
| 20 | 21 | 22 | 23 | 24 | 25 | 26 |
| 27 | 28 | 29 | 30 | 31 | ||
目录分类
文章归档
- 2022年8月 (2)
- 2022年7月 (1)
- 2022年3月 (1)
- 2021年10月 (3)
- 2021年1月 (1)
- 2020年4月 (3)
- 2020年3月 (3)
- 2020年2月 (2)
- 2020年1月 (3)
- 2019年12月 (2)
- 2019年11月 (3)
- 2019年10月 (2)
- 2019年9月 (2)
- 2019年8月 (4)
- 2019年7月 (2)
- 2019年6月 (2)
- 2019年5月 (2)
- 2019年4月 (3)
- 2019年3月 (2)
- 2019年2月 (3)
- 2019年1月 (2)
- 2018年12月 (2)
- 2018年11月 (2)
- 2018年10月 (3)
- 2018年9月 (2)
- 2018年8月 (2)
- 2018年7月 (1)
- 2018年6月 (2)
- 2018年5月 (3)
- 2018年4月 (2)
- 2018年3月 (6)
- 2018年2月 (7)
- 2018年1月 (3)
- 2017年11月 (2)
- 2017年10月 (2)
- 2017年9月 (5)
- 2017年8月 (4)
- 2017年7月 (8)
- 2017年6月 (5)
- 2017年5月 (14)
- 2017年4月 (8)
- 2017年3月 (5)
- 2017年2月 (2)
- 2017年1月 (1)
- 2016年12月 (1)
- 2016年11月 (5)
- 2016年10月 (3)
- 2016年9月 (2)
- 2016年8月 (1)
- 2016年7月 (2)
- 2016年6月 (2)
- 2016年5月 (5)
- 2016年4月 (5)
- 2016年3月 (2)
- 2016年2月 (1)
- 2016年1月 (2)
- 2015年12月 (2)
- 2015年11月 (1)
- 2015年10月 (3)
- 2015年9月 (2)
- 2015年8月 (4)
- 2015年7月 (5)
- 2015年6月 (6)
- 2015年5月 (3)
- 2015年4月 (8)
- 2015年3月 (6)
- 2015年2月 (4)
- 2015年1月 (5)
- 2014年12月 (2)
- 2014年11月 (5)
- 2014年10月 (5)
- 2014年9月 (1)
- 2014年8月 (2)
- 2014年7月 (4)
- 2014年6月 (1)
- 2014年5月 (9)
- 2014年4月 (5)
- 2014年3月 (1)
- 2014年2月 (1)
- 2014年1月 (5)
- 2013年12月 (4)
- 2013年11月 (12)
- 2013年10月 (6)
- 2013年9月 (7)
- 2013年8月 (8)
- 2013年7月 (15)
- 2013年6月 (9)
- 2013年5月 (12)
- 2013年4月 (8)
- 2013年3月 (11)
- 2013年2月 (9)
- 2013年1月 (21)
- 2012年12月 (8)
- 2012年11月 (7)
- 2012年10月 (19)
- 2012年9月 (16)
- 2012年8月 (13)
- 2012年7月 (10)
- 2012年6月 (11)
- 2012年5月 (11)
- 2012年4月 (8)
- 2012年3月 (8)
- 2012年2月 (11)
- 2012年1月 (8)
- 2011年12月 (18)
- 2011年11月 (32)
- 2011年10月 (17)
- 2011年9月 (18)
- 2011年8月 (11)
- 2011年7月 (55)
- 2011年6月 (1)
- 2011年5月 (4)
- 2011年4月 (2)
- 2011年3月 (1)
- 2011年1月 (3)
- 2010年12月 (1)
- 2010年11月 (6)
- 2010年9月 (5)
- 2010年8月 (2)
- 2010年7月 (3)
- 2010年6月 (7)
- 2010年5月 (3)
- 2010年4月 (4)
- 2010年3月 (8)
- 2010年2月 (2)
- 2010年1月 (2)
- 2009年12月 (2)
- 2009年11月 (1)
- 2009年10月 (1)
- 2009年8月 (1)
- 2009年7月 (2)
- 2009年5月 (1)
- 2009年4月 (1)
- 2009年3月 (1)
- 2009年2月 (1)
- 2009年1月 (1)
- 2008年12月 (1)
- 2008年11月 (2)
- 2008年10月 (1)
- 2008年8月 (5)
- 2008年7月 (2)
- 2008年6月 (1)
- 2008年5月 (3)
- 2008年4月 (11)
- 2008年3月 (1)
- 2008年2月 (1)
- 2008年1月 (1)
- 2007年12月 (1)
- 2007年11月 (3)
- 2007年10月 (1)
- 2007年9月 (1)
- 2007年8月 (1)
- 2007年7月 (1)
- 2007年6月 (1)
- 2007年5月 (1)