63月/18关
Vagrant-安装教程及常见问题
前言:
Vagrant是一个基于Ruby的工具,用于创建和部署虚拟化开发环境。
它的主要意义是让所有开发人员都使用和线上服务器一样的环境,本质上和你新建一个虚拟机。
那最常见的,正常我们是怎么开发呢,大部分童鞋应该是在windows下搭建开发环境,敲代码,运行程序,达到效果git或svn提交,发布linux环境再看效果。
而vagrant virtualBox实现了把代码同步共享到linux虚拟机,而这个虚拟机你可以配成和你生产环境一样的,
说白了,通过共享文件到虚拟机,在类生产环境下运行。【让你在windows下体验到在linux开发的效果。】
还有一种共享方式,可以借助IDE的develop功能通过sftp上传到服务器,然后访问服务器
三种方式总结:
【1】原始windows开发模式:windows开发-本地访问调试(与生产环境毕竟不同)-发布到linux运行
【2】vagrant virtualBox模式: windows开发 - 文件本地共享 -- 直接访问虚拟机(linux环境与生产一致)
【3】IDE develop 模式: windows开发 - 文件远程上传 -- 访问远程开发机(linux环境与生产一致)
其实【1】,与【2,3】的区别就在于,程序是在哪里运行的,windows本地?or Linux仿生产环境
(能在仿生产的环境直接开发肯定比在windows开发在放到linux更好些,开发方便避免一些环境上等的麻烦)
【2】与【3】的区别就在于文件是如何同步的:【2】是通过虚拟机文件共享实现同步;【3】直接利用sftp远程上传实现同步。
缺点:
【1】毫无疑问,它的弊端就是开发时不能模拟生产环境,可能会有衔接问题,环境有了问题不像虚拟机重安一台立刻搞定。
【3】存在的问题,比如:当切换开发分支后改动了文件a和b,当前ide选中的是a文件,ok他会自动上传更新,但是b文件不会,因为窗口你没在b文件下呀,没有那么智能不会自动触发上传更新,这点就坑了造成代码不同步,需要你自己手动触发一下相关文件的上传,尤其是依赖一些包的时候会发生丢失,得全项目上传一次;
【2】因为是本地和虚拟机的文件共享嘛,没有文件上传遗漏一说,所以还是很推荐用
目录:
一。安装虚拟机
二。Vagrantfile配置文件详解
三。连接虚拟机
四。碰到问题
一。安装虚拟机
1.添加box
vagrant box add base your_box_addres
注意:base是默认名称,主要用来标识一下你添加的box,后面的命令都是基于这个标识来操作的,你也可以用其他名称【但是用了其他名字记得在第二步用此名字init】
2.初始化
vagrant init
vagrant init box_name
如果你添加的box名称不是[base],那么需要在初始化的时候指定名称
3.启动虚拟机
vagrant up
启动过程可能比较长,耐心等待
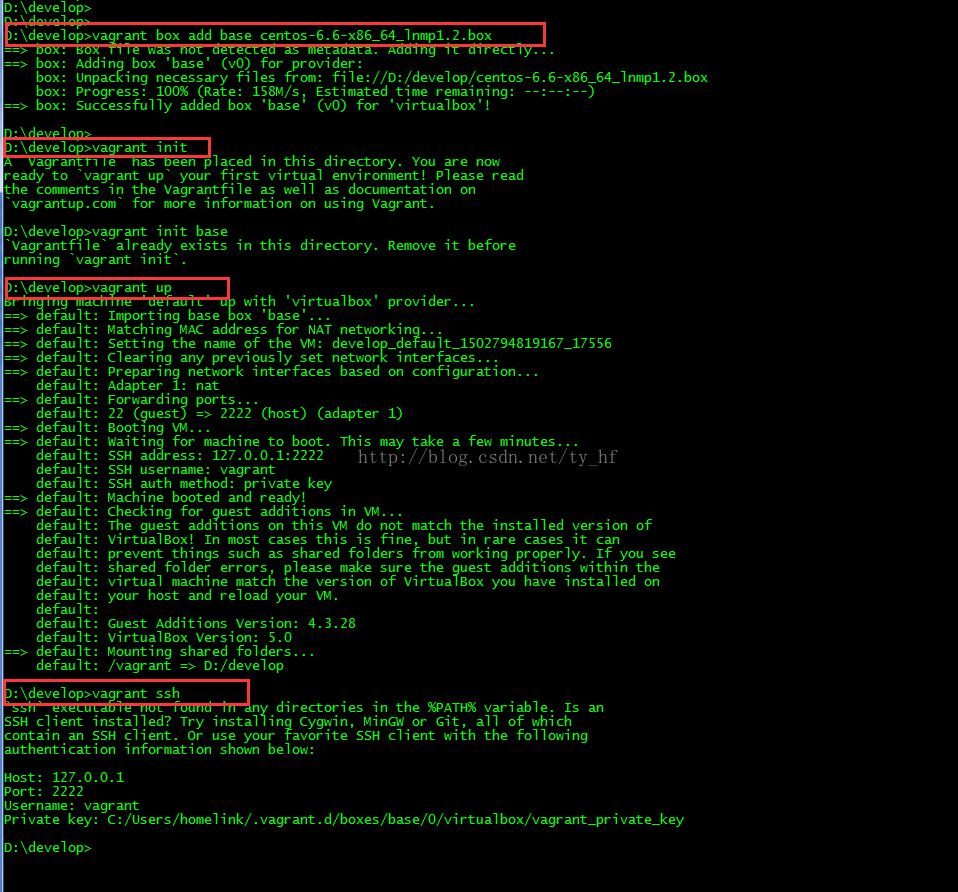

图一.运行过程总图

图二
相关指令:
- vagrant up (启动虚拟机)
- vagrant halt (关闭虚拟机——对应就是关机)
- vagrant suspend (暂停虚拟机——只是暂停,虚拟机内存等信息将以状态文件的方式保存在本地,可以执行恢复操作后继续使用)
- vagrant resume (恢复虚拟机—— 与前面的暂停相对应)
- vagrant destroy (删除虚拟机,删除后在当前虚拟机所做进行的除开Vagrantfile中的配置都不会保留)
二.Vagrantfile配置文件详解
在我们的开发目录下有一个文件Vagrantfile,里面包含有大量的配置信息,主要包括三个方面的配置,虚拟机的配置、SSH配置、Vagrant的一些基础配置。(它的配置语法也是Ruby的)【修改配置文件,记得完后重启vagrant才能生效哦】
在我们的开发目录下有一个文件Vagrantfile,里面包含有大量的配置信息,主要包括三个方面的配置,虚拟机的配置、SSH配置、Vagrant的一些基础配置。Vagrant是使用Ruby开发的,所以它的配置语法也是Ruby的,但是我们没有学过Ruby的人还是可以跟着它的注释知道怎么配置一些基本项的配置。
具体介绍,参考:http://blog.csdn.net/chajinglong/article/details/52805915
- # -*- mode: ruby -*-
- # vi: set ft=ruby :
- # All Vagrant configuration is done below. The "2" in Vagrant.configure
- # configures the configuration version (we support older styles for
- # backwards compatibility). Please don\'t change it unless you know what
- # you\'re doing.
- Vagrant.configure(2) do |config|
- # The most common configuration options are documented and commented below.
- # For a complete reference, please see the online documentation at
- # https://docs.vagrantup.com.
- # Every Vagrant development environment requires a box. You can search for
- # boxes at https://atlas.hashicorp.com/search.
- config.vm.box = "base"
- # Disable automatic box update checking. If you disable this, then
- # boxes will only be checked for updates when the user runs
- # `vagrant box outdated`. This is not recommended.
- # config.vm.box_check_update = false
- # Create a forwarded port mapping which allows access to a specific port
- # within the machine from a port on the host machine. In the example below,
- # accessing "localhost:8080" will access port 80 on the guest machine.
- # config.vm.network "forwarded_port", guest: 80, host: 80
- # Create a private network, which allows host-only access to the machine
- # using a specific IP.
- config.vm.network "private_network", ip: "192.168.33.10"
- # Create a public network, which generally matched to bridged network.
- # Bridged networks make the machine appear as another physical device on
- # your network.
- # config.vm.network "public_network"
- # Share an additional folder to the guest VM. The first argument is
- # the path on the host to the actual folder. The second argument is
- # the path on the guest to mount the folder. And the optional third
- # argument is a set of non-required options.
- config.vm.synced_folder "D:/all_code/", "/home/www"
- # Provider-specific configuration so you can fine-tune various
- # backing providers for Vagrant. These expose provider-specific options.
- # Example for VirtualBox:
- #
- # config.vm.provider "virtualbox" do |vb|
- # # Display the VirtualBox GUI when booting the machine
- # vb.gui = true
- #
- # # Customize the amount of memory on the VM:
- # vb.memory = "1024"
- # end
- #
- # View the documentation for the provider you are using for more
- # information on available options.
- # Define a Vagrant Push strategy for pushing to Atlas. Other push strategies
- # such as FTP and Heroku are also available. See the documentation at
- # https://docs.vagrantup.com/v2/push/atlas.html for more information.
- # config.push.define "atlas" do |push|
- # push.app = "YOUR_ATLAS_USERNAME/YOUR_APPLICATION_NAME"
- # end
- # Enable provisioning with a shell script. Additional provisioners such as
- # Puppet, Chef, Ansible, Salt, and Docker are also available. Please see the
- # documentation for more information about their specific syntax and use.
- # config.vm.provision "shell", inline: <
- # sudo apt-get update
- # sudo apt-get install -y apache2
- # SHELL
- end
三.连接虚拟机
1.虚拟机相关登录信息
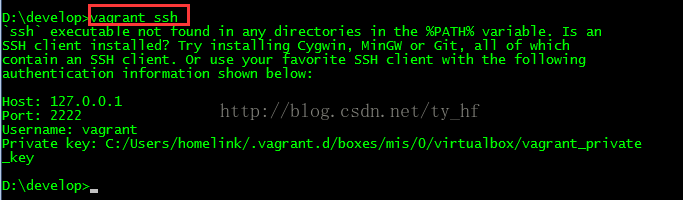
vagrant ssh
这样我们就可以像连接到一台服务器一样进行操作了。
图三
2.ssh登录
window机器不支持这样的命令,必须使用第三方客户端来进行连接,例如xmoba、putty、Xshell等.
- ssh: 127.0.0.1
- 端口: 2222
- 用户名: vagrant
- 密码: vagrant
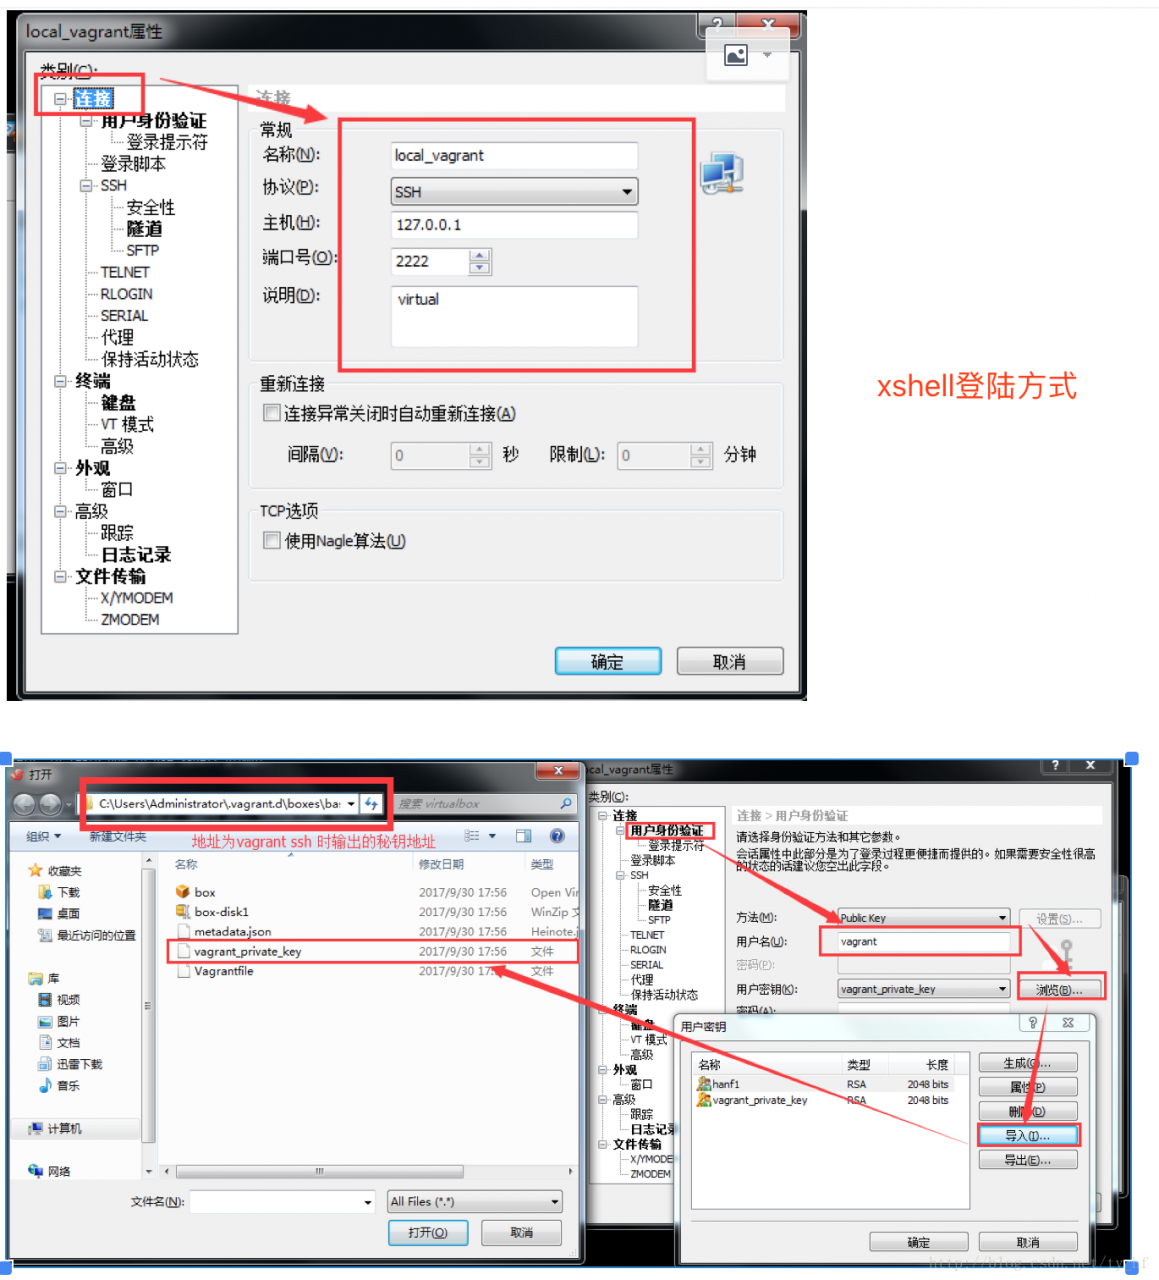
图四.xshell登陆举例
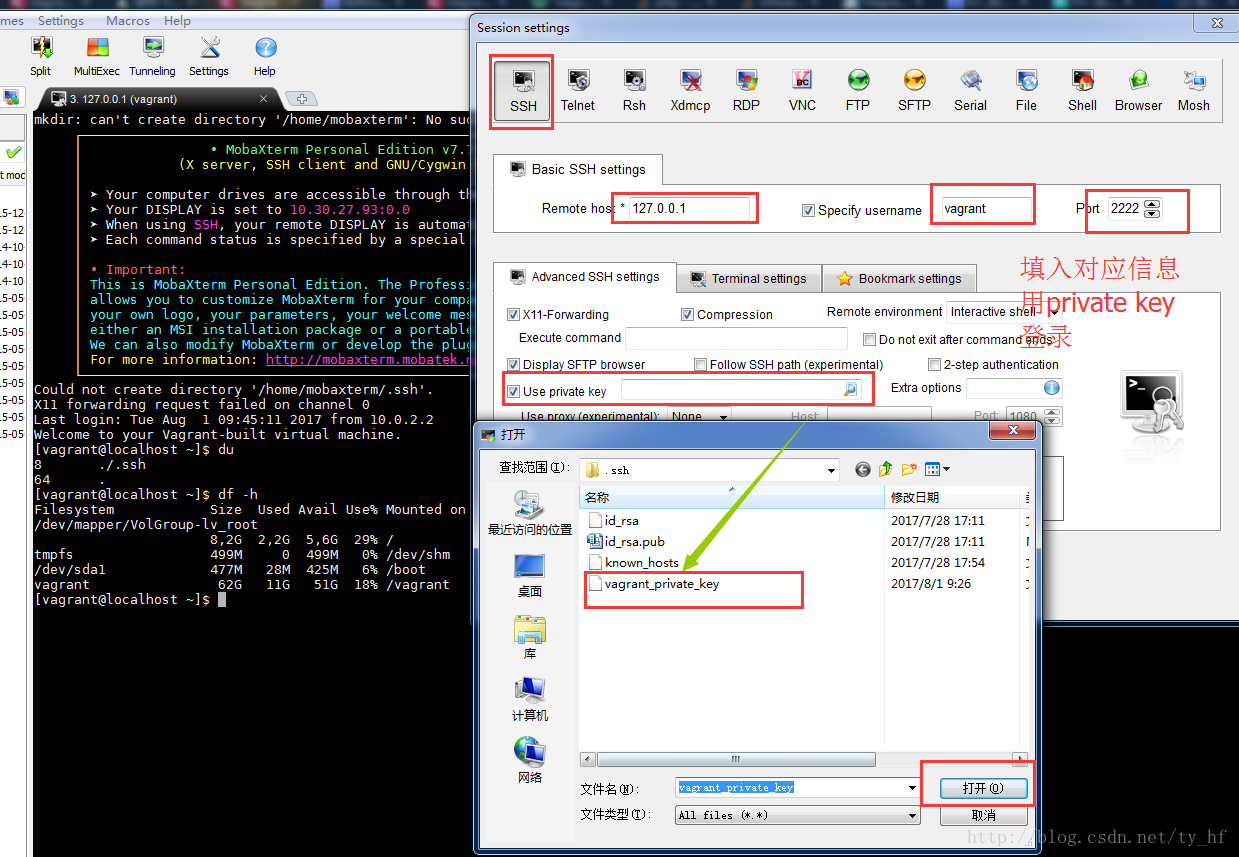
图五.xmoba登陆举例
3.系统信息
df -h
/vagrant这个目录是自动映射的,被映射到你刚刚建立的文件夹,这样就方便我们以后在开发机中进行开发,在虚拟机中进行运行效果测试了。
四。碰到问题:
1.vagrant up 时提示错误 cound not open file 问题
如果init指定了 add的名称test,那么init时也要说明,少了这一步
如下边错误演示与正确演示。
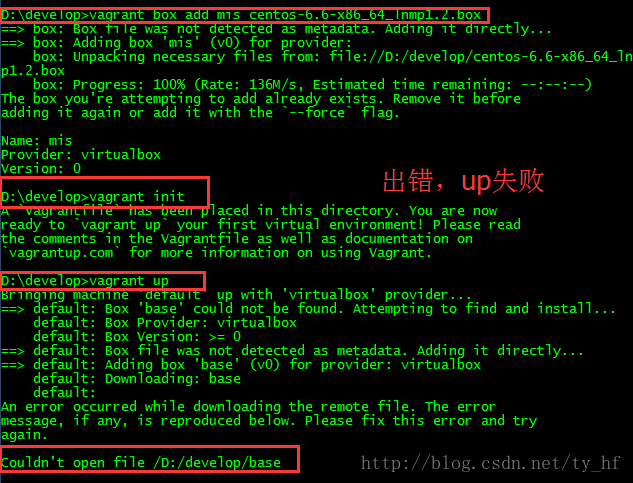
图六.错误演示

图七.正确演示
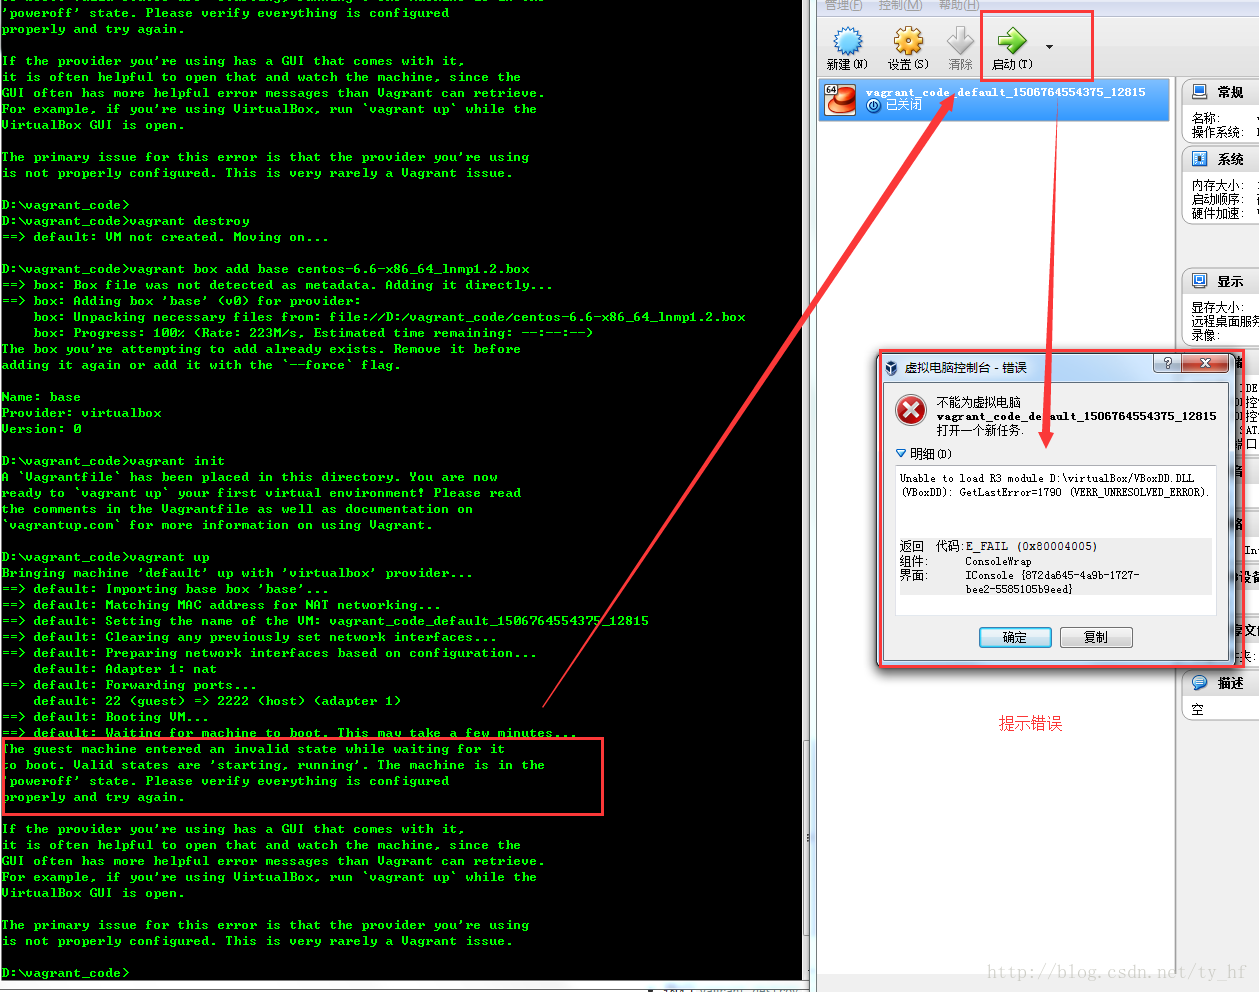
2.vagrant up 时提示错误:
- The guest machine entered an invalid state while waiting for it
- to boot. Valid states are \'starting, running\'. The machine is in the
- \'poweroff\' state. Please verify everything is configured
- properly and try again.
- If the provider you\'re using has a GUI that comes with it,
- it is often helpful to open that and watch the machine, since the
- GUI often has more helpful error messages than Vagrant can retrieve.
- For example, if you\'re using VirtualBox, run `vagrant up` while the
- VirtualBox GUI is open.
- The primary issue for this error is that the provider you\'re using
- is not properly configured. This is very rarely a Vagrant issue.
打开虚拟机启动,也会提示报错:
- Unable to load R3 module D:\virtualBox/VBoxDD.DLL (VBoxDD): GetLastError=1790 (VERR_UNRESOLVED_ERROR).
原因:
本目录中的以下三个文件是原始的未被破解的WIN7 64位系统主题文件:
themeservice.dll , themeui.dll ,uxtheme.dll
为了使用工具UniversalThemePatcher-x64.exe恢复主题,特地将以上3个文件,
各拷贝了一份,并重新命名如下:
themeservice.dll.backup ,themeui.dll.backup ,uxtheme.dll.backup
解决方法:
我们只须把重命名后的3个文件:
themeservice.dll.backup ,themeui.dll.backup ,uxtheme.dll.backup
拷贝到C:\Windows\System32目录下面,
然后运行工具UniversalThemePatcher-x64.exe进行恢复即可。
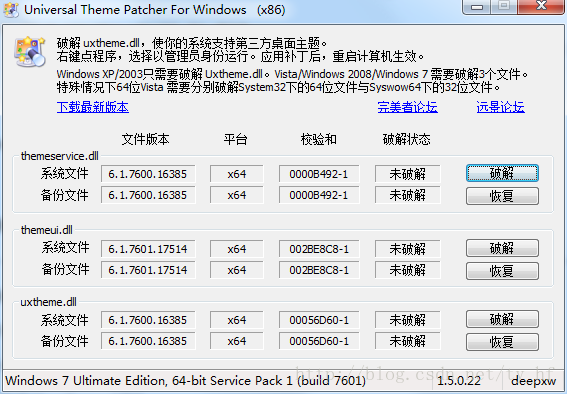
下载地址:http://download.csdn.net/download/ty_hf/10013443【里边有使用说明】
3.虚拟机一切正常,文件代码也映射到虚拟机,但就是不能正常访问。
a).配置文件需要删除
- sudo rm -f /etc/udev/rules.d/70-persistent-net.rules
问题就处在在持久网络设备udev规则(persistent network device udev rules)是被原VM设置好的,再用box生成新VM时,这些rules需要被更新。而这和Vagrantfile里对新VM设置private network的指令发生冲突。删除就好了。
b).如果设置了host,虚拟机里也要设置一次
- vi /etc/hosts
3.问题 default: Warning: Authentication failure. Retrying...
- Bringing machine \'default\' up with \'virtualbox\' provider...
- ==> default: Clearing any previously set forwarded ports...
- ==> default: Clearing any previously set network interfaces...
- ==> default: Preparing network interfaces based on configuration...
- default: Adapter 1: nat
- default: Adapter 2: hostonly
- ==> default: Forwarding ports...
- default: 22 (guest) => 2222 (host) (adapter 1)
- ==> default: Booting VM...
- ==> default: Waiting for machine to boot. This may take a few minute
- default: SSH address: 127.0.0.1:2222
- default: SSH username: vagrant
- default: SSH auth method: private key
- default: Warning: Remote connection disconnect. Retrying...
- default: Warning: Authentication failure. Retrying...
- default: Warning: Authentication failure. Retrying...
- default: Warning: Authentication failure. Retrying...
- Timed out while waiting for the machine to boot. This means that
- Vagrant was unable to communicate with the guest machine within
- the configured ("config.vm.boot_timeout" value) time period.
- If you look above, you should be able to see the error(s) that
- Vagrant had when attempting to connect to the machine. These errors
- are usually good hints as to what may be wrong.
- If you\'re using a custom box, make sure that networking is properly
- working and you\'re able to connect to the machine. It is a common
- problem that networking isn\'t setup properly in these boxes.
- Verify that authentication configurations are also setup properly,
- as well.
- If the box appears to be booting properly, you may want to increase
- the timeout ("config.vm.boot_timeout") value.
解决:
编辑Vagrantfile ,添加如下文件
- config.ssh.username = "vagrant"
- config.ssh.password = "vagrant"
然后重启vagrant 重新加载配置文件
- vagrant halt
- vagrant up
注意登陆的时候看下 vagrant ssh 看下你的登录信息,端口号
4.报错问题:
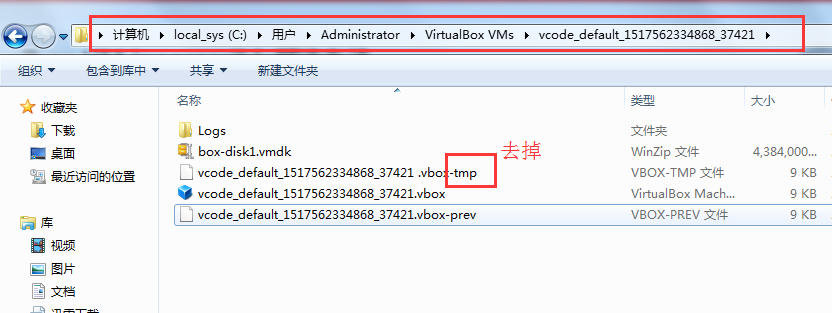
- Bringing machine \'default\' up with \'virtualbox\' provider...
- Your VM has become "inaccessible." Unfortunately, this is a critical error
- with VirtualBox that Vagrant can not cleanly recover from. Please open VirtualBox
- and clear out your inaccessible virtual machines or find a way to fix
解决:
http://doodlebobbers.com/vagrant-error-your-vm-has-become-inaccessible/
其实就是删除.vagrant文件夹,然后重启vagrant
5.vagrant 启动的时候报错
- A Vagrant environment or target machine is required to run this
- command. Run vagrant init to create a new Vagrant environment. Or,
- get an ID of a target machine from vagrant global-status to run
- this command on. A final option is to change to a directory with a
- Vagrantfile and to try again.
少前边步骤了,比如vagrant init;或者没有进入对应vagrant init的文件夹
6.vagrant dns解析异常,访问接口特别慢,在Vagrantfile 配置文件中添加下边代码:
- config.vm.provider :virtualbox do |vb|
- vb.customize ["modifyvm", :id, "--natdnshostresolver1", "on"]
- vb.customize ["modifyvm", :id, "--natdnsproxy1", "on"]
7.vagrant up 又提示新报错!
- D:\vcode>vagrant up
- Bringing machine \'default\' up with \'virtualbox\' provider...
- Your VM has become "inaccessible." Unfortunately, this is a critical error
- with VirtualBox that Vagrant can not cleanly recover from. Please open VirtualBo
- x
- and clear out your inaccessible virtual machines or find a way to fix
- them.
相关资源:
虚拟机等相关安装包: 链接:http://pan.baidu.com/s/1dEWSnEL 密码:ajaq
喜欢这个文章吗?
支持博主

关于邵珠庆博客
文章标签
API
GA
Git
Google Analytics
HTML5
jquery
JS
Linux
MySQL
nginx
PHP
SaaS
web
互联网
代码
使用
分析
创业
原理
命令
好东西
如何
工具
常用
开发
总结
技巧
技术
插件
数据
文件
方法
时间
架构
框架
汇总
百度
管理
系统
网站
网站分析
设计
详解
问题
阿里云
记事邵珠庆博客
最近文章
最近评论
- 发表在《中国翻墙网民状况调查》
- 发表在《教你如何简单获取新浪微博短地址接口》
- 发表在《教你如何简单获取新浪微博短地址接口》
- 发表在《教你如何简单获取新浪微博短地址接口》
- 发表在《教你如何简单获取新浪微博短地址接口》
博客日历
| 一 | 二 | 三 | 四 | 五 | 六 | 日 |
|---|---|---|---|---|---|---|
| « 8月 | ||||||
| 1 | 2 | 3 | 4 | |||
| 5 | 6 | 7 | 8 | 9 | 10 | 11 |
| 12 | 13 | 14 | 15 | 16 | 17 | 18 |
| 19 | 20 | 21 | 22 | 23 | 24 | 25 |
| 26 | 27 | 28 | 29 | 30 | 31 | |
目录分类
文章归档
- 2025年8月 (2)
- 2022年9月 (1)
- 2022年8月 (3)
- 2022年7月 (1)
- 2022年3月 (1)
- 2021年10月 (3)
- 2021年1月 (1)
- 2020年4月 (3)
- 2020年3月 (3)
- 2020年2月 (2)
- 2020年1月 (3)
- 2019年12月 (2)
- 2019年11月 (3)
- 2019年10月 (2)
- 2019年9月 (2)
- 2019年8月 (4)
- 2019年7月 (2)
- 2019年6月 (2)
- 2019年5月 (2)
- 2019年4月 (3)
- 2019年3月 (2)
- 2019年2月 (3)
- 2019年1月 (2)
- 2018年12月 (2)
- 2018年11月 (2)
- 2018年10月 (3)
- 2018年9月 (2)
- 2018年8月 (2)
- 2018年7月 (1)
- 2018年6月 (2)
- 2018年5月 (3)
- 2018年4月 (2)
- 2018年3月 (6)
- 2018年2月 (7)
- 2018年1月 (3)
- 2017年11月 (2)
- 2017年10月 (2)
- 2017年9月 (5)
- 2017年8月 (4)
- 2017年7月 (8)
- 2017年6月 (5)
- 2017年5月 (14)
- 2017年4月 (8)
- 2017年3月 (5)
- 2017年2月 (2)
- 2017年1月 (1)
- 2016年12月 (1)
- 2016年11月 (5)
- 2016年10月 (3)
- 2016年9月 (2)
- 2016年8月 (1)
- 2016年7月 (2)
- 2016年6月 (2)
- 2016年5月 (5)
- 2016年4月 (5)
- 2016年3月 (2)
- 2016年2月 (1)
- 2016年1月 (2)
- 2015年12月 (2)
- 2015年11月 (1)
- 2015年10月 (3)
- 2015年9月 (2)
- 2015年8月 (4)
- 2015年7月 (5)
- 2015年6月 (6)
- 2015年5月 (3)
- 2015年4月 (8)
- 2015年3月 (6)
- 2015年2月 (4)
- 2015年1月 (5)
- 2014年12月 (2)
- 2014年11月 (5)
- 2014年10月 (5)
- 2014年9月 (1)
- 2014年8月 (2)
- 2014年7月 (4)
- 2014年6月 (1)
- 2014年5月 (9)
- 2014年4月 (5)
- 2014年3月 (1)
- 2014年2月 (1)
- 2014年1月 (5)
- 2013年12月 (4)
- 2013年11月 (12)
- 2013年10月 (6)
- 2013年9月 (7)
- 2013年8月 (8)
- 2013年7月 (15)
- 2013年6月 (9)
- 2013年5月 (12)
- 2013年4月 (8)
- 2013年3月 (11)
- 2013年2月 (9)
- 2013年1月 (21)
- 2012年12月 (8)
- 2012年11月 (7)
- 2012年10月 (19)
- 2012年9月 (16)
- 2012年8月 (13)
- 2012年7月 (10)
- 2012年6月 (11)
- 2012年5月 (11)
- 2012年4月 (8)
- 2012年3月 (8)
- 2012年2月 (11)
- 2012年1月 (8)
- 2011年12月 (18)
- 2011年11月 (32)
- 2011年10月 (17)
- 2011年9月 (18)
- 2011年8月 (11)
- 2011年7月 (55)
- 2011年6月 (1)
- 2011年5月 (4)
- 2011年4月 (2)
- 2011年3月 (1)
- 2011年1月 (3)
- 2010年12月 (1)
- 2010年11月 (6)
- 2010年9月 (5)
- 2010年8月 (2)
- 2010年7月 (3)
- 2010年6月 (7)
- 2010年5月 (3)
- 2010年4月 (4)
- 2010年3月 (8)
- 2010年2月 (2)
- 2010年1月 (2)
- 2009年12月 (2)
- 2009年11月 (1)
- 2009年10月 (1)
- 2009年8月 (1)
- 2009年7月 (2)
- 2009年5月 (1)
- 2009年4月 (1)
- 2009年3月 (1)
- 2009年2月 (1)
- 2009年1月 (1)
- 2008年12月 (1)
- 2008年11月 (2)
- 2008年10月 (1)
- 2008年8月 (5)
- 2008年7月 (2)
- 2008年6月 (1)
- 2008年5月 (3)
- 2008年4月 (11)
- 2008年3月 (1)
- 2008年2月 (1)
- 2008年1月 (1)
- 2007年12月 (1)
- 2007年11月 (3)
- 2007年10月 (1)
- 2007年9月 (1)
- 2007年8月 (1)
- 2007年7月 (1)
- 2007年6月 (1)
- 2007年5月 (1)
博客功能
京东好物
