CentOS 使用 Google Authenticator 登录验证
Google Authentication 项目 包含了多个手机平台的一次性验证码生成器的实现,以及一个可插拔的验证认证模块(PAM)。这些实现支持基于 HMAC 的一次性验证码(HOTP)算法(RFC 4226)和基于时间的一次性验证码(TOTP)算法(RFC 6238)。
下面将在 CentOS 上安装并使用 Google Authenticator 做登录的身份验证,当前系统的版本为
CentOS Linux release 7.2.1511 (Core)
安装 Google Authenticator PAM module
-
确保
ntpd已安装并正常运行运行yum install -y ntpdate systemctl start ntpd systemctl enable ntpdntpdate是用来自动同步时间的程序,这里启动它并设置它开机自动启动。 -
安装一些接下去会用到的组件
yum install -y git make gcc libtool pam-devel -
编译安装 Google Authenticator PAM module
git clone https://github.com/google/google-authenticator
cd google-authenticator/libpam
./bootstrap.sh
./configure
make
make install
ln -s /usr/local/lib/security/pam_google_authenticator.so /usr/lib64/security/
配置 SSH 服务
打开 /etc/ssh/sshd_config 文件
vim /etc/ssh/sshd_config
修改下面字段的配置
ChallengeResponseAuthentication yes
PasswordAuthentication no
PubkeyAuthentication yes
UsePAM yes
然后重启一下 sshd 服务,使配置生效
systemctl restart sshd
这里将 PubkeyAuthentication 配置成了 yes 表示支持公钥验证登录,即使某个账号启用了 Google Authenticator 验证,只要登录者机器的公钥在这个账号的授权下,就可以不输入密码和 Google Authenticator 的认证码直接登录。
配置 PAM
打开 /etc/pam.d/sshd 文件
vim /etc/pam.d/sshd
这里分四种情况来配置
-
验证密码和认证码,没有启用 Google Authenticator 服务的账号只验证密码(推荐)
auth substack password-auth #... auth required pam_google_authenticator.so nullokpassword-auth与pam_google_authenticator的先后顺序决定了先输入密码还是先输入认证码。 -
验证密码和认证码,没有启用 Google Authenticator 服务的账号无法使用密码登录
auth substack password-auth #... auth required pam_google_authenticator.so -
只验证认证码,不验证密码,没有启用 Google Authenticator 服务的账号不用输入密码直接可以成功登录
#auth substack password-auth
#...
auth required pam_google_authenticator.so nullok
注释掉
auth substack password-auth配置就不会再验证账号密码了。 -
只验证认证码,不验证密码,没有启用 Google Authenticator 服务的账号无法使用密码登录
#auth substack password-auth
#...
auth required pam_google_authenticator.so
启用 Google Authenticator
切换至想要使用 Google Authenticator 来做登录验证的账号,执行下面操作
google-authenticator
然后会出现下面一系列交互式的对话做对应的设置
Do you want authentication tokens to be time-based (y/n) y
https://www.google.com/chart?chs=200x200&chld=M|0&cht=qr&chl=otpauth://totp/shenyu@shenyu.me%3Fsecret%3DKHMH46EWI2RIRZ53KQTNGHXNP4%26issuer%3Dshenyu.me
# 这里是个二维码
Your new secret key is: KHMH46EWI2RIRZ53KQTNGHXNP4
Your verification code is 753579
Your emergency scratch codes are:
  99181037
  68865807
  88385439
  59103432
  81045035
这里会显示一个二维码,如果你的终端终端不支持显示二维码,可以手动打开这个网页链接(墙)来查看二维码或者手动输入后面的密钥(secret key)来代替扫描二维码,之后的操作会用到这个二维码/密钥(secret key)。这里还有一个认证码(verifiction code),暂时不知道有什么用,以及 5 个紧急救助码(emergency scratch code),紧急救助码就是当你无法获取认证码时(比如手机丢了),可以当做认证码来用,每用一个少一个,但其实可以手动添加的,建议如果 root 账户使用 Google Authenticator 的话一定要把紧急救助码另外保存一份。
Do you want me to update your "/home/test/.google_authenticator" file? (y/n) y
是否更新用户的 Google Authenticator 配置文件,选择 y 才能使上面操作对当前用户生效,其实就是在对应用户的 Home 目录下生成了一个 .google_authenticator 文件,如果你想停用这个用户的 Google Authenticator 验证,只需要删除这个用户 Home 目录下的 .google_authenticator 文件就可以了。
Do you want to disallow multiple uses of the same authentication
token? This restricts you to one login about every 30s, but it increases
your chances to notice or even prevent man-in-the-middle attacks (y/n) y
每次生成的认证码是否同时只允许一个人使用?这里选择 y。
By default, tokens are good for 30 seconds. In order to compensate for
possible time-skew between the client and the server, we allow an extra
token before and after the current time. If you experience problems with
poor time synchronization, you can increase the window from its default
size of  -1min (window size of 3) to about  -4min (window size of
17 acceptable tokens).
Do you want to do so? (y/n) n
是否增加时间误差?这里选择 n。
If the computer that you are logging into isn\'t hardened against brute-force
login attempts, you can enable rate-limiting for the authentication module.
By default, this limits attackers to no more than 3 login attempts every 30s.
Do you want to enable rate-limiting (y/n) y
是否启用次数限制?这里选择 y,默认每 30 秒最多尝试登录 3 次。
上面交互式的设置也可用通过参数一次性设置(推荐)
google-authenticator -t -f -d -l shenyu@shenyu.me -i SHENYU.ME -r 3 -R 30 -W
可以看到,通过参数还可以自定义 发行商 和 标签,执行 google-authenticator -h 来查看所有的参数设置
google-authenticator []
-h, --help Print this message
-c, --counter-based Set up counter-based (HOTP) verification
-t, --time-based Set up time-based (TOTP) verification
-d, --disallow-reuse Disallow reuse of previously used TOTP tokens
-D, --allow-reuse Allow reuse of previously used TOTP tokens
-f, --force Write file without first confirming with user
-l, --label=设置 Google Authenticator 手机 App
在手机上下载并安装 Google Authenticator
| 手机类型 | App 程序名称 |
|---|---|
| IOS | Google Authenticator |
| Android | 谷歌动态口令(请在手机对应的应用商店里搜索下载) |
安装完后,打开 Google Authenticator/谷歌动态口令 App,点击 开始设置,选择 扫描条形码 扫描上面 google-authenticator 命令生成的二维码,然后手机上就能看到对应的认证码了。

这里的认证码每 30 秒变化一次,认证码上面的 SHENYU.ME 对应的是 google-authenticator 参数 -i 设置的发行商,认证码下面的 shenyu@shenyu.me 对应的是 google-authenticator 参数 -l设置的标签,如果你没有通过 google-authenticator 的参数设置发行商和标签,默认会使用系统的 hostname 来作为发行商,标签则则使用用户名和 hostname 的组合,格式为 username@hostname,标签其实是后期可以通过手机App来修改的,而发行商则修改不了。
现在重新使用 SSH 登录服务器,就会要求输入密码和 Verification code 来验证身份。如果登陆时遇到问题,请查看日志文件 /var/log/secure。
参考资料
使用树莓派创建WIFI热点
http://www.cybersecurityguy.com/Building_a_Raspberry_Pi_Captive_Portal_Wi-Fi_Hotspot.pdf
Have you ever needed to create a second Wi-Fi network in addition to your primary network? If you (or someone close to you) have a business (coffee, restaurant, hairdresser or doctor, in short, a place where people are likely to wait), it is likely that you have already had to provide internet access to your Customers, without wanting to give the password of your box. In the same way, you may have already wanted to create an internal network that is cut off from the Internet, for example to exchange files within a small company, and so on.
For all these situations, the simplest solution is to create what is called a hotspot, that is to say a kind of box that you can control and to which your users can connect to access the internet. In this tutorial, let’s see how we can use a raspberry pi to create our own homemade hotspot, in less than 10 minutes!
The hardware needed to create your hotspot
In order to create our own hotspot, we will need a little bit of hardware, but nothing complicated or too expensive, you will be able to get around for about 50 € to 60 €, and you can use all the equipment for other uses in parallel.
To achieve our hotspot, we will need the following:
- A raspberry pi 3 (Chosen because it has an ethernet port and a built-in Wi-Fi connection)
- A power supply for your raspberry pi
- A MicroSD card of at least 8GB
- An Ethernet cable
As you can see, all these components are just the ones needed to operate a raspberry pi, and you will be able to use the raspberry pi in question for other things in parallel to its role as a hotspot.
Moreover, by tweaking a bit in the configurations, and if you add a second Wi-Fi interface on your raspberry pi, you can also transform your hotspot into a Wi-Fi repeater, in order to increase the range of your box!
Install hostapd and its interface to turn your raspberry pi into a Wi-Fi hotspot
Now that we have all the hardware we need, we will be able to switch to installing the various software needed to transform our raspberry pi to Wi-Fi.
The first step will be to install Raspbian (the lite version, preferably) on your raspberry pi. To do this, we will let you consult our tutorial explaining how to install Raspbian on raspberry pi from Windows, or from Linux.
Once you have installed Raspbian, the first thing to do is to plug your raspberry pi to your internet router using the Ethernet cable and then take control of your raspberry, either directly with a keyboard / screen, or through SSH , as explained in this tutorial.
Once done, we will make sure that the Wi-Fi connection of the raspberry remains available for the creation of the hotspot. For this purpose, we will simply create a copy of the configuration file allowing the connection to a box, in order to keep it aside, and modify the main file.
To do this, go to the terminal of the raspberry pi and run the following commands:
sudo cp /etc/wpa_supplicant/wpa_supplicant.conf /etc/wpa_supplicant/wpa_supplicant.conf.sav
sudo cp /dev/null/etc/wpa_supplicant/wpa_supplicant.conf
Finally, edit in the file /etc/wpa_supplicant/wpa_supplicant.conf and add the following lines:
ctrl_interface=DIR=/var/run/wpa_supplicant GROUP=netdev
update_config=1
Now that we are sure that the Wi-Fi interface is available, all we have to do now is install the various software to make the raspberry pi an access point.
In this tutorial, we will use the hostapd software, which will allow us to turn the raspberry pi into an access point. And to facilitate the installation and administration of this access point, we will also install a web interface that will allow us to control our hotspot, RaspAP (for more info, go to the Github page of the software, https://github.com/billz/raspap-webgui).
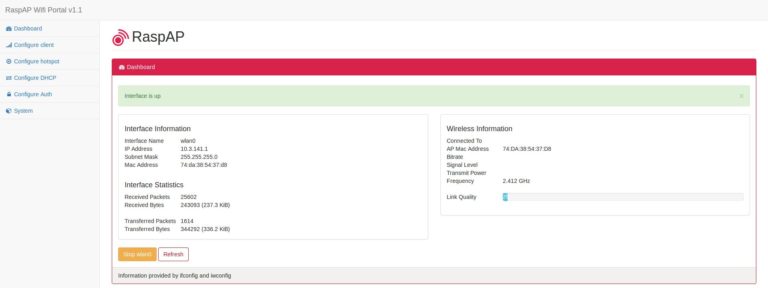
With RaspAP, you can manage your Wi-Fi hotspot with a web interface.
And the good news is that to do all this we will need to run only one command:
wget -q https://git.io/voEUQ -O /tmp/raspap && bash /tmp/raspap
Once the command is launched, you only have to answer the few questions that will be asked, and the installation of all the components will be done by itself.
Connect to your Wi-Fi hotspot
When the installation is complete, your raspberry pi restarts, and you should see a “raspi-webgui” network in the list of accessible networks.
If, however, the network does not appear, find the IP of the raspberry pi, and connect to it via your web browser. You should arrive on the hotspot administration interface, the default password is shown on the github page of the software. Once connected, go to the “Configure Hotspot” section, and change the “Wireless Mode” field, this should solve the problem.
Once the network is visible, all you have to do is connect to it, the default password is ChangeMe.
You can change this password, network name, and many other things by connecting to the admin interface of your raspberry hotspot via your web browser, by default the address should be 10.3.141.1.
And if it still does not work?
For some time, we do not know why, but it seems that Internet access is no longer functional by default after installation. To solve this problem you only need to do the following two things.
As a first step, enable the transfer of IPv4 packets. To do this, edit the file /etc/sysctl.confand uncomment (ie remove it #at the beginning) the following line:
#net.ipv4.ip_forward=1
This done, we will modify iptables to define the output IP that will be indicated so that the servers know who to answer (well, from what I understand, if I’m wrong rectifications are welcome ). To do this, open the file /etc/rc.localand add the following line before the “exit 0” part:
iptables -t nat -A POSTROUTING -j MASQUERADE
Restart the pi and everything should now work as it should!
All you have to do is configure your hotspot to suit your needs!
We hope that this tutorial will have helped you, do not hesitate to consult our other tutorials, such as the one on the creation of a retro-gaming console with the Raspberry Pi, and if you need help, do not hesitate to ask for on the comments !
支持博主

关于邵珠庆博客
文章标签
记事邵珠庆博客
最近文章
最近评论
- 发表在《中国翻墙网民状况调查》
- 发表在《教你如何简单获取新浪微博短地址接口》
- 发表在《教你如何简单获取新浪微博短地址接口》
- 发表在《教你如何简单获取新浪微博短地址接口》
- 发表在《教你如何简单获取新浪微博短地址接口》
博客日历
目录分类
文章归档
- 2025年8月 (2)
- 2022年9月 (1)
- 2022年8月 (3)
- 2022年7月 (1)
- 2022年3月 (1)
- 2021年10月 (3)
- 2021年1月 (1)
- 2020年4月 (3)
- 2020年3月 (3)
- 2020年2月 (2)
- 2020年1月 (3)
- 2019年12月 (2)
- 2019年11月 (3)
- 2019年10月 (2)
- 2019年9月 (2)
- 2019年8月 (4)
- 2019年7月 (2)
- 2019年6月 (2)
- 2019年5月 (2)
- 2019年4月 (3)
- 2019年3月 (2)
- 2019年2月 (3)
- 2019年1月 (2)
- 2018年12月 (2)
- 2018年11月 (2)
- 2018年10月 (3)
- 2018年9月 (2)
- 2018年8月 (2)
- 2018年7月 (1)
- 2018年6月 (2)
- 2018年5月 (3)
- 2018年4月 (2)
- 2018年3月 (6)
- 2018年2月 (7)
- 2018年1月 (3)
- 2017年11月 (2)
- 2017年10月 (2)
- 2017年9月 (5)
- 2017年8月 (4)
- 2017年7月 (8)
- 2017年6月 (5)
- 2017年5月 (14)
- 2017年4月 (8)
- 2017年3月 (5)
- 2017年2月 (2)
- 2017年1月 (1)
- 2016年12月 (1)
- 2016年11月 (5)
- 2016年10月 (3)
- 2016年9月 (2)
- 2016年8月 (1)
- 2016年7月 (2)
- 2016年6月 (2)
- 2016年5月 (5)
- 2016年4月 (5)
- 2016年3月 (2)
- 2016年2月 (1)
- 2016年1月 (2)
- 2015年12月 (2)
- 2015年11月 (1)
- 2015年10月 (3)
- 2015年9月 (2)
- 2015年8月 (4)
- 2015年7月 (5)
- 2015年6月 (6)
- 2015年5月 (3)
- 2015年4月 (8)
- 2015年3月 (6)
- 2015年2月 (4)
- 2015年1月 (5)
- 2014年12月 (2)
- 2014年11月 (5)
- 2014年10月 (5)
- 2014年9月 (1)
- 2014年8月 (2)
- 2014年7月 (4)
- 2014年6月 (1)
- 2014年5月 (9)
- 2014年4月 (5)
- 2014年3月 (1)
- 2014年2月 (1)
- 2014年1月 (5)
- 2013年12月 (4)
- 2013年11月 (12)
- 2013年10月 (6)
- 2013年9月 (7)
- 2013年8月 (8)
- 2013年7月 (15)
- 2013年6月 (9)
- 2013年5月 (12)
- 2013年4月 (8)
- 2013年3月 (11)
- 2013年2月 (9)
- 2013年1月 (21)
- 2012年12月 (8)
- 2012年11月 (7)
- 2012年10月 (19)
- 2012年9月 (16)
- 2012年8月 (13)
- 2012年7月 (10)
- 2012年6月 (11)
- 2012年5月 (11)
- 2012年4月 (8)
- 2012年3月 (8)
- 2012年2月 (11)
- 2012年1月 (8)
- 2011年12月 (18)
- 2011年11月 (32)
- 2011年10月 (17)
- 2011年9月 (18)
- 2011年8月 (11)
- 2011年7月 (55)
- 2011年6月 (1)
- 2011年5月 (4)
- 2011年4月 (2)
- 2011年3月 (1)
- 2011年1月 (3)
- 2010年12月 (1)
- 2010年11月 (6)
- 2010年9月 (5)
- 2010年8月 (2)
- 2010年7月 (3)
- 2010年6月 (7)
- 2010年5月 (3)
- 2010年4月 (4)
- 2010年3月 (8)
- 2010年2月 (2)
- 2010年1月 (2)
- 2009年12月 (2)
- 2009年11月 (1)
- 2009年10月 (1)
- 2009年8月 (1)
- 2009年7月 (2)
- 2009年5月 (1)
- 2009年4月 (1)
- 2009年3月 (1)
- 2009年2月 (1)
- 2009年1月 (1)
- 2008年12月 (1)
- 2008年11月 (2)
- 2008年10月 (1)
- 2008年8月 (5)
- 2008年7月 (2)
- 2008年6月 (1)
- 2008年5月 (3)
- 2008年4月 (11)
- 2008年3月 (1)
- 2008年2月 (1)
- 2008年1月 (1)
- 2007年12月 (1)
- 2007年11月 (3)
- 2007年10月 (1)
- 2007年9月 (1)
- 2007年8月 (1)
- 2007年7月 (1)
- 2007年6月 (1)
- 2007年5月 (1)
博客功能
京东好物
