[Mon Oct 29 08:12:04 EDT 2018] Your cert is in  /root/.acme.sh/derror.com/mrnil.com.cer
[Mon Oct 29 08:12:04 EDT 2018] Your cert key is in  /root/.acme.sh/derror.com/mrnil.com.key
[Mon Oct 29 08:12:05 EDT 2018] The intermediate CA cert is in  /root/.acme.sh/derror.com/ca.cer
[Mon Oct 29 08:12:05 EDT 2018] And the full chain certs is there:  /root/.acme.sh/derror.com/fullchain.cer
$ acme.sh --issue -d lab.derror.com -w /home/work/local/www
...
[Wed Nov 21 04:19:14 EST 2018] Your cert is in  /root/.acme.sh/lab.derror.com/lab.derror.com.cer
[Wed Nov 21 04:19:14 EST 2018] Your cert key is in  /root/.acme.sh/lab.derror.com/lab.derror.com.key
[Wed Nov 21 04:19:16 EST 2018] The intermediate CA cert is in  /root/.acme.sh/lab.derror.com/ca.cer
[Wed Nov 21 04:19:16 EST 2018] And the full chain certs is there:  /root/.acme.sh/lab.derror.com/fullchain.cer

$ mkdir -p /home/work/local/cert/lab.derror.com

$ acme.sh --install-cert -d lab.derror.com \
--key-file       /home/work/local/cert/lab.derror.com/key.pem  \
--fullchain-file /home/work/local/cert/lab.derror.com/cert.pem \
--reloadcmd     "systemctl restart nginx"

[Wed Nov 21 04:21:57 EST 2018] Installing key to:/home/work/local/cert/lab.derror.com/key.pem
[Wed Nov 21 04:21:57 EST 2018] Installing full chain to:/home/work/local/cert/lab.derror.com/cert.pem
[Wed Nov 21 04:21:57 EST 2018] Run reload cmd: systemctl restart nginx
[Wed Nov 21 04:22:04 EST 2018] Reload success

$ openssl dhparam -out /home/work/local/cert/lab.derror.com/dhparam.pem 2048
git clone https://github.com/google/google-authenticator
cd google-authenticator/libpam
./bootstrap.sh
./configure
make
make install
ln -s /usr/local/lib/security/pam_google_authenticator.so /usr/lib64/security/
配置 SSH 服务
打开 /etc/ssh/sshd_config 文件
vim /etc/ssh/sshd_config
修改下面字段的配置
ChallengeResponseAuthentication yes
PasswordAuthentication no
PubkeyAuthentication yes
UsePAM yes
然后重启一下 sshd 服务,使配置生效
systemctl restart sshd
这里将 PubkeyAuthentication 配置成了 yes 表示支持公钥验证登录,即使某个账号启用了 Google Authenticator 验证,只要登录者机器的公钥在这个账号的授权下,就可以不输入密码和 Google Authenticator 的认证码直接登录。
Do you want authentication tokens to be time-based (y/n) y
https://www.google.com/chart?chs=200x200&chld=M|0&cht=qr&chl=otpauth://totp/shenyu@shenyu.me%3Fsecret%3DKHMH46EWI2RIRZ53KQTNGHXNP4%26issuer%3Dshenyu.me
# 这里是个二维码
Your new secret key is: KHMH46EWI2RIRZ53KQTNGHXNP4
Your verification code is 753579
Your emergency scratch codes are:
  99181037
  68865807
  88385439
  59103432
  81045035
Do you want me to update your "/home/test/.google_authenticator" file? (y/n) y
是否更新用户的 Google Authenticator 配置文件,选择 y 才能使上面操作对当前用户生效,其实就是在对应用户的 Home 目录下生成了一个 .google_authenticator 文件,如果你想停用这个用户的 Google Authenticator 验证,只需要删除这个用户 Home 目录下的 .google_authenticator 文件就可以了。
Do you want to disallow multiple uses of the same authentication
token? This restricts you to one login about every 30s, but it increases
your chances to notice or even prevent man-in-the-middle attacks (y/n) y
每次生成的认证码是否同时只允许一个人使用?这里选择 y。
By default, tokens are good for 30 seconds. In order to compensate for
possible time-skew between the client and the server, we allow an extra
token before and after the current time. If you experience problems with
poor time synchronization, you can increase the window from its default
size of  -1min (window size of 3) to about  -4min (window size of
17 acceptable tokens).
Do you want to do so? (y/n) n
是否增加时间误差?这里选择 n。
If the computer that you are logging into isn\'t hardened against brute-force
login attempts, you can enable rate-limiting for the authentication module.
By default, this limits attackers to no more than 3 login attempts every 30s.
Do you want to enable rate-limiting (y/n) y
google-authenticator []
-h, --help Print this message
-c, --counter-based Set up counter-based (HOTP) verification
-t, --time-based Set up time-based (TOTP) verification
-d, --disallow-reuse Disallow reuse of previously used TOTP tokens
-D, --allow-reuse Allow reuse of previously used TOTP tokens
-f, --force Write file without first confirming with user
-l, --label=
Have you ever needed to create a second Wi-Fi network in addition to your primary network? If you (or someone close to you) have a business (coffee, restaurant, hairdresser or doctor, in short, a place where people are likely to wait), it is likely that you have already had to provide internet access to yourCustomers, without wanting to give the password of your box.In the same way, you may have already wanted to create an internal network that is cut off from the Internet, for example to exchange files within a small company, and so on.
For all these situations, the simplest solution is to create what is called a hotspot, that is to say a kind of box that you can control and to which your users can connect to access the internet. In this tutorial, let’s see how we can use a raspberry pi to create our own homemade hotspot, in less than 10 minutes!
The hardware needed to create your hotspot
In order to create our own hotspot, we will need a little bit of hardware, but nothing complicated or too expensive, you will be able to get around for about 50 € to 60 €, and you can use all the equipment for other uses in parallel.
To achieve our hotspot, we will need the following:
A raspberry pi 3(Chosen because it has an ethernet port and a built-in Wi-Fi connection)
As you can see, all these components are just the ones needed to operate a raspberry pi, and you will be able to use the raspberry pi in question for other things in parallel to its role as a hotspot.
Moreover, by tweaking a bit in the configurations, and if you add a second Wi-Fi interface on your raspberry pi, you can also transform your hotspot into a Wi-Fi repeater, in order to increase the range of your box!
Install hostapd and its interface to turn your raspberry pi into a Wi-Fi hotspot
Now that we have all the hardware we need, we will be able to switch to installing the various software needed to transform our raspberry pi to Wi-Fi.
Once you have installed Raspbian, the first thing to do is to plug your raspberry pi to your internet router using the Ethernet cable and then take control of your raspberry, either directly with a keyboard / screen, or through SSH , as explained in this tutorial.
Once done, we will make sure that the Wi-Fi connection of the raspberry remains available for the creation of the hotspot. For this purpose, we will simply create a copy of the configuration file allowing the connection to a box, in order to keep it aside, and modify the main file. To do this, go to the terminal of the raspberry pi and run the following commands:
Now that we are sure that the Wi-Fi interface is available, all we have to do now is install the various software to make the raspberry pi an access point.
In this tutorial, we will use the hostapd software, which will allow us to turn the raspberry pi into an access point. And to facilitate the installation and administration of this access point, we will also install a web interface that will allow us to control our hotspot, RaspAP (for more info, go to the Github page of the software, https://github.com/billz/raspap-webgui).
With RaspAP, you can manage your Wi-Fi hotspot with a web interface.
And the good news is that to do all this we will need to run only one command:
Once the command is launched, you only have to answer the few questions that will be asked, and the installation of all the components will be done by itself.
Connect to your Wi-Fi hotspot
When the installation is complete, your raspberry pi restarts, and you should see a “raspi-webgui” network in the list of accessible networks.
If, however, the network does not appear, find the IP of the raspberry pi, and connect to it via your web browser. You should arrive on the hotspot administration interface, the default password is shown on the github page of the software.Once connected, go to the “Configure Hotspot” section, and change the “Wireless Mode” field, this should solve the problem.
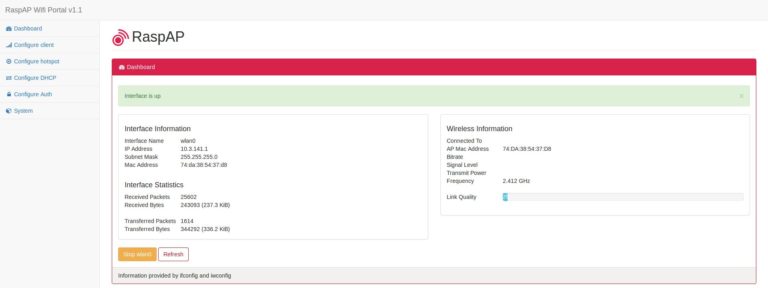
Once the network is visible, all you have to do is connect to it, the default password is ChangeMe. You can change this password, network name, and many other things by connecting to the admin interface of your raspberry hotspot via your web browser, by default the address should be 10.3.141.1.
And if it still does not work?
For some time, we do not know why, but it seems that Internet access is no longer functional by default after installation. To solve this problem you only need to do the following two things.
As a first step, enable the transfer of IPv4 packets. To do this, edit the file /etc/sysctl.confand uncomment (ie remove it #at the beginning) the following line:
#net.ipv4.ip_forward=1
This done, we will modify iptables to define the output IP that will be indicated so that the servers know who to answer (well, from what I understand, if I’m wrong rectifications are welcome ). To do this, open the file /etc/rc.localand add the following line before the “exit 0” part:
iptables -t nat -A POSTROUTING -j MASQUERADE
Restart the pi and everything should now work as it should!
All you have to do is configure your hotspot to suit your needs!
@startuml
Alice -> Bob: Authentication Request
Bob --> Alice: Authentication Response

Alice -> Bob: Another authentication Request
Alice
声明参与者
关键字 participant 用于改变参与者的先后顺序。
你也可以使用其它关键字来声明参与者:
actor
boundary
control
entity
database
@startuml
actor Foo1
boundary Foo2
control Foo3
entity Foo4
database Foo5
collections Foo6
Foo1 -> Foo2 : To boundary
Foo1 -> Foo3 : To control
Foo1 -> Foo4 : To entity
Foo1 -> Foo5 : To database
Foo1 -> Foo6 : To collections

@enduml
关键字 as 用于重命名参与者
你可以使用RGB值或者颜色名修改 actor 或参与者的背景颜色。
@startuml
actor Bob #red
\\' The only difference between actor
\\'and participant is the drawing
participant Alice
participant "I have a really\nlong name" as L #99FF99
/\\' You can also declare:
   participant L as "I have a really\nlong name"  #99FF99
  \\'/

Alice->Bob: Authentication Request
Bob->Alice: Authentication Response
Bob->L: Log transaction
@enduml
You can use the orderkeyword to custom the print order of participant.
@startuml
participant Last order 30
participant Middle order 20
participant First order 10
@enduml
在参与者中使用非字母符号
你可以使用引号定义参与者,还可以用关键字 as 给参与者定义别名。
@startuml
Alice -> "Bob()" : Hello
"Bob()" -> "This is very\nlong" as Long
\\' You can also declare:
\\' "Bob()" -> Long as "This is very\nlong"
Long --> "Bob()" : ok
@enduml
给自己发消息
参与者可以给自己发信息,
消息文字可以用\n来换行。
@startuml
Alice->Alice: This is a signal to self.\nIt also demonstrates\nmultiline \ntext
@enduml
修改箭头样式
修改箭头样式的方式有以下几种:
表示一条丢失的消息:末尾加 x
让箭头只有上半部分或者下半部分:将<和>替换成\或者 /
细箭头:将箭头标记写两次 (如 >> 或 //)
虚线箭头:用 -- 替代 -
箭头末尾加圈:->o
双向箭头:
@startuml
Bob ->x Alice
Bob -> Alice
Bob ->> Alice
Bob -\ Alice
Bob \\- Alice
Bob //-- Alice

Bob ->o Alice
Bob o\\-- Alice

Bob  Alice
Bob o Alice
@enduml
修改箭头颜色
你可以用以下记号修改箭头的颜色:
@startuml
Bob -[#red]> Alice : hello
Alice -[#0000FF]->Bob : ok
@enduml
对消息序列编号
关键字 autonumber 用于自动对消息编号。
@startuml
autonumber
Bob -> Alice : Authentication Request
Bob
@startuml
autonumber
Bob -> Alice : Authentication Request
Bob  Alice : Another authentication Request
Bob  Alice : Yet another authentication Request
Bob
@startuml
autonumber "[000]"
Bob -> Alice : Authentication Request
Bob  Alice : Another authentication Request
Bob  Alice : Yet another authentication Request
Bob
@startuml
autonumber 10 10 "[000]"
Bob -> Alice : Authentication Request
Bob  Alice : dummy

autonumber resume "Message 0  "
Bob -> Alice : Yet another authentication Request
Bob  Alice : dummy

autonumber resume 1 "Message 0  "
Bob -> Alice : Yet another authentication Request
Bob
分割示意图
关键字 newpage 用于把一张图分割成多张。
在 newpage 之后添加文字,作为新的示意图的标题。
这样就能很方便地在 Word 中将长图分几页打印。
@startuml

Alice -> Bob : message 1
Alice -> Bob : message 2

newpage

Alice -> Bob : message 3
Alice -> Bob : message 4

newpage A title for the\nlast page

Alice -> Bob : message 5
Alice -> Bob : message 6
@enduml
组合消息
我们可以通过以下关键词将组合消息:
alt/else
opt
loop
par
break
critical
group, 后面紧跟着消息内容
可以在标头(header)添加需要显示的文字(group除外)。
关键词 end 用来结束分组。
注意,分组可以嵌套使用。
@startuml
Alice -> Bob: Authentication Request

alt successful case

	Bob -> Alice: Authentication Accepted

else some kind of failure

	Bob -> Alice: Authentication Failure
	group My own label
		Alice -> Log : Log attack start
	    loop 1000 times
	        Alice -> Bob: DNS Attack
	    end
		Alice -> Log : Log attack end
	end

else Another type of failure

   Bob -> Alice: Please repeat

end
@enduml
给消息添加注释
我们可以通过在消息后面添加 note left 或者 note right 关键词来给消息添加注释。
你也可以通过使用 end note 来添加多行注释。
@startuml
Alice->Bob : hello
note left: this is a first note

Bob->Alice : ok
note right: this is another note

Bob->Bob : I am thinking
note left
	a note
	can also be defined
	on several lines
end note
@enduml
其他的注释
可以使用note left of,note right of或note over在节点(participant)的相对位置放置注释。
还可以通过修改背景色来高亮显示注释。
以及使用关键字end note来添加多行注释。
@startuml
participant Alice
participant Bob
note left of Alice #aqua
	This is displayed
	left of Alice.
end note

note right of Alice: This is displayed right of Alice.

note over Alice: This is displayed over Alice.

note over Alice, Bob #FFAAAA: This is displayed\n over Bob and Alice.

note over Bob, Alice
	This is yet another
	example of
	a long note.
end note
@enduml
改变备注框的形状
你可以使用 hnote 和 rnote 这两个关键字来修改备注框的形状。
@startuml
caller -> server : conReq
hnote over caller : idle
caller
Creole和HTML
可以使用creole格式。
@startuml
participant Alice
participant "The **Famous** Bob" as Bob

Alice -> Bob : hello --there--
... Some ~~long delay~~ ...
Bob -> Alice : ok
note left
  This is **bold**
  This is //italics//
  This is ""monospaced""
  This is --stroked--
  This is __underlined__
  This is ~~waved~~
end note

Alice -> Bob : A //well formatted// message
note right of Alice
 This is displayed
 __left of__ Alice.
end note
note left of Bob
 This is displayed
 **left of Alice Bob**.
end note
note over Alice, Bob
 <w:#FF33FF>This is hosted by
end note
@enduml
分隔符
你可以通过使用 == 关键词来将你的图表分割多个步骤。
@startuml

== Initialization ==

Alice -> Bob: Authentication Request
Bob --> Alice: Authentication Response

== Repetition ==

Alice -> Bob: Another authentication Request
Alice
引用
你可以在图中通过使用ref over关键词来实现引用
@startuml
participant Alice
actor Bob

ref over Alice, Bob : init

Alice -> Bob : hello

ref over Bob
  This can be on
  several lines
end ref
@enduml
延迟
你可以使用...来表示延迟,并且还可以给延迟添加注释。
@startuml

Alice -> Bob: Authentication Request
...
Bob --> Alice: Authentication Response
...5 minutes latter...
Bob --> Alice: Bye !

@enduml
空间
你可以使用|||来增加空间。
还可以使用数字指定增加的像素的数量。
@startuml

Alice -> Bob: message 1
Bob --> Alice: ok
|||
Alice -> Bob: message 2
Bob --> Alice: ok
||45||
Alice -> Bob: message 3
Bob --> Alice: ok

@enduml
生命线的激活与撤销
关键字activate和deactivate用来表示参与者的生命活动。
一旦参与者被激活,它的生命线就会显示出来。
activate和deactivate适用于以上情形。
destroy表示一个参与者的生命线的终结。
@startuml
participant User

User -> A: DoWork
activate A

A -> B: << createRequest >>
activate B

B -> C: DoWork
activate C
C --> B: WorkDone
destroy C

B --> A: RequestCreated
deactivate B

A -> User: Done
deactivate A

@enduml
还可以使用嵌套的生命线,并且运行给生命线添加颜色。
@startuml
participant User

User -> A: DoWork
activate A #FFBBBB

A -> A: Internal call
activate A #DarkSalmon

A -> B: << createRequest >>
activate B

B --> A: RequestCreated
deactivate B
deactivate A
A -> User: Done
deactivate A

@enduml
创建参与者
你可以把关键字create放在第一次接收到消息之前,以强调本次消息实际上是在创建新的对象。
@startuml
Bob -> Alice : hello

create Other
Alice -> Other : new

create control String
Alice -> String
note right : You can also put notes!

Alice --> Bob : ok

@enduml
进入和发出消息
如果只想关注部分图示,你可以使用进入和发出箭头。
使用方括号[和]表示图示的左、右两侧。
@startuml
[-> A: DoWork

activate A

A -> A: Internal call
activate A

A ->] : << createRequest >>

A<--] : RequestCreated
deactivate A
[
还可以使用下面的语法:
@startuml
[-> Bob
[o-> Bob
[o->o Bob
[x-> Bob

[]
Bob ->o]
Bob o->o]
Bob ->x]

Bob <-]
Bob x<-]
@enduml
构造类型和圈点
可以使用<<和>>给参与者添加构造类型。
在构造类型中,你可以使用(X,color)格式的语法添加一个圆圈圈起来的字符。
@startuml

participant "Famous Bob" as Bob << Generated >>
participant Alice << (C,#ADD1B2) Testable >>

Bob->Alice: First message

@enduml
@startuml

skinparam guillemet false
participant "Famous Bob" as Bob << Generated >>
participant Alice << (C,#ADD1B2) Testable >>

Bob->Alice: First message

@enduml
@startuml

participant Bob << (C,#ADD1B2) >>
participant Alice << (C,#ADD1B2) >>

Bob->Alice: First message

@enduml
更多标题信息
你可以在标题中使用creole格式。
@startuml

title __Simple__ **communication** example

Alice -> Bob: Authentication Request
Bob -> Alice: Authentication Response

@enduml
在标题描述中使用\n表示换行。
@startuml

title __Simple__ communication example\non several lines

Alice -> Bob: Authentication Request
Bob -> Alice: Authentication Response

@enduml
还可以使用关键字title和end title定义多行标题。
@startuml

title
 Simple communication example
 on several lines and using html
 This is hosted by
end title

Alice -> Bob: Authentication Request
Bob -> Alice: Authentication Response

@enduml
包裹参与者
可以使用box和end box画一个盒子将参与者包裹起来。
还可以在box关键字之后添加标题或者背景颜色。
@startuml

box "Internal Service" #LightBlue
	participant Bob
	participant Alice
end box
participant Other

Bob -> Alice : hello
Alice -> Other : hello

@enduml
移除脚注
使用hide footbox关键字移除脚注。
@startuml

hide footbox
title Footer removed

Alice -> Bob: Authentication Request
Bob --> Alice: Authentication Response

@enduml
外观参数(skinparam)
使用skinparam命令改变颜色和字体。
如下场景可以使用这一命令:
在图示定义中,
在一个包含文件中,
在由命令行或者ANT任务提供的配置文件中。
你也可以修改其他渲染元素,如以下示例:
@startuml
skinparam sequenceArrowThickness 2
skinparam roundcorner 20
skinparam maxmessagesize 60
skinparam sequenceParticipant underline

actor User
participant "First Class" as A
participant "Second Class" as B
participant "Last Class" as C

User -> A: DoWork
activate A

A -> B: Create Request
activate B

B -> C: DoWork
activate C
C --> B: WorkDone
destroy C

B --> A: Request Created
deactivate B

A --> User: Done
deactivate A

@enduml
@startuml
skinparam backgroundColor #EEEBDC
skinparam handwritten true

skinparam sequence {
	ArrowColor DeepSkyBlue
	ActorBorderColor DeepSkyBlue
	LifeLineBorderColor blue
	LifeLineBackgroundColor #A9DCDF

	ParticipantBorderColor DeepSkyBlue
	ParticipantBackgroundColor DodgerBlue
	ParticipantFontName Impact
	ParticipantFontSize 17
	ParticipantFontColor #A9DCDF

	ActorBackgroundColor aqua
	ActorFontColor DeepSkyBlue
	ActorFontSize 17
	ActorFontName Aapex
}

actor User
participant "First Class" as A
participant "Second Class" as B
participant "Last Class" as C

User -> A: DoWork
activate A

A -> B: Create Request
activate B

B -> C: DoWork
activate C
C --> B: WorkDone
destroy C

B --> A: Request Created
deactivate B

A --> User: Done
deactivate A

@enduml
填充区设置
可以设定填充区的参数配置。
@startuml
skinparam ParticipantPadding 20
skinparam BoxPadding 10

box "Foo1"
participant Alice1
participant Alice2
end box
box "Foo2"
participant Bob1
participant Bob2
end box
Alice1 -> Bob1 : hello
Alice1 -> Out : out
@enduml
虽然现在大量的沟通都是电子化和无纸化的,但是在我们的公司中还有大量的材料需要打印。银行结算单、公用事业帐单、财务和其它报告、以及收益结算单等一些东西还是需要打印的。本教程将介绍在 Linux 中如何使用 CUPS 去打印。
CUPS,是通用 Unix 打印系统的首字母缩写,它是 Linux 中的打印机和打印任务的管理者。早期计算机上的打印机一般是在特定的字符集和字体大小下打印文本文件行。现在的图形打印机可以打印各种字体和大小的文本和图形。尽管如此,现在你所使用的一些命令,在古老的行式打印守护进程(LPD)技术的历史中仍能找到它们。
本教程将帮你了解 Linux 服务器专业考试(LPIC-1)的第 108 号主题的 108.4 目标。这个目标的权重为 2。
前提条件
为了更好地学习本系列教程,你需要具备基本的 Linux 知识,和使用 Linux 系统实践本教程中的命令的能力,你应该熟悉 GNU 和 UNIX® 命令的使用。有时不同版本的程序输出可能会不同,因此,你的结果可能与本教程中的示例有所不同。
MySQL数据库与 Oracle、 SQL Server 等数据库相比,有其内核上的优势与劣势。我们在使用MySQL数据库的时候需要遵循一定规范,扬长避短。本规范旨在帮助或指导RD、QA、OP等技术人员做出适合线上业务的数据库设计。在数据库变更和处理流程、数据库表设计、SQL编写等方面予以规范,从而为公司业务系统稳定、健康地运行提供保障。


