手机无须ROOT和修改hosts在本地测试安卓和H5应用
开发手机APP和 H5 应用经常需要在本地和线上环境分开测试,一般想到的操作都是修改hosts,我也一直这么干的,但手机上修改hosts是需要 ROOT权限的,这样太过麻烦,还有变砖头的风险,而且有些手机根本不能ROOT的。
忙和了一下午,总算完全达到预期,有点收获,下面说说重点,主要是两个:
- 本地 DNS 服务
- 网络代理
做个本地的 DNS 服务,有点像DNS劫持的感觉,这个是一劳永逸的办法
首先,你需要一个Linux 虚拟机或一台服务器
我下面的配置使用的 Centos7.0 系统,不通版本可能有些差别的。
一、安装 DNSMasq
# 安装
yum install dnsmasq -y
service dnsmasq start

# 编辑配置参数
vi /etc/dnsmasq.conf

# 查找 resolv-file 去掉注释符,添加文件路径
# 表示 dnsmasq 会从这个指定的文件中寻找上游dns服务器
resolv-file=/etc/resolv.conf

# 查找 no-hosts , 确保前面有 # 井号的(表示被注释掉的),否则 hosts 配置不起作用
# 监听的IP
listen-address=127.0.0.1,192.168.0.103
strict-order
addn-hosts=/etc/hosts
cache-size=32768

# 配置到网卡参数,centos7 和 6 的网卡名是不同的,用ifconfig 查看替换下
# centos 7 以前
vi /etc/sysconfig/network-scripts/ifcfg-eth0
# centos7 不一定相同
vi /etc/sysconfig/network-scripts/ifcfg-enp3s0

#  最多只能写3个,注意原配置中若存在则需要调整
DNS1=127.0.0.1
DNS2=192.168.0.103
DNS3=202.101.172.35
#DNS3=202.101.172.47

# 保存后, resolv.conf 文件内容会自动更新的
cat /etc/resolv.conf

# 查看DNS是否已添加进去

# 注册服务
chkconfig dnsmasq on

# 重启
/etc/init.d/dnsmasq restart

# centos7 下使用的命令
systemctl restart dnsmasq

# 检查是否安装成功
netstat -tunlp|grep 53
yum install bind-utils

# 测试是否启用 DNS 配置
dig m.ai9475.com

# 编辑 hosts 文件,配置本地 DNS 劫持域名 IP 的映射关系
vi /etc/hosts
192.168.0.105 m.ai9475.com
这样服务端的 DNS 劫持就基本配置好了
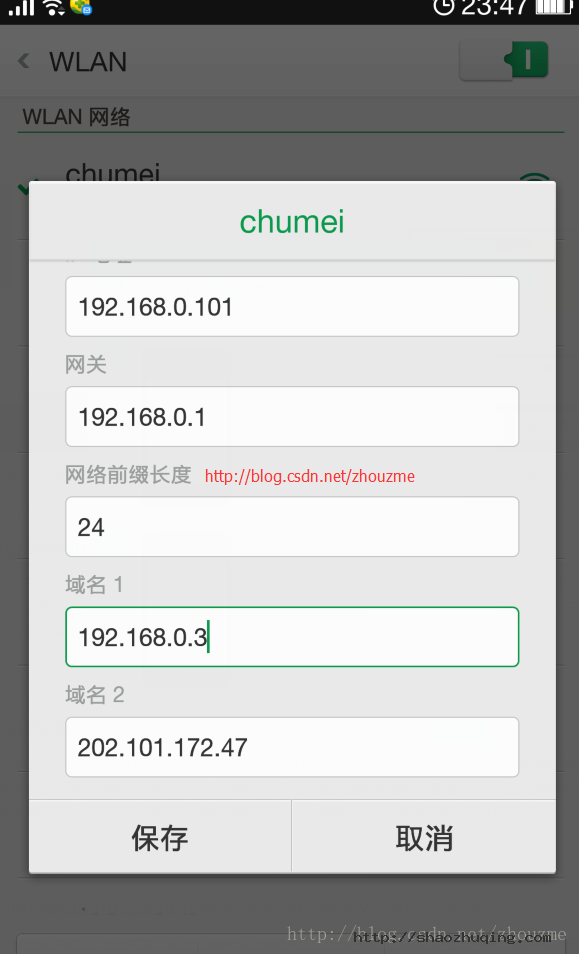
下一步还需要在手机上设置 DNS 对应的 IP,
打开 网络设置 -> wifi连接 -> 修改网络 -> 高级 -> 静态IP方式 -> 修改第一个NS的IP即可,第二个可用正常的公网DNS

如下图:
最后注意:修改 hosts 之后,需要重启 dnsmasq 还有 network 最好也重启
二、使用本地网络代理
这个方法比较有局限性,对 H5 网页应用还可以,对部分原生 APP 可能无效哦,但有个好处是配合一些软件可以做前端的抓包查看,对测试接口之类的查看数据很有用
我用到过两个软件,
1. Fiddler
这个软件使用很方便,网上有很多介绍,这里就不说了,但据说仅支持 windows 平台
2. Whistle
这个是开源的项目,跨平台,我目前用的是这个,配置也很简单
下面简单说下如何安装使用
依赖 Nodejs,所以先安装 nodejs
我这里图方便,就用 yum 的方式安装了
curl --silent --location https://rpm.nodesource.com/setup_4.x | bash -
yum install -y nodejs
下载速度可能有些忙,10KB/s 下载了好半天才下完,耐心等吧
npm install cnpm -g --registry=https://registry.npm.taobao.org
cnpm install -g whistle
w2 start
这样就完成了。。。
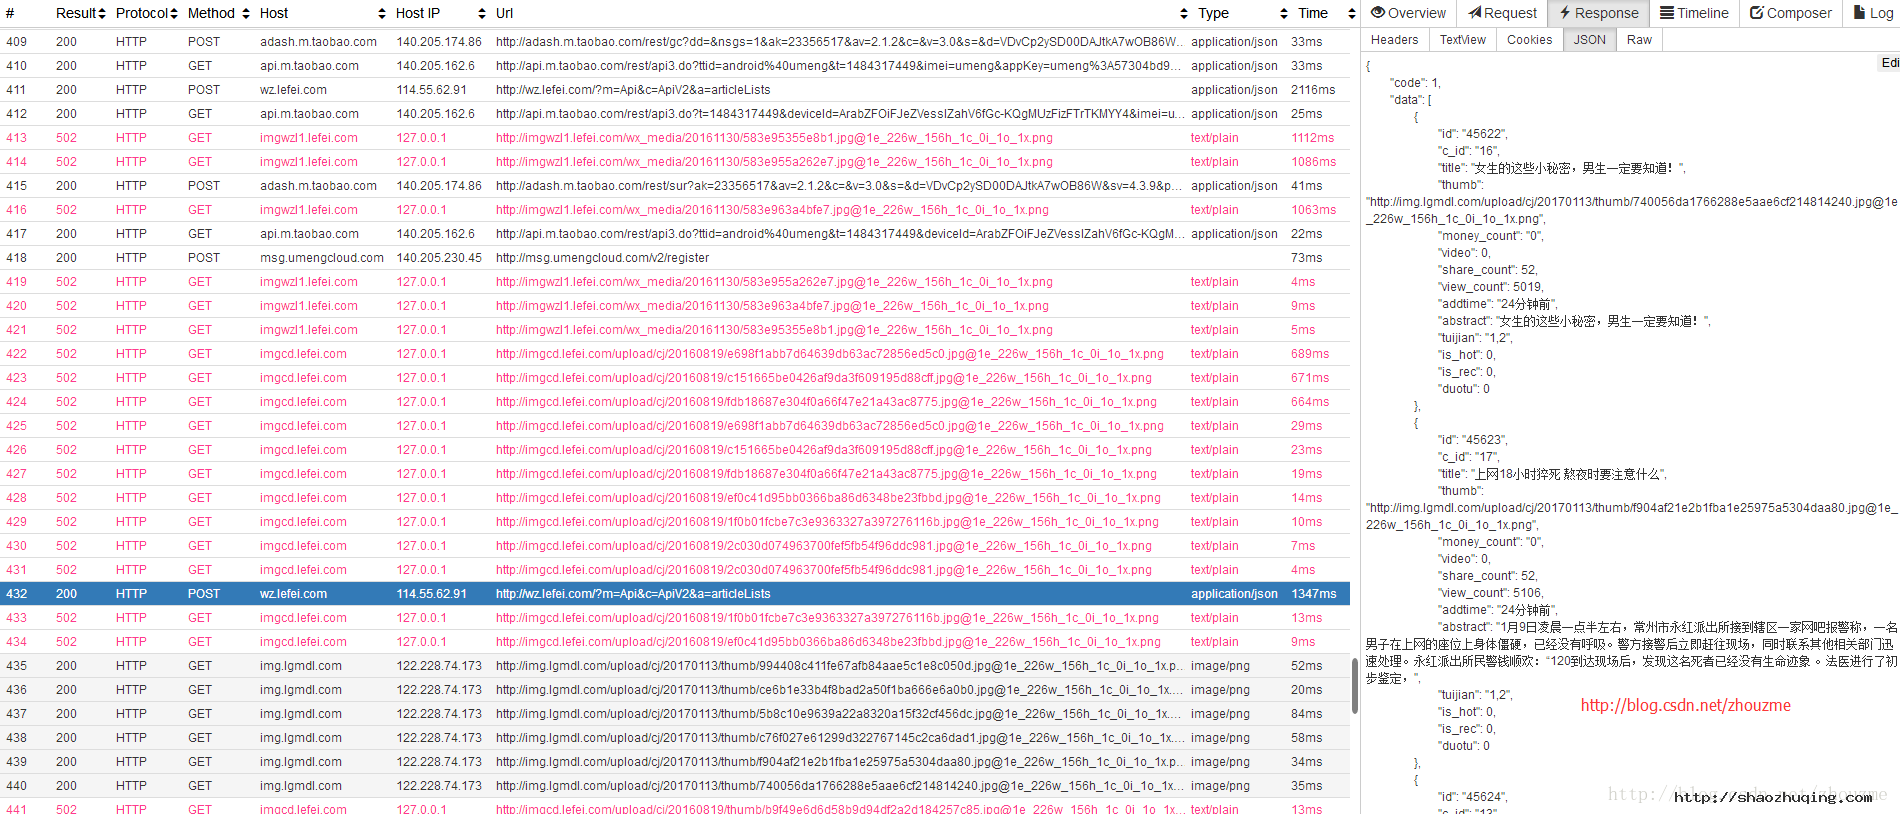
查看代理请求数据,就是抓包数据
http://127.0.0.1:8900
http://127.0.0.1:8899
:8899 是代理的端口,但也可以查看抓包数据
两个端口都可以看,下图看看效果先(图片可以直接拖拽查看大图)

其他的就直接看官方说明文档吧,中文的,很清晰明了
https://avwo.github.io/whistle/install.html
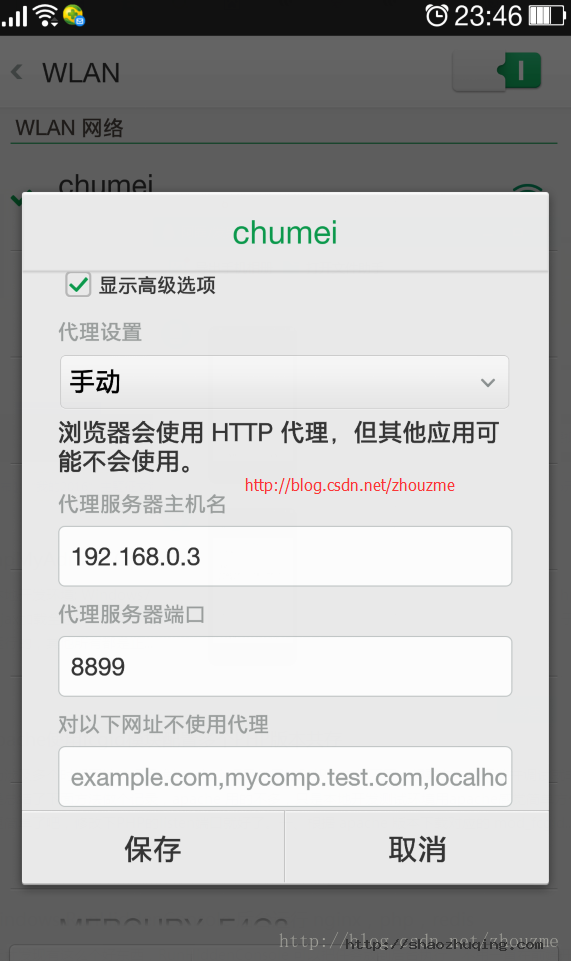
后面就是手机上操作和上面的 DNS 设置是同一个地方
打开 网络设置 -> wifi连接 -> 修改网络 -> 高级 -> 代理(手动配置) -> 填写局域网中服务器的IP,如192.168.0.103,端口 8899
如下图:

最后就是修改服务器上的 hosts,参考上方 DNS 配置 hosts 的操作是一样的
差不多就这样设置好了。
最后需要注意的就是清除手机上的缓存,一定要关闭浏览器和应用,清理内存后再打开,否则手机上的 DNS 和网络设置可能没有切换过来的。
以上配置我都是在 Android 设备上测试的, iOS 没有应用可测试,不过按理说应该是一样的效果的。
虽然代理的方法对有些APP 不一定有用,但建议还是 DNS 和 代理一起上吧。。。就这样了。
GooglePlus登录添加修改操作记录
使用官方定义按钮页面自动刷新登录:
<div id="gConnect">
<button class="g−signin"
data−scope="https://www.googleapis.com/auth/plus.login https://www.googleapis.com/auth/userinfo.email"
data−requestvisibleactions="http://schemas.google.com/AddActivity"
data−clientId="申请ClientID"
data−callback="onSignInCallback"
data−theme="dark"
data−cookiepolicy="single_host_origin">
</button>
</div>
<script type="text/javascript">
var kx_google_host_config = "配置登录成功后跳转域名";
</script>
<script type="text/javascript" src="https://apis.google.com/js/client:platform.js" async defer></script>
<script type="text/javascript" src="http://简单封装/clientgoogle.so.js" ></script>
使用自己定义按钮页面不自动刷新登录:
<div id="gConnect">
<button type="button" onclick="window.render();return false;" class="btnLarge">使用Google帐号登录</button>
</div>
<script type="text/javascript">
var kx_google_host_config = "配置登录成功后跳转域名";
window.___gcfg = {
parsetags: 'explicit'
};
var render = function(){
gapi.signin.render('gConnect', {
'scope': 'https://www.googleapis.com/auth/plus.login https://www.googleapis.com/auth/userinfo.email',
'requestvisibleactions': 'http://schemas.google.com/AddActivity',
'clientId': '申请ClientID',
'callback': 'onSignInCallback',
'theme': 'dark',
'cookiepolicy': 'single_host_origin'
});
};
</script>
<script type="text/javascript" src="https://apis.google.com/js/client:platform.js" async defer></script>
<script type="text/javascript" src="http://简单封装/clientgoogle.so.js"></script>
clientgoogle.so.js文件封装内容:
var helper = (function() {
var BASE_API_PATH = 'plus/v1/';
return {
onSignInCallback: function(authResult) {
gapi.client.load('plus','v1').then(function() {
if (authResult['access_token']) {
helper.profile();
}
});
},
/**
* Gets and renders the currently signed in user's profile data.
*/
profile: function(){
gapi.client.plus.people.get({
'userId': 'me'
}).then(function(res) {
var urlmark = '?';
var profile = res.result;
var kx_google_host = kx_google_host_config;
var openid_response_nonce = profile.etag;
var openid_return_to = kx_google_host;
var openid_sig = randomString(28);
var openid_identity = "http://shaozhuqing.com/openid?id="+profile.id;
var openid_claimed_id = openid_identity;
var openid_ext1_value_first = profile.name.familyName;
var openid_ext1_value_last = profile.name.givenName;
var openid_ext1_value_email = profile.emails[0].value;
if(kx_google_host.indexOf('?') != −1){
var urlmark = '&';
}
var kx_google_url = kx_google_host+urlmark+"openid.response.nonce="+openid_response_nonce+"&openid.return.to="+
openid_return_to+"&openid.sig="+openid_sig+"&openid.identity="+openid_identity+"&openid.claimed.id="+openid_claimed_id+"&openid.
ext1.value.first="+openid_ext1_value_first+"&openid.ext1.value.last="+openid_ext1_value_last+"&openid.ext1.value.email="+
openid_ext1_value_email;
location.href =kx_google_url;
});
}
};
})();
function onSignInCallback(authResult) {
helper.onSignInCallback(authResult);
}
function randomString(len) {
len = len || 32;
var $chars = 'ABCDEFGHJKMNPQRSTWXYZabcdefhijkmnprstwxyz2345678';
var maxPos = $chars.length;
var pwd = '';
for (i = 0; i < len; i++) {
pwd += $chars.charAt(Math.floor(Math.random() * maxPos));
}
return pwd;
}
按钮自定义参数:
-
data-theme:light | dark
-
data-width :iconOnly | standard | wide
- data-height:short | standard | tall
google开发文档:https://developers.google.com/+/web/signin/
mysql批量删除指定前缀表,批量修改表名SQL语句
- Select CONCAT( 'drop table ', table_name, ';' )
- FROM information_schema.tables
- Where table_name LIKE 'uc_%';
注意: like ‘uc_%’ 其中 uc_是你需要替换的表前缀.
执行查询,会自动生成出 drop table table_name这样的SQL语句.
然后复制 drop语句 可以执行删除的操作了.
这么一来也可以安全的审核一下语句,避免误操作..
顺便补充一下一个批量修改表名的操作方法
- Select CONCAT( 'ALTER TABLE ', table_name, 'RENAME TO ', table_name,';' )
- FROM information_schema.tables
- Where table_name LIKE 'uc_%';
下面这种代码是今天遇到的,表头前面是 db,但是没有下横线显得很乱,于是批量将”dbtable_name”改成”db_table_name”
主要用的函数是mysql的substring函数
mysql教程 substring 字符截取函数
substring(str,pos)语法substring(filed,m):截取filed字段从第m个字符开始到结束的字符串;
substring(filed,m,n):截取filed字段从第m个字符开始的长度为n的字符串;
str,字符
pos,从第几个开始取
- Select CONCAT( 'ALTER TABLE ', table_name, 'RENAME TO db_', substring(table_name,3),';' )
- FROM information_schema.tables
- Where table_name LIKE 'db%';
会得到结果
- ALTER TABLE uc_aaa RENAME TO uc_aaa;
- ALTER TABLE uc_bbb RENAME TO uc_bbb;
批量复制一下到记事本或者 et之类的编辑工具中,然后批量替换 RENAME TO uc 成 RENAME TO 你想要的表前缀
完成后 再执行.
这样就完成了表名的批量修改拉…

